
What Is Contamination Control in Mycology?
You're probably here because something looked fine yesterday and wrong today. A grain bag that was turning snowy white now has a green patch in one corner. A jar smells sour when you crack the lid. A tub that seemed healthy suddenly has a gray film creeping across the surface.
That moment feels personal, especially on a first grow. You cleaned the table. You wore gloves. You followed the steps. Then contamination showed up anyway.
What is contamination control? In mycology, it's the practice of keeping unwanted organisms from getting a foothold where your mushroom mycelium is supposed to grow. That includes molds, bacteria, yeasts, and competitor fungi. It also includes understanding how they move, because contamination usually enters through invisible pathways long before you ever see color or smell trouble.
The useful way to think about it is simple. You are not trying to create a magical, perfectly sterile universe in your spare room. You are trying to make the growing environment favorable to your mushroom and unfavorable to everything racing against it.
Why Contamination Control Matters in Mushroom Cultivation
You inoculate a grain bag, tuck it away, and check it every day. At first, you see healthy white growth spreading from the injection point. Then one morning there's a bright green bloom near the bottom seam. Weeks of waiting are over in a glance.
That's the beginner's crash course in contamination control. It's not abstract cleanliness. It's detecting, blocking, and removing unwanted life before it outcompetes your culture.
Your mushrooms are not growing alone
Mushroom mycelium shares space with countless other organisms. Grain, substrate, air, hands, and tools all carry microscopic life. On rich food sources like hydrated grain, many bacteria and molds move faster than the mushroom you want. By the time you can see a problem, the invasion usually happened earlier.
Contamination control became a formal engineering discipline during the cleanroom era. Historians trace the idea back to mid-19th-century hospital operating rooms, while modern cleanrooms developed during World War II and changed again when Willis Whitfield invented the modern cleanroom in 1960. HEPA filtration arrived in the early 1950s, and laminar-flow design followed in 1961, creating environments reported to be more than 1,000 times cleaner than earlier non-unidirectional airflow rooms, according to ASHRAE's historical review of cleanroom development.
At home, you don't need a pharmaceutical suite. You do need the same mindset. Control the pathways, not just the mess.
Practical rule: Cleanliness is visible. Contamination control is mostly about what you can't see.
Small habits beat one big cleaning spree
Beginners often think the answer is to sanitize harder. Usually the answer is to work more deliberately. Slower movements in a still-air box. A wiped tool handle, not just a wiped blade. A clean sleeve that doesn't brush an open bag. A room with less drifting dust and fewer soft surfaces that hold particles.
If you want a simple mental model for indoor reservoirs, this overview of fabric and HVAC pollution reservoirs is useful because it shows how particles linger in textiles and air systems rather than only on obvious dirty spots.
Contamination control matters because mushroom growing is a race. Your job isn't to eliminate every microbe in your life. Your job is to keep competitors below the level where they can win.
The Main Types of Contaminants You Will Meet
When you're new, every weird patch looks like “mold.” That's normal. Over time, you start noticing patterns. Texture, smell, moisture, and speed of spread tell you almost as much as color.
Here's a visual comparison to help train your eye.
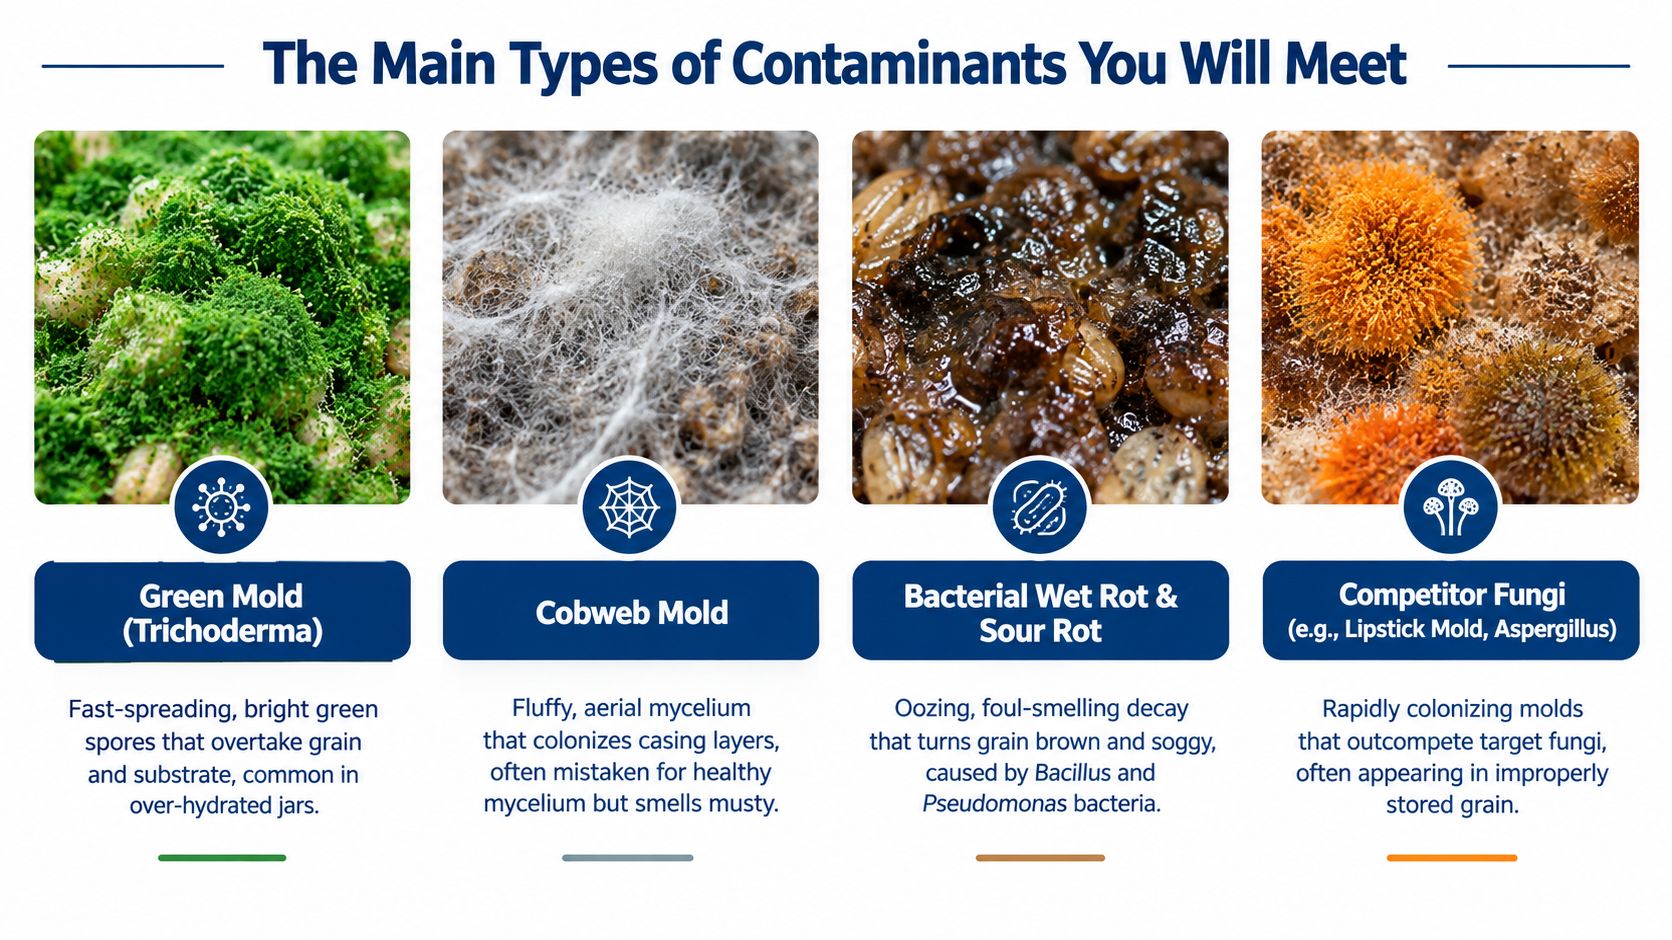
Four common troublemakers
Green mold, often associated by growers with Trichoderma, usually starts pale and then turns vividly green as it sporulates. It tends to spread aggressively once established. In grain or bulk substrate, it often appears as a patch that suddenly “pops” with color after seeming harmless at first.
Cobweb mold looks wispy and airy, almost like gray dryer lint stretched over the surface. Beginners mistake it for healthy mycelium because both can look fluffy from a distance. The difference is that cobweb often seems taller, thinner, and more ghostlike.
Bacterial wet rot or sour rot usually announces itself with smell before color. Think sour, fermented, sometimes vinegary. Grain may look greasy, darkened, or overly wet. Instead of firm kernels wrapped in white growth, you'll see clumping and pooling moisture.
Competitor fungi can show up as orange, brown, black, or strange off-white growth with a texture that doesn't match the dense ropey look of healthy colonization. Some appear powdery. Some form crusty islands. Some erupt from a single hidden point and overtake a container fast.
What to do when you spot one
Different contaminants call for different responses.
Fast-sporulating mold needs quick isolation. Don't squeeze or shake the container in your grow area.
Bacterial-looking grain usually isn't worth “waiting out.” Bacteria often hide deeper than the visible wet patch.
Questionable fluffy growth should be observed closely for color shift, odd smell, or unusually rapid spread.
Unclear cases are easier to judge when you compare them against photo references like these mycelium contamination pictures.
Less common issues like pin molds and yeasts can also appear, especially in warm, damp setups or older cultures.
Healthy identification is a learned skill, not a personality trait. Nobody is born knowing what bad grain smells like.
How Contaminants Actually Get Into Your Grow
Most failed home grows don't collapse because the room looked dirty. They collapse because contamination found a route in. If you can picture the routes, sterile work starts making sense.
Here's a pathway map worth keeping in your head while you work.
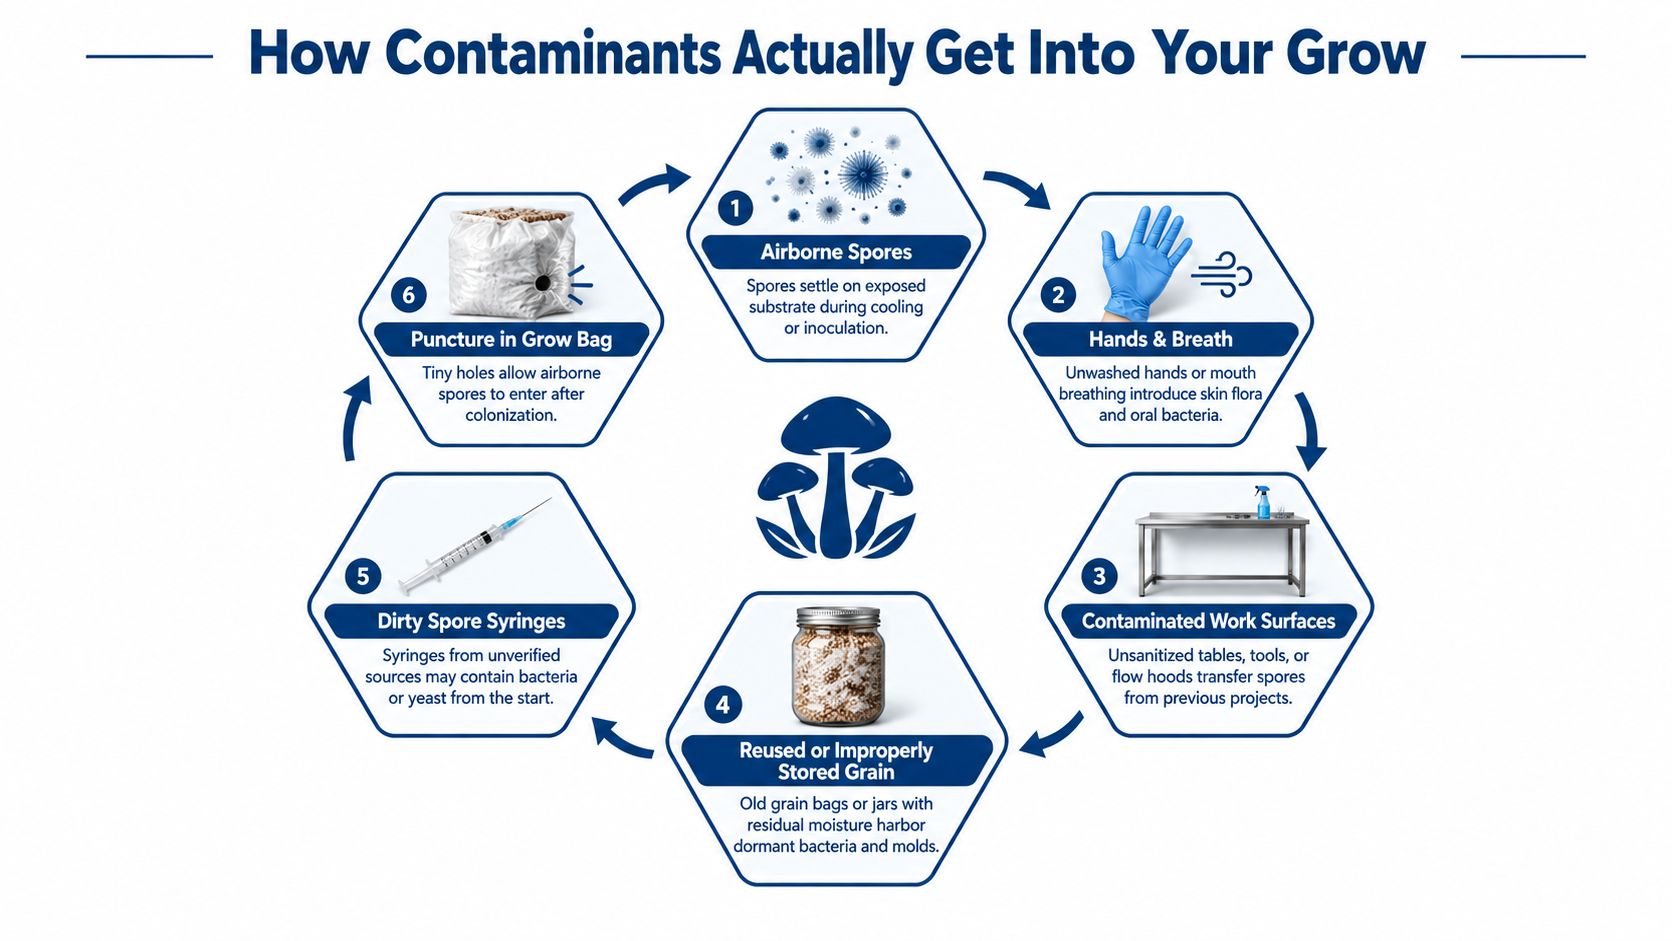
The usual entry points
The biggest culprit in home cultivation is usually moving air during exposed work. Open a bag, hover over it, shift your arms too quickly, and floating spores get a landing strip.
After that, failures often come from the next tier of pathways:
Pathway | What it looks like in real life |
|---|---|
Air | You open a still-air box quickly and create a small current across exposed grain |
Surfaces | The table was wiped, but the edge of the bag touched a dusty shelf first |
Hands and breath | You adjust your mask, answer your phone, then return to inoculation |
Tools | A scalpel handle or inoculation loop was clean last session, not this one |
Raw materials | Grain, sawdust, or supplements carry dormant contaminants before prep |
Transfer steps | Every inoculation, agar transfer, or bag opening creates a brief vulnerability |
A useful way to define contamination control is as a risk-based strategy rather than a generic cleaning concept. In technical settings, controls are built around microbes, particles, endotoxin or pyrogen, and cross-contamination, with increasing emphasis on documented, risk-assessed operating programs and continuous monitoring, as described in Rommelag's overview of contamination control.
Why beginners blame the wrong thing
Visible dirt gets blamed because it's easy to point at. Invisible movement is harder to notice. The clean countertop feels safe, but the problem may be the rush of air from leaning over an open jar. The alcohol wipe feels powerful, but the problem may be the syringe that sat uncapped for a few seconds too long.
This walkthrough helps if you want to see the pathways in motion rather than just read about them.
Once you start seeing contamination as traffic flow instead of “bad luck,” your technique gets sharper fast.
Sterilization, Pasteurization, and Clean Technique as a Layered Defense
Beginners often ask which matters more: sterilization, pasteurization, or sterile technique. That's like asking whether a front door, a roof, or locked windows matter more in a storm. They do different jobs.
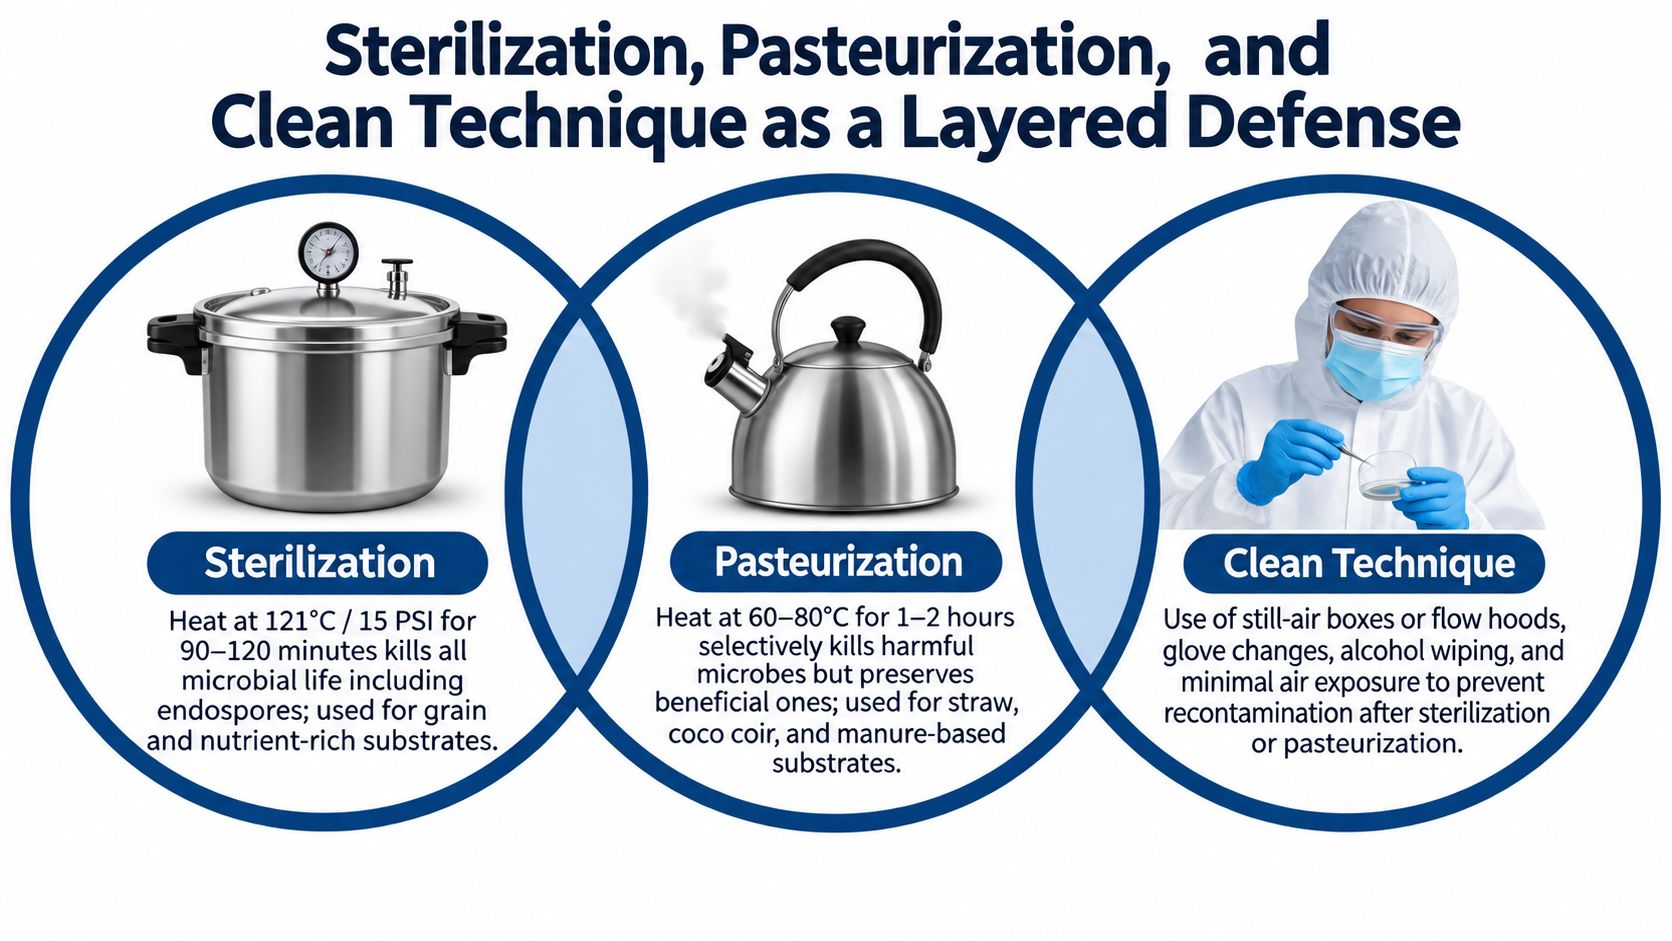
What each layer does
Sterilization is the heavy-duty layer for nutrient-rich material like grain and supplemented substrates. You're trying to wipe the slate clean before inoculation.
Pasteurization is gentler. It lowers the population of harmful organisms in bulk materials like straw or coco coir mixes without treating the material the same way you'd treat grain.
Clean technique prevents recontamination after prep. That includes wiped surfaces, gloved hands, controlled airflow, flame-sterilized tools where appropriate, and patient movements during transfers.
A beginner workflow that makes sense
Think about one ordinary project from start to finish.
Prepare your bulk material If you're using a substrate that's usually pasteurized, treat it accordingly rather than assuming every material needs the same process. If you want a step-by-step walkthrough, this guide on how to pasteurize mushroom substrate shows the logic behind that layer.
Prep grain properly Grain is a buffet. That's why it gets the stronger treatment. Moisture, load size, and container choice all matter because underprocessed grain gives contaminants a head start.
Inoculate in controlled air Clean technique earns its keep. A still-air box is often enough for beginners if used calmly. A laminar flow hood gives cleaner moving air, but it doesn't fix rushed hands or sloppy habits.
Protect the recovery period Freshly inoculated grain is vulnerable. Rough handling, temperature swings, and constant peeking can all make small problems larger.
Redundancy is the point
If one layer slips, the others help contain the mistake. If grain prep was slightly imperfect, careful inoculation may still save the project. If your room is less than ideal, proper substrate prep reduces the number of threats entering that room in the first place.
One clean action rarely saves a grow. Several decent actions stacked together often do.
This same layered logic shows up in broader facility hygiene too. For example, integrated sanitation and exclusion matter alongside microbe control. Resources like Pestless Inc. sustainable pest management tips are useful because pests, residue, moisture, and shelter often overlap in real grow spaces.
If you'd rather skip one source of beginner error, Colorado Cultures sterilized grain bags are one option for reducing the prep burden before inoculation. They don't replace technique, but they do remove one variable.
Why Contamination Survives Even With Sterile Grain and Bags
This is the part that frustrates careful growers most. You bought or prepared sterile grain. Your bag looked sealed. You worked clean. Then contamination still appeared.
That doesn't always mean you were careless. Sometimes the problem is biological, environmental, or built into the material itself.
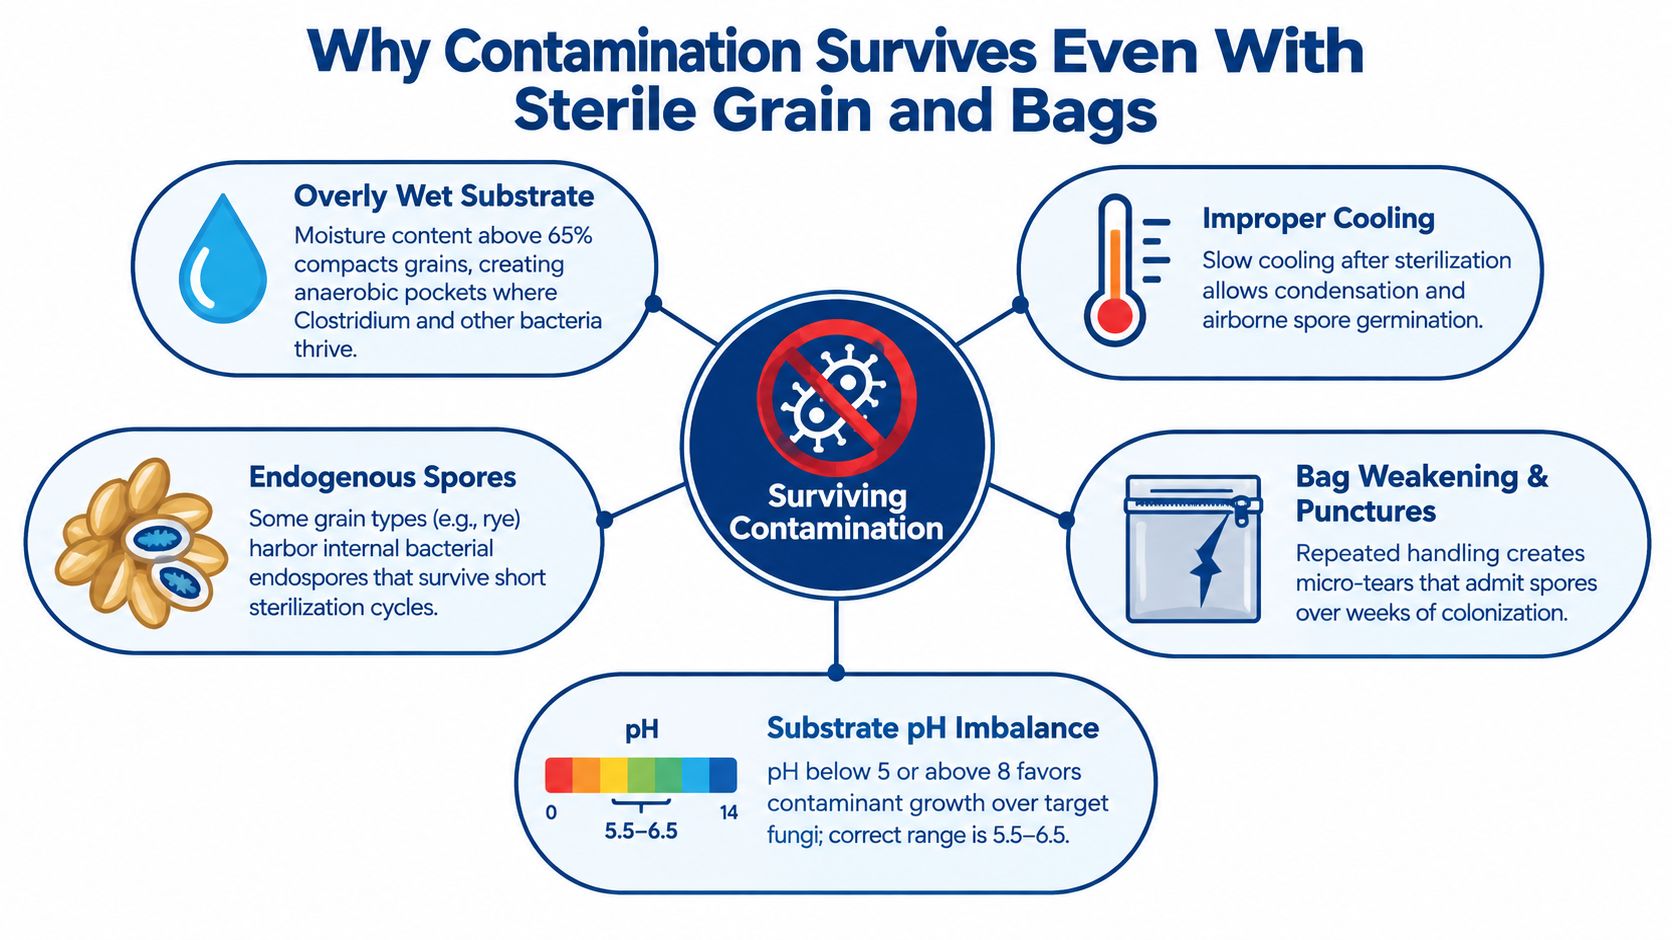
The grow has its own ecology
A room remembers. Old spores settle into curtains, carpet, tent seams, shelving joints, and fan housings. You may introduce a perfectly clean bag into a space that already has a resident population waiting for an opening.
Moisture also changes the game. Condensation around filter patches, damp folds in plastic, or overly wet grain can create little shelters where competitors get traction before mycelium can fully claim the space.
Biology matters more than people admit
Many contamination discussions reduce failure to “you must have messed up.” That's too simple. In mushroom production, contamination can be tied to specific equipment and environmental conditions. Research on king oyster mushroom plants found Listeria monocytogenes contamination was most likely caused by mycelium stimulation machines, with low growth temperatures also implicated. Other mushroom-focused research reported that lower substrate carbon-to-nitrogen ratios negatively affected orange mold growth and suggested nitrogen supplementation in sawdust or using rice straw as management strategies, according to this mushroom contamination research summary.
For home growers, the practical lesson is clear. Substrate chemistry, species speed, and facility ecology all shape contamination risk.
One clean bag doesn't guarantee a clean process
If you want to tighten the most vulnerable handoff, this guide on how to inoculate sterilized grain bags is worth studying because inoculation is where many “mystery” contaminations begin.
Slow-colonizing species often lose races that vigorous cultures win. Wet grain behaves differently than properly dried grain. A tiny puncture or stressed filter can matter more over time than it seems in the moment.
Treat contamination as a signal from the whole system, not just a judgment on your cleaning.
Simple Monitoring Habits for Beginners
Contamination control isn't only about prep day. It's also about catching problems early, before one bad jar turns into a dirty shelf, a dirty room, and a month of confusion.
Your daily checks
You don't need fancy instruments to monitor a small grow. You need consistency.
Look for color changes that don't belong. Green, black, pink, and strong yellow are common warning colors.
Check moisture behavior. A little condensation can be normal. Pooling liquid, greasy kernels, or slimy patches are not.
Use your nose carefully. Healthy mycelium usually smells earthy and mushroomy. Sour, sweet-fermented, or sharply unpleasant odors suggest trouble.
Feel for odd heat on a bag or jar. Unexpected warmth can signal heavy microbial activity.
Keep these checks brief. Constant handling creates fresh risk.
Your weekly review
A weekly review helps you notice patterns, not just events.
Habit | Why it helps |
|---|---|
Rotate jars or bags gently | Hidden contamination often starts on the underside |
Compare colonization pace | Stalled growth can be an early warning even before discoloration |
Log room conditions | Temperature swings and damp corners often line up with recurring issues |
Review the last handling event | Trouble often appears after a shake, transfer, or move |
If you're unsure whether a jar is contaminated, isolate it first and decide later. If you leave it with the healthy ones, the decision may be made for you.
Discard, isolate, or observe
Use a simple decision rule.
Discard immediately if you see active green sporulation, obvious black mold, foul bacterial liquid, or a container that has broken integrity.
Isolate and monitor if growth is unusual but not conclusive. Put the suspect item far from clean projects and mark the date.
Never return a contaminated tub to the main grow area after opening it. Once spores release in your work zone, they become part of the room's background burden.
A simple notebook works fine. Write the date, culture, substrate, room conditions, and what changed. The habit looks small, but it turns contamination from a mystery into a pattern you can learn from.
Common Myths That Trip Up New Growers
The first myth is that contamination means you failed. It doesn't. It means a competitor found a pathway or a favorable condition. That's frustrating, but it's also information.
Myth one says clean enough means safe enough
A wiped table and sterile grain jar don't guarantee success. You can sterilize perfectly and still reintroduce contaminants during inoculation, mixing, fruiting, or casual handling afterward. That's why sterile work alone doesn't solve everything.
In regulated sterile manufacturing, contamination control is treated as a measurable, high-stakes discipline. One industry analysis reports an average of 330 drug recalls per year from 2012 to 2023 due to contamination, affecting about 400,000 units per incident, with Class I recalls making up 14% of the total. The same analysis notes that by 2022, sterility-related problems caused the highest number of recalls in five years, and sterile manufacturing standards target a sterility assurance level of less than one non-sterile unit per million. That perspective comes from PharmAlliance's discussion of contamination risk in sterile manufacturing. Home cultivation is smaller in scale, but the lesson is the same. Small contamination failures have real consequences.
Myth two says more aggression equals better technique
More bleach isn't automatically better. More flaming isn't automatically safer. More time hunched inside a still-air box doesn't automatically improve outcomes if your movements get sloppy halfway through.
A few common corrections help:
Not every green patch is the same organism. Treat identification as observation, not guesswork.
Bacterial contamination is not rare at home. It often hides behind stall, smell, and wet texture.
Over-sanitizing can backfire. Residue, corrosion, and rushed handling create their own problems.
One contamination event doesn't condemn your whole hobby. It points to a likely source worth tracing.
Treat each contamination event like a lab note, not a verdict on your ability.
The growers who improve fastest aren't the ones who never get contamination. They're the ones who stop turning every loss into shame and start turning it into diagnosis.
Your First 30 Days of Cleaner Grows
If you want a practical start, don't aim for mastery this month. Aim for repeatable habits that make your process calmer and easier to troubleshoot.
Week one setup and rehearsal
Pick one area that will be your clean work zone. Not the whole room. One zone. Remove clutter, reduce fabric, and keep only the tools you need nearby.
Then rehearse your motions. Set up a still-air box or your preferred clean workspace and do two mock sessions with sterile water jars or empty practice containers. Open, position, recap, and reset. This builds the muscle memory that beginners often try to learn during a real inoculation.
Week two grain and hand discipline
Choose whether you're pressure sterilizing your own grain or starting with pre-sterilized grain from a reliable source. Stick with one method for the month so your notes mean something.
Make the same hand routine automatic every time:
Wash first
Glove up
Wipe contact surfaces
Arrange tools before opening anything
Stop touching unrelated objects once work begins
That last one matters more than people think.
Week three learn healthy mycelium on agar
Agar teaches your eye. Even one known clean plate can show you how healthy growth differs from sketchy growth. Cut a clean wedge, transfer it carefully, and watch how it expands.
You don't need to become an agar expert in a week. You need to start seeing the difference between “white” and “healthy white.”
Week four run a real batch and log everything
Launch a small real batch. Not your largest one. A manageable one. Check it daily without overhandling it, and keep a simple contamination log every time you notice a smell change, moisture shift, stall, or suspicious color.
On Friday, review the week in one sitting.
What changed after handling
Which container moved fastest
Which one stalled
Whether room conditions stayed steady
Whether any off smell appeared before visible contamination
This is how cleaner grows begin. Not with superstition, and not with panic cleaning. With observation, control of pathways, and enough repetition that your process stops changing every session.
After that first month, the next skill layer opens up naturally. Agar isolation gets easier. Liquid culture testing makes more sense. Shelf-life questions become testable instead of mysterious. Contamination control isn't the finish line. It's the floor you build everything else on.
If you want help building that floor, Colorado Cultures offers sterilized grain bags, substrates, grow supplies, and practical education that line up directly with the contamination control habits covered here. If you'd like cleaner starting materials and beginner-friendly guidance, visit Colorado Cultures.
Comments