
How to Grow Oyster Mushroom Spawn Step by Step
The popular shortcut for growing oyster mushroom spawn is to start with a spore syringe and add plenty of it to grain. That's a weak default. A verified oyster culture, properly hydrated grain, and clean transfers give you a more predictable starting point than extra inoculum added to a questionable jar.
Learning how to grow oyster mushroom spawn means learning to judge the material before you multiply it. Spawn is grain colonized by mushroom mycelium, not the mushrooms themselves. Your job is to produce clean, vigorous mycelium that can carry into a fruiting substrate without carrying competitors along with it.
Start with a Verified Oyster Culture
A spore print can produce oyster mycelium, but it isn't the same thing as a verified culture. Spores introduce genetic variation, so the resulting growth can differ in speed, appearance, and fruiting performance. Preparing a spore suspension also adds handling during which unwanted organisms can enter.
For a beginner, choose a fresh, correctly identified Pleurotus ostreatus culture on agar or a verified liquid culture. Agar lets you examine growth on a surface before transferring it. Liquid culture makes inoculation convenient, but cloudy liquid alone doesn't prove that the organism inside is clean oyster mycelium.
A peer-reviewed HortScience method reported approximately 5% contamination under relatively clean procedures. That isn't a predicted failure rate for your kitchen. It's a reminder that even careful methods can lose containers, and additional open handling creates more opportunities for contamination.
More inoculation points won't rescue a contaminated or genetically inconsistent starting culture.
What a usable culture looks like
Keep the culture's identity attached to it. A label should tell you the species or strain, where it came from, and when it was prepared or received.
Before opening any grain, check for:
Consistent growth: White mycelium spreading without unexplained colored sectors.
Traceable identity: A culture sold or maintained as the oyster strain you intend to grow.
A closed backup: Clean material you haven't exposed during the grain transfer.
This is the kind of starting material you want to examine before committing a batch of grain.
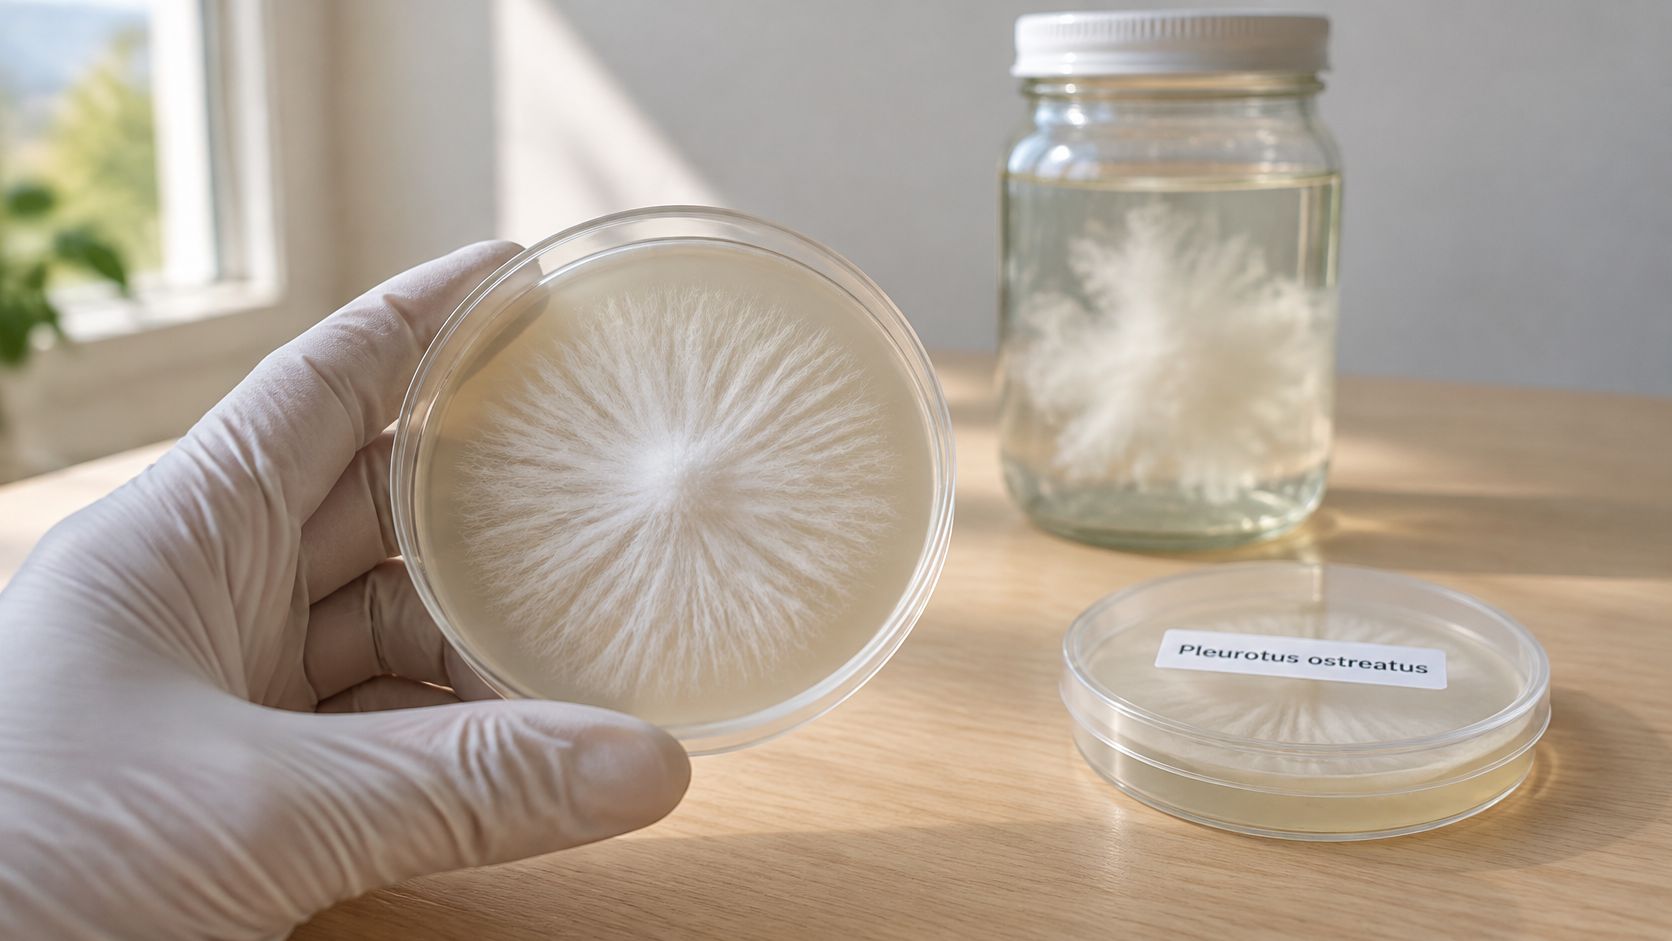
Reject a culture with unexplained colored growth or an identity you can't establish. If you notice a sour odor during normal handling, stop using it. Don't deliberately open and sniff a suspect plate.
Our guide to working with fungi agar plates can help you understand why a visible culture surface is useful. For a first Denver home transfer, choose a room with the fan off and protect the transfer inside a still-air box. A quiet room helps, but it isn't a sterile workspace by itself.
How to Make and Time Oyster Grain Spawn
Grain does two jobs at once: it feeds the culture, and it breaks into hundreds of colonized starting points you can spread through a bulk substrate. Rye and sorghum are practical choices. Use clean grain without obvious spoilage, and keep the grain type consistent while you learn your process.
Here is the part that decides whether the rest matters: a modest amount of verified culture on properly prepared grain beats a heavy inoculation poured into a wet, questionable jar. More solution cannot buy back a bad start.
Gather heat-safe jars with suitable filtered lids or purpose-made filter bags, a pressure sterilizer, clean culture, labels, and transfer tools. If you're using agar, prepare a sterile scalpel. If you're using liquid culture, use an appropriate sterile syringe and an injection port designed for inoculation.
Prepare grain that's moist inside and loose outside
Hydrate the grain, then drain it thoroughly. The University of Florida cultivation guide places grain moisture near 50%, with a workable range of 40–60%. That figure describes the moisture held inside each kernel, so it is not an instruction to mix equal scoops of water and dry grain. Each kernel works like a sealed water bottle. Your job is to fill the bottle, then dry the outside so no water film sits between kernels for bacteria to use. After hydration, split a kernel to confirm the interior has absorbed water, then let the exterior drain and surface-dry until the grain separates when moved instead of smearing into a sticky mass. Hold this line before you open the culture: "If the grain clumps when you tilt the jar, no syringe volume will fix it." Water trapped between kernels leaves bacteria favorable conditions even when some kernel interiors stayed poorly hydrated, and adding more inoculum to visibly pooled water only gives the contamination a faster start.
Load containers with room to redistribute the grain. Leave headspace so you can gently move the grain after inoculation. Keep kernels away from sealing surfaces and avoid clogging filters. A jar packed tightly to the lid is awkward to mix. A filter bag needs enough loose material around the grain mass for you to redistribute it without stressing the seams. Use containers intended to withstand pressure sterilization.
Pressure-sterilize using a load-appropriate procedure. A pressure sterilizer works because steam under pressure reaches temperatures boiling water cannot. The catch is that heat still has to penetrate to the center of every kernel in the container, and jar size, packing density, and cooker load all change how long that takes. Use a validated grain-sterilization procedure matched to your equipment rather than borrowing a schedule from a different setup. Follow the cooker's operating instructions, including venting and cooling. In the Denver metro area, elevation changes how your equipment behaves, so a sea-level procedure may not transfer unchanged. If you can't establish a suitable process, start with pre-sterilized grain rather than guessing.
Transfer culture without reopening the batch
Let the grain cool completely. Don't inoculate grain that still feels warm in its center. Heat can damage the culture, and opening a cooling container also creates an avoidable exposure. Arrange your tools before starting. Position the culture and grain so you can make the transfer without reaching over an open container or searching for a lid.
Inoculate through the shortest practical opening. For agar, transfer small pieces from clean, actively growing mycelium with a sterile tool. Avoid dragging the tool across questionable areas of the plate. Close the receiving container immediately. For liquid culture, use the intended injection port rather than opening the bag unnecessarily. The Full Flush instructions specify at least 5–10 ml of spore/LC solution, depending on spawn size. For the oyster-culture approach described here, choose verified oyster liquid culture, and treat that quantity as a product-specific instruction rather than a universal dose for every grain container.
Distribute the inoculum and keep the container closed. Gently roll or shake the sealed container to spread the culture through the grain. With agar, you're distributing colonized pieces. With liquid culture, you're moving liquid into contact with kernels without leaving a puddle at the bottom. If the grain won't move because it's compacted or sticky, the fix lives back in step 1, not in another open transfer. Record the preparation problem, and don't reopen the grain chasing better distribution.
Read the timing as a range, not a deadline
A peer-reviewed oyster mushroom study reports sorghum fully covered by Pleurotus ostreatus mycelium within 10 days at 26°C, while its slower controlled grain runs extended to about 21 days at 25°C. The fastest result in a study is not your household deadline.
The University of Florida incubation guidance gives a practical reference of 23°C (73°F), in darkness, for about 10–20 days until grain or seed is fully colonized. Use a thermometer at the containers rather than relying on the thermostat elsewhere in the house.
Oyster grain spawn targets and colonization times
Setup | Moisture | Temperature | Full colonization |
|---|---|---|---|
Sorghum, fast research run | Hydrated, no free water | 26°C | About 10 days |
Grain or seed, University of Florida guide | About 50% | 23°C (73°F), darkness | 10–20 days |
Inoculated grains, slower study runs | Avoid excess free water | 25°C | About 21 days |
These benchmarks come from different preparations under different conditions. Strain condition, hydration, inoculum contact, and cleanliness all shift the finish date, so a range of roughly two to three weeks is normal to see at home. Don't turn up the heat just because another grower's jar finished sooner; warmer grain can favor the contaminants you're racing against.
Label the batch and wait for complete colonization. Record the inoculation date, culture identity, grain type, and incubation location. Photograph the same side of the container when checking progress so you can distinguish slow expansion from no expansion. A finished container shows mycelium throughout its depth, not only where the glass lets you look. Rotate it to inspect the bottom and opposite side without opening it. "White against the glass is a checkpoint, not a finish line." Bare pockets matter because moving unfinished grain into bulk substrate also moves exposed nutrients into that new environment, and contaminants reach them faster than your culture will.
Sterile Handling That Cuts Contamination
Contamination by sterilization and inoculation setup
The following figures come from a farmer-scale sorghum comparison, not a prediction of contamination in your home.
Method | Contamination | What it means at home |
|---|---|---|
Steaming | 48.1% | Weakest of the grain treatments compared |
Pressure cooking | 39% | A practical home option, but later handling still matters |
Autoclaving | 38% | Similar losses in this comparison, not proof of equivalent sterilization |
Open-air bench inoculation | 51% | Exposed transfers deserve close attention |
Laminar-flow inoculation | 33% | Protected transfer reduced losses in this comparison |
The comparison separates problems beginners often combine. Treating the grain and protecting the transfer are different jobs. A pressure cooker can't prevent you from introducing contamination when you open the cooled jar.
Nor does a still-air box reproduce laminar flow. A flow hood supplies filtered moving air; a still-air box limits air movement around the transfer. Both require careful hand placement and clean tools.
Make the transfer deliberate
Disinfect the work surface, turn off nearby fans, and close windows that create drafts. Wipe the outside of containers before bringing them into the work area. Wear clean gloves, but remember that touching your phone or face makes those gloves another dirty surface.
Use this sequence:
Prepare the receiving container: Keep its lid or port protected until the culture is ready.
Prepare the tool: Use sterile disposable tools or an appropriate sterilization method for reusable instruments.
Transfer without hovering: Keep hands, sleeves, and your face away from the opening.
Close immediately: Finish the transfer before labeling, photographing, or rearranging supplies.
Alcohol disinfects surfaces; it doesn't replace sterilization of grain or cutting tools. Keep flames away from alcohol, its vapors, and plastic still-air boxes. Sterile disposable scalpels can simplify a beginner setup.
Our basic sterile technique guide is useful for organizing this workflow before you handle live culture.
Practical rule: Prepare everything you'll need before exposing either the culture or the grain.
Improve the process without guessing
Check sealed containers daily once growth begins. Note whether a failure appeared around an injection site, beside an agar piece, or throughout the grain. Those patterns can help you choose what to investigate, although appearance alone can't identify the exact organism or entry point.
Change a specific part of the process rather than replacing everything at once. If the grain was visibly wet, correct hydration. If you paused with a jar open while looking for the scalpel, reorganize the transfer.
Repeated failures aren't evidence that oysters need more inoculum. They're a reason to examine grain preparation, heat treatment, transfer exposure, and incubation conditions separately.
Spawn Rates for the Next Substrate
More spawn isn't automatically a better use of a clean batch. Spawn rate describes how much colonized spawn you add to the fruiting substrate. It doesn't describe how much liquid culture you inject into grain.
Keep those decisions separate. The liquid culture starts your grain culture; the finished grain then inoculates straw, sawdust, or another suitable bulk material. Increasing the second quantity won't correct a problem introduced during the first operation.
An agricultural-substrate study reported 743 g and 99.3% biological efficiency at a 4% spawn ratio on barley-based substrate, while another treatment at the same rate produced 551 g and 84.4% biological efficiency. The useful lesson is the difference between those treatments, not a promise that your home block will produce either yield.
Separate a working rate from a yield promise
Spawn rate and what it changed
Spawn rate | Substrate context | Reported result | Use it when |
|---|---|---|---|
2–3% of wet substrate weight | Common oyster protocols | A practical inoculation range, not a yield guarantee | Planning a modest home bulk grow |
3.2% | One technical protocol | A published working rate, not a comparative yield result | Following that protocol |
4% | Barley-based substrate | 743 g and 99.3% biological efficiency | Testing a well-matched substrate |
4% | Alternate treatment in the same study | 551 g and 84.4% biological efficiency | Comparing substrate performance |
8% | Small home comparison only | No yield result established for your setup | Checking whether colonization time changes |
Use the percentage basis specified by the procedure. Wet substrate weight and dry substrate weight aren't interchangeable, and a study's rate shouldn't be converted into another basis.
Biological efficiency compares fresh mushroom yield with the dry weight of the substrate. It isn't the percentage of a wet block that became mushrooms. If you want meaningful comparisons, record the dry material used before hydration as well as the harvested fresh weight.
Run a small local comparison
For a Colorado grower choosing between straw, hardwood sawdust, and an agricultural by-product, availability matters. Our guide to oyster mushroom substrates can help you narrow the materials before testing rates.
A useful experiment compares the modest and higher rates in the table across locally available substrates. Keep the culture, container style, preparation method, and incubation location consistent. Treat any extra-high-rate container as a test, not your default recipe.
Record colonization time, contamination, fresh yield, and biological efficiency. Raise the rate only when your notes suggest insufficient distribution or slow establishment, not when the block is sour or visibly contaminated. A clean, well-prepared substrate is a better investment than feeding a dirty block more spawn.
Slow Colonization and Bad Jars
A jar that looks idle after several days isn't automatically lost. Examine the inoculation points through the container. Fine white threads extending into nearby grain indicate activity even if most kernels still look unchanged.
Check the actual incubation location before blaming the culture. A shelf beside a cold exterior wall can behave differently from the room around it. Look for continued expansion across successive checks rather than judging the jar from a single photograph.
Use this checklist to decide whether you're seeing a slow start or a reason to stop.
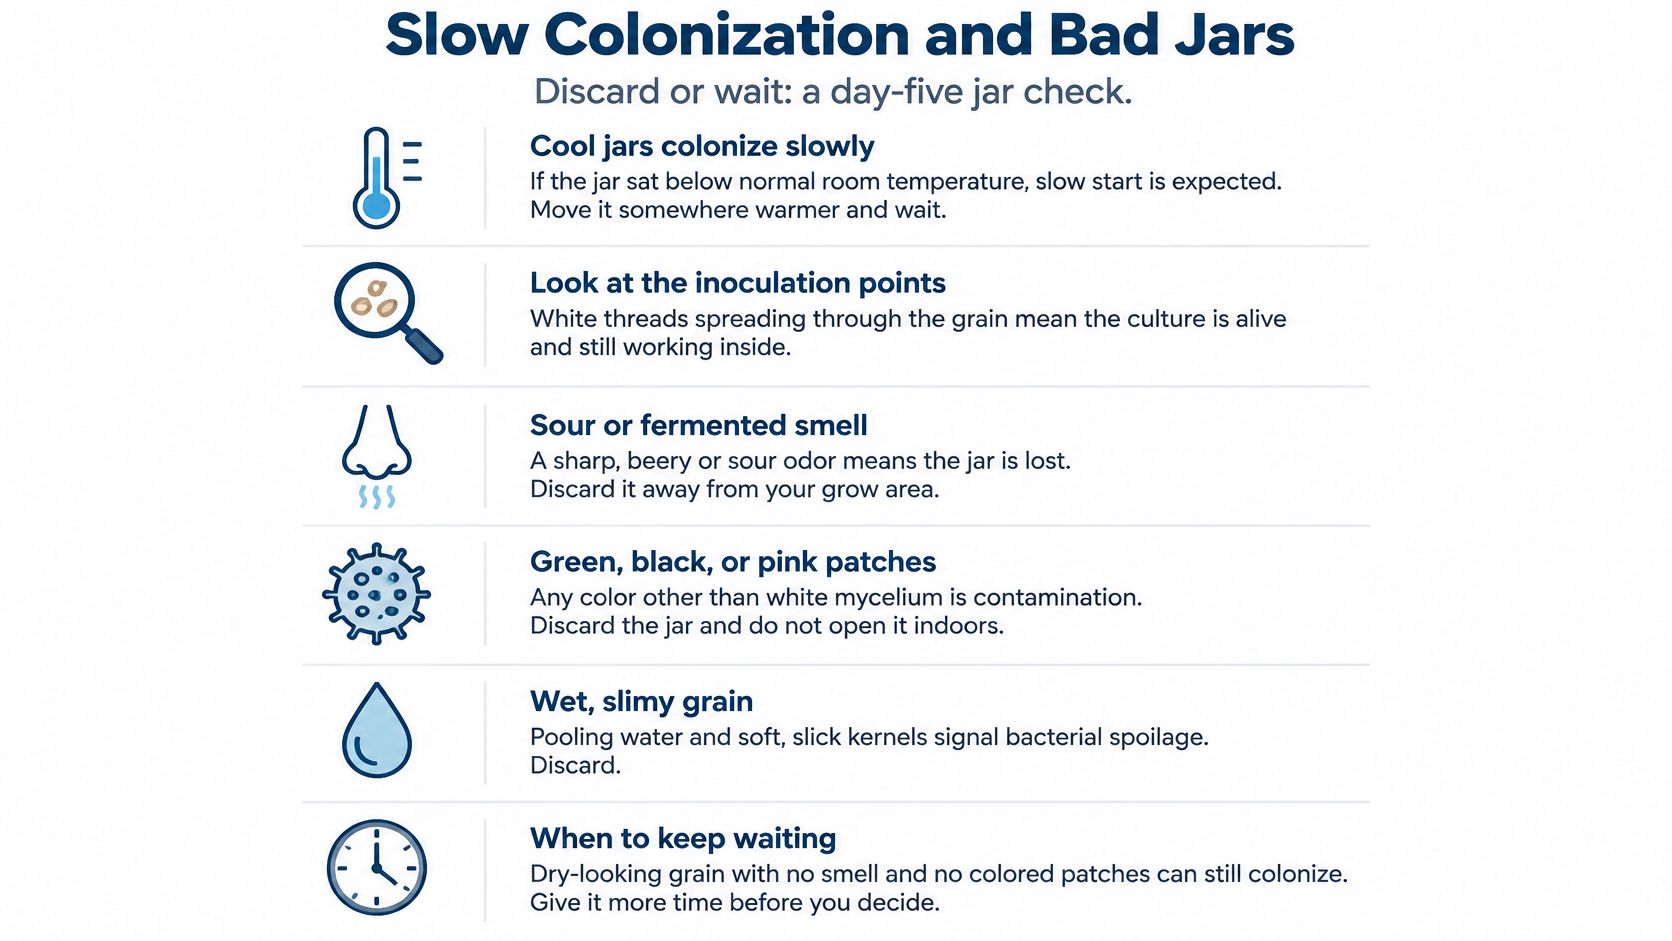
Make the discard decision unmistakable
Spawn jar symptoms and what to do
What you see | Likely cause | Action |
|---|---|---|
No change for several days | Cool spot, slow strain, or growth hidden near the inoculum | Confirm suitable incubation conditions and watch for expansion |
Still bare at the late end of the expected run | Weak culture, unsuitable moisture, or poor inoculum contact | Restart from the closed backup culture |
Sour smell or slimy wet grains | Suspected bacterial contamination | Discard the sealed container |
Green, black, gray, or pink patches | Suspected mold or another contaminant | Discard without opening it on the bench |
Even white growth, some grains still loose | Colonization in progress | Leave closed until colonized throughout |
Uniform white growth and a clean mushroomy smell during intended use | Finished spawn, provided no other warning signs are present | Use, expand, or hold under strain-appropriate refrigeration |
Color and texture are screening clues, not laboratory identification. Thin oyster mycelium can look translucent or grayish through a container, so distinguish a spreading white network from a separate, unfamiliar patch. When you can't confidently separate the two, don't use that jar for expansion.
Bacteria may also be present before obvious slime appears. For background on what it means for bacteria to establish themselves in an environment, the BacteriaFAQ explainer on bacterial colonization provides useful context. It isn't a substitute for inspecting your spawn or confirming a contaminant's identity.
When a container looks suspect, don't open it just to get a better smell.
Condensation alone doesn't establish bacterial spoilage. Persistent slick kernels, localized stalled growth, and a sour odor noticed during normal handling are more concerning together. Don't rinse questionable grain or pick apparently clean kernels out for another batch.
The following video provides an additional visual reference for the cultivation workflow.
Keep a record you can actually use
Growth can pause after shaking while the mycelium reconnects. If the container remains otherwise normal, give it uninterrupted recovery time rather than adding more liquid or reopening it.
Keep a short log:
Inoculation date: Include the culture identity.
Measured temperature: Record conditions beside the container.
First visible growth: Note when white growth appeared and whether it continued spreading.
That record makes the next decision less emotional. You can distinguish a consistently slow culture from a batch that changed after a different hydration method.
Expand Spawn or Move to Bulk
Once the grain is colonized throughout and has no warning signs, choose its next use before opening it. Don't expose the whole batch while deciding what to do with it.
Choose the next destination
Expand onto fresh grain. Transfer a small portion into cooled, pressure-sterilized grain using the same protected handling you'd use for an agar transfer. Incubate the new containers under conditions suited to the culture, and judge each independently. Expansion multiplies whatever you transfer, so don't use a questionable donor jar.
Inoculate a fruiting substrate. Break up the finished grain while its container is closed, then distribute it evenly through properly prepared, cooled substrate. Use your chosen spawn rate rather than emptying the jar by habit. Avoid crushing the mix into a dense mass that's difficult for mycelium to colonize.
Simplify a failing preparation stage. If your pressure treatment keeps producing unusable grain, use pre-sterilized grain with the same verified culture. That lets you concentrate on transfer technique without also troubleshooting grain cooking.
For a monotub prepared under our instructions, the mixed tub rests in a dark spot at 70–80°F for 5–10 days, until it's 80–100% white. That's a kit-process benchmark, not a universal fruiting schedule for every oyster strain or container. Match the eventual fresh air, light, and humidity to oyster mushrooms rather than assuming all gourmet mushrooms fruit alike.
Keep the backup culture closed while the new batch establishes itself. Label the spawn that passed inspection, assign it to a prepared grain or bulk container, and make that transfer deliberately. Clean material is worth protecting all the way to the next stage.
We offer spawn, substrates, and liquid culture recipes to support your next oyster mushroom grow. Visit Colorado Cultures to choose supplies for your grain-to-bulk setup and get practical guidance before making the transfer.
Comments