
DIY Mushroom Grow Bags: A Complete Beginner's Guide
You've got a clean table, a bag of substrate, and a head full of questions. The hard part isn't finding a mushroom kit, it's knowing which details matter and which ones are just noise. DIY Mushroom Grow Bags work because they turn a messy biological process into a controlled routine, as long as you respect the bag, the substrate, and the clean handoff between them.
A grow bag isn't just a container. It's a small environment that has to hold back competing organisms while still letting the mycelium breathe. That balance is why the bag material, the substrate moisture, the sterilization step, and the inoculation cleanup all matter at the same time.
What a DIY Mushroom Grow Bag Does
A first-time grower often assumes the bag's job is to hold mushrooms. The bag does something more specific. It protects a prepared substrate long enough for mushroom spawn to colonize it, then gives that same block the right conditions to shift from colonization to fruiting without opening the door to contamination.
The logic is the same whether you are working on a kitchen counter or trying to be more exact about process control. Penn State Extension separates pasteurization from sterilization. Pasteurization lowers the number of insects, fungi, nematodes, and bacteria while leaving some helpful microorganisms in place. Grain for spawn production is cooked, sterilized, and cooled before inoculation. In a bag-based setup, the bag has to support both microbial control and gas exchange during colonization, not just act as storage. Penn State Extension on mushroom growing procedures
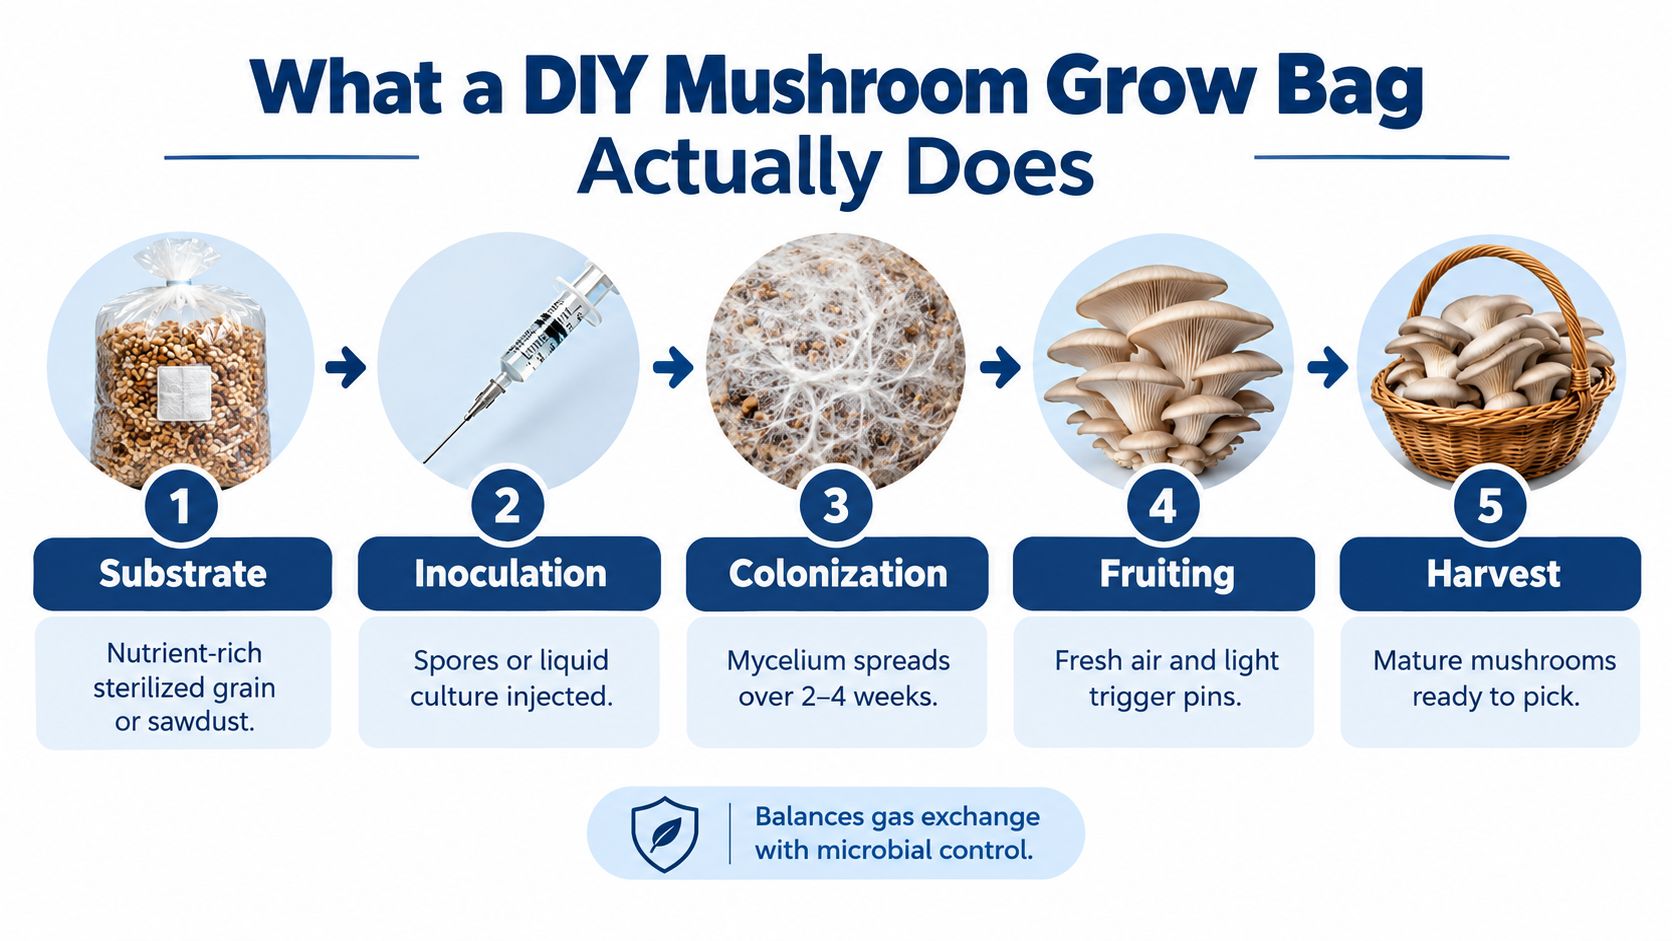
The bag moves through four real phases
First comes substrate preparation, where the grower hydrates grain, sawdust, or straw and gets it ready for treatment. Then comes sterilization, where heat reduces or removes competing organisms. After that, the bag enters colonization, when mycelium spreads through the food source. Last is fruiting, when fresh air, humidity, and species-appropriate light cues tell the fungus to produce mushrooms.
Each phase leaves clues you can check. A prepared bag should feel evenly moist, but not dripping. That moisture check matters because a bag that is too wet invites bacteria, while a bag that is too dry slows colonization. A sterilized bag should cool before inoculation, because heat damages spawn just as reliably as contamination does. During colonization, the contents should gradually turn white as the mycelium takes over. Fruiting comes later, after the block is fully colonized and the environment changes.
Practical rule: if the bag smells sour, looks slimy, or shows colored growth before it is fully colonized, treat it as contamination, not as a stage to wait out.
A published oyster-mushroom experiment gives a useful picture of how controlled bag work can be. Researchers packed 1.5 kilograms of substrate into polypropylene bags with gas-exchange filters and autoclaved them twice at 121°C for 2 hours per cycle, with a 24-hour interval between cycles. A beginner does not need to copy that exact protocol, but it shows why grow bags use heat-resistant plastic with filter patches instead of ordinary storage film.
A first-time grower should expect a slow, steady process. The first days are usually about cooling and clean handling, not visible growth. The next stretch is mostly colonization, when the bag can look inactive before it starts whitening. Worry only when growth stops, smells off, or changes color. Patience is part of the technique.
Choosing Between Grain, Sawdust, and Straw
The substrate you choose sets the rest of the process in motion. Some bags are meant to become spawn, some are built as fruiting blocks, and some work better for oyster mushroom setups that can tolerate simpler treatment. Choosing the wrong one usually leads to avoidable contamination or moisture problems, so the better question is not what looks easiest, but what you can prepare cleanly.
A useful shortcut is this. Grain is for making spawn, supplemented sawdust suits richer bag systems that need tighter control, and straw is often the most forgiving option for oyster mushrooms when pasteurization is enough. In one oyster-bag protocol, the substrate was prepared at about 70% moisture and inoculated at 10% spawn on a wet-substrate basis, with incubation around 24 ± 2 °C until colonization. Oyster bag protocol and incubation conditions
Substrate | Best For | Sterilization Method | Colonization Speed | Contamination Risk |
|---|---|---|---|---|
Grain | Making spawn and small controlled transfers | Pressure sterilization | Fast once inoculated | Higher if handled poorly |
Supplemented sawdust | All-in-one bags and structured indoor grows | Pressure sterilization | Moderate, depends on species and load | Higher because nutrients attract competitors |
Straw | Oyster mushrooms and low-tech bag projects | Hot-water or steam pasteurization | Moderate | Lower than nutrient-rich mixes when prepared well |
Straw is usually the easiest starting point because it has fewer nutrients for contaminants to exploit, and its treatment is simpler. Sawdust-based bags fit compact indoor grows better, but they ask for cleaner prep and better sterilization. Grain has a narrower role. It is usually part of spawn production rather than the final fruiting bag.
A good beginner choice is the one you can prepare cleanly every time, not the one that sounds most advanced.
For readers who want fewer steps, an all-in-one bag sits between home mixing and lab-style preparation. It bundles the substrate system into one package, which lets the grower focus on inoculation and cleanliness instead of building every layer from scratch. If you want a clearer side-by-side look at common mushroom substrates, the overview at Colorado Cultures' substrate guide is a useful reference while you decide.
Bag Types, Loading, and Sterilization
A grow bag has a simple job, but it only works if the material matches the heat and moisture it will face. A thin kitchen bag can soften or split under pressure, while a heat-resistant polypropylene bag with a filter patch keeps its shape and still allows gas exchange after sterilization. That balance matters because the bag has to survive the cooker and then support mycelium during colonization.
The filter patch is part of the control system, not a decoration. It lets the bag breathe after sterilization so the substrate does not turn into a sealed block with little room for gas exchange. Commercial all-in-one bags use this setup because the container has to stay clean and still give the mycelium a workable environment.
Load the bag loosely, not tightly
Packing the substrate hard makes the center harder to sterilize than the outer layer. Heat moves through a loose load more evenly, like steam working through a pile of towels instead of a compressed brick. If the middle stays cooler for too long, contamination can survive where you cannot see it.
Fill the bag with enough space for steam to move, then press out excess air without squeezing the contents into a solid mass. The goal is not to make the bag look tidy. The goal is to give heat a clear path through the substrate.
Work clean, then stay patient. Once the bag has been sterilized, every new touch is a contamination risk.
For nutrient-rich substrate, the standard target is 121 °C at 15 psi. Academic bag-cultivation literature identifies 121 °C as the standard sterilization temperature and notes that the bag must tolerate autoclave conditions. Sterile bag workflow and 121 °C guidance That makes the handling after the cycle just as important as the cycle itself. Let the bag cool all the way down before opening or inoculating it, because a hot bag can force moisture movement, distort the filter, or create a rushed mistake that undoes the clean work.
A better quality check is to treat sterilization like a process you confirm, not a step you assume. Autoclave tape should change as expected, and the bag should be fully cooled before it goes near spawn. If the outside still feels warm, the center may still be holding more heat than you want. That is the point where patience protects the whole batch.
Before sterilization day, stage the work area carefully. Have the bags, substrate, scale, funnel, autoclave tape, and a clean cooling space ready before you start. If you want a practical walkthrough for grain bag prep and sterilization handling, this sterilization guide is a useful reference for keeping the workflow organized and calm.
Inoculation and Clean Technique
A clean inoculation is the point where a good bag either stays on track or gets set back. The substrate may already be sterile, but once you open the bag or add spawn, you are back in a contamination-sensitive step. Treat it like a quality-control check, not a quick handoff.
Start by making the workspace as still and orderly as you can. A still-air box helps because it blocks drafts and gives you a quiet pocket of air. A flow hood works even better if you have one. If you do not, a wiped surface, 70% isopropyl alcohol, fresh gloves, and slow movements still make a real difference.
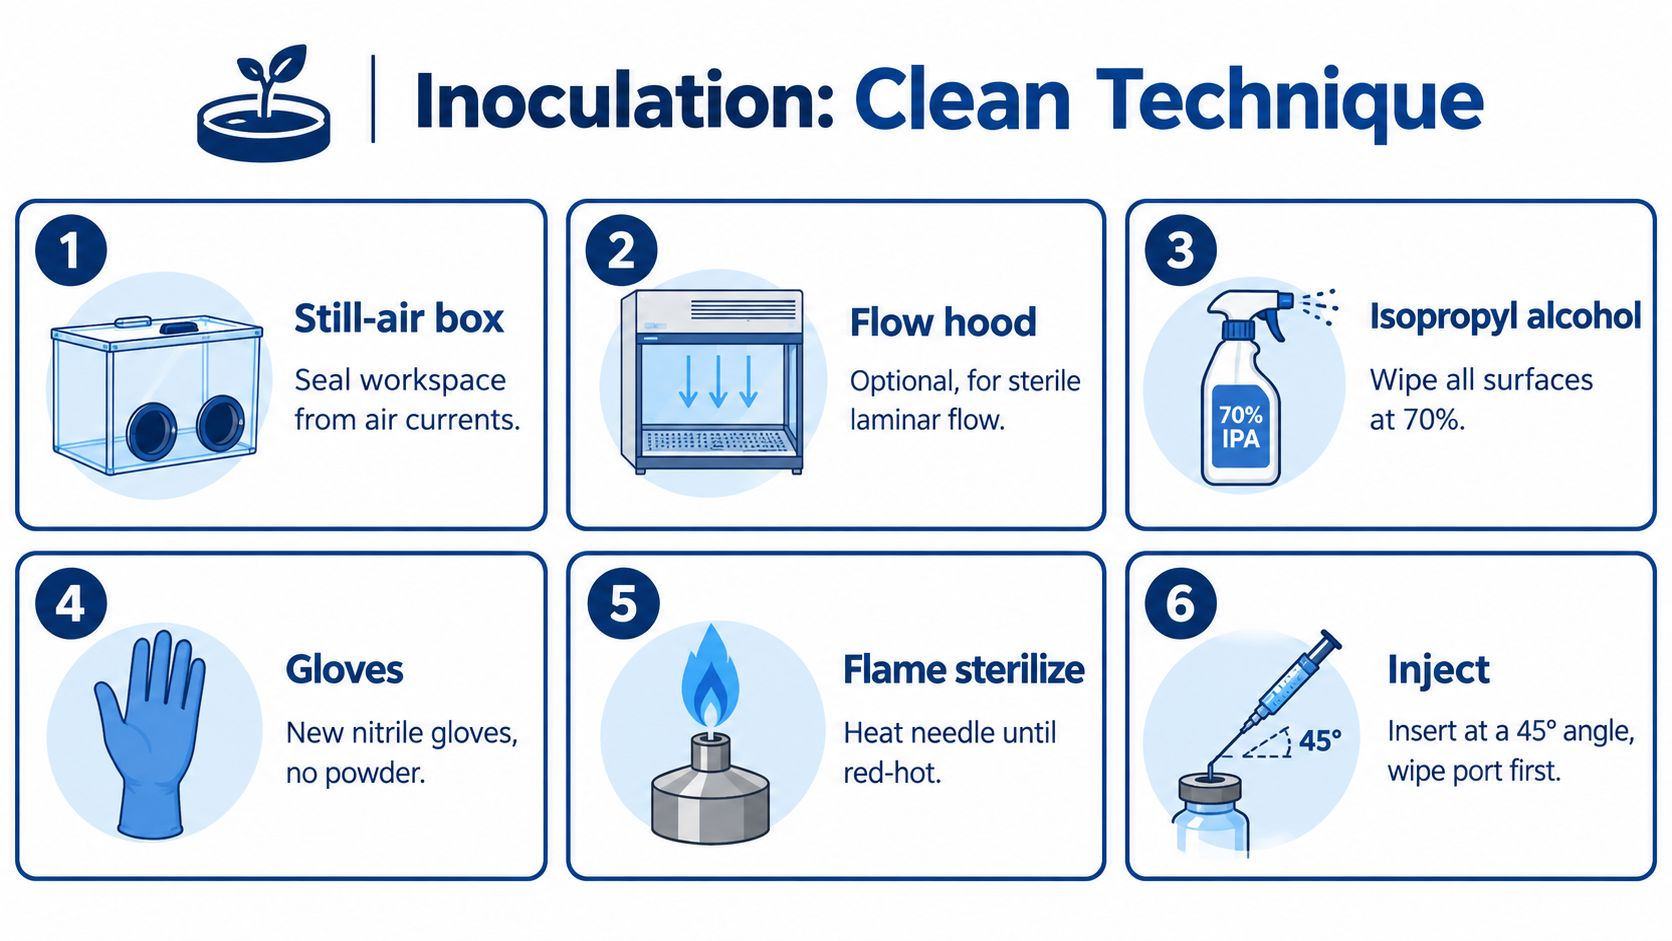
The cleanest habits are the simplest
Wash your hands before you begin. Put on nitrile gloves. Wipe the work surface, the outside of the bag, and any tool that will touch the setup. If you are using a needle, flame-sterilize it until it is red-hot, then let it cool before it meets the spawn or the port.
Handle the spawn briefly and with intent. Open it only after the workspace is ready, and do not leave the bag open while you search for tools or adjust the setup. Every extra second with an exposed opening gives airborne dust more time to settle where you do not want it.
The amount of spawn matters, but handling quality matters more. A representative bag protocol used about 10% spawn on a wet-substrate basis. Representative oyster-bag inoculation level Other oyster systems use lower wet-weight rates, so the exact amount depends on the substrate and species. The practical rule stays the same: add spawn cleanly, seal promptly, and keep the bag still after inoculation.
Keep drafts out, keep tools clean, and keep your hands moving less than you think they need to.
Post-sterilization handling is where small mistakes become expensive. In one substrate study, sterilized material showed microbial counts below 0.5 log CFU/g, while contaminated substrate averaged 8.0 log CFU/g, a gap tied largely to what happened after sterilization. Contamination contrast after sterilization That difference is why the open-bag moment deserves so much care.
Seal the bag quickly, label it with the date and strain, and move it to incubation without extra handling. If the routine still feels unfamiliar, Colorado Cultures offers printable instructions, video tutorials, and direct help by email, phone, or in person, which is useful while you are building a repeatable habit.
Colonization, Break and Shake, and Fruiting
A healthy bag changes in visible stages, and those stages tell you what to do next. Early on, the bag should look almost boring. Then the white mycelium begins to spread, and the whole thing shifts from substrate in a bag to a living culture you can monitor with care.
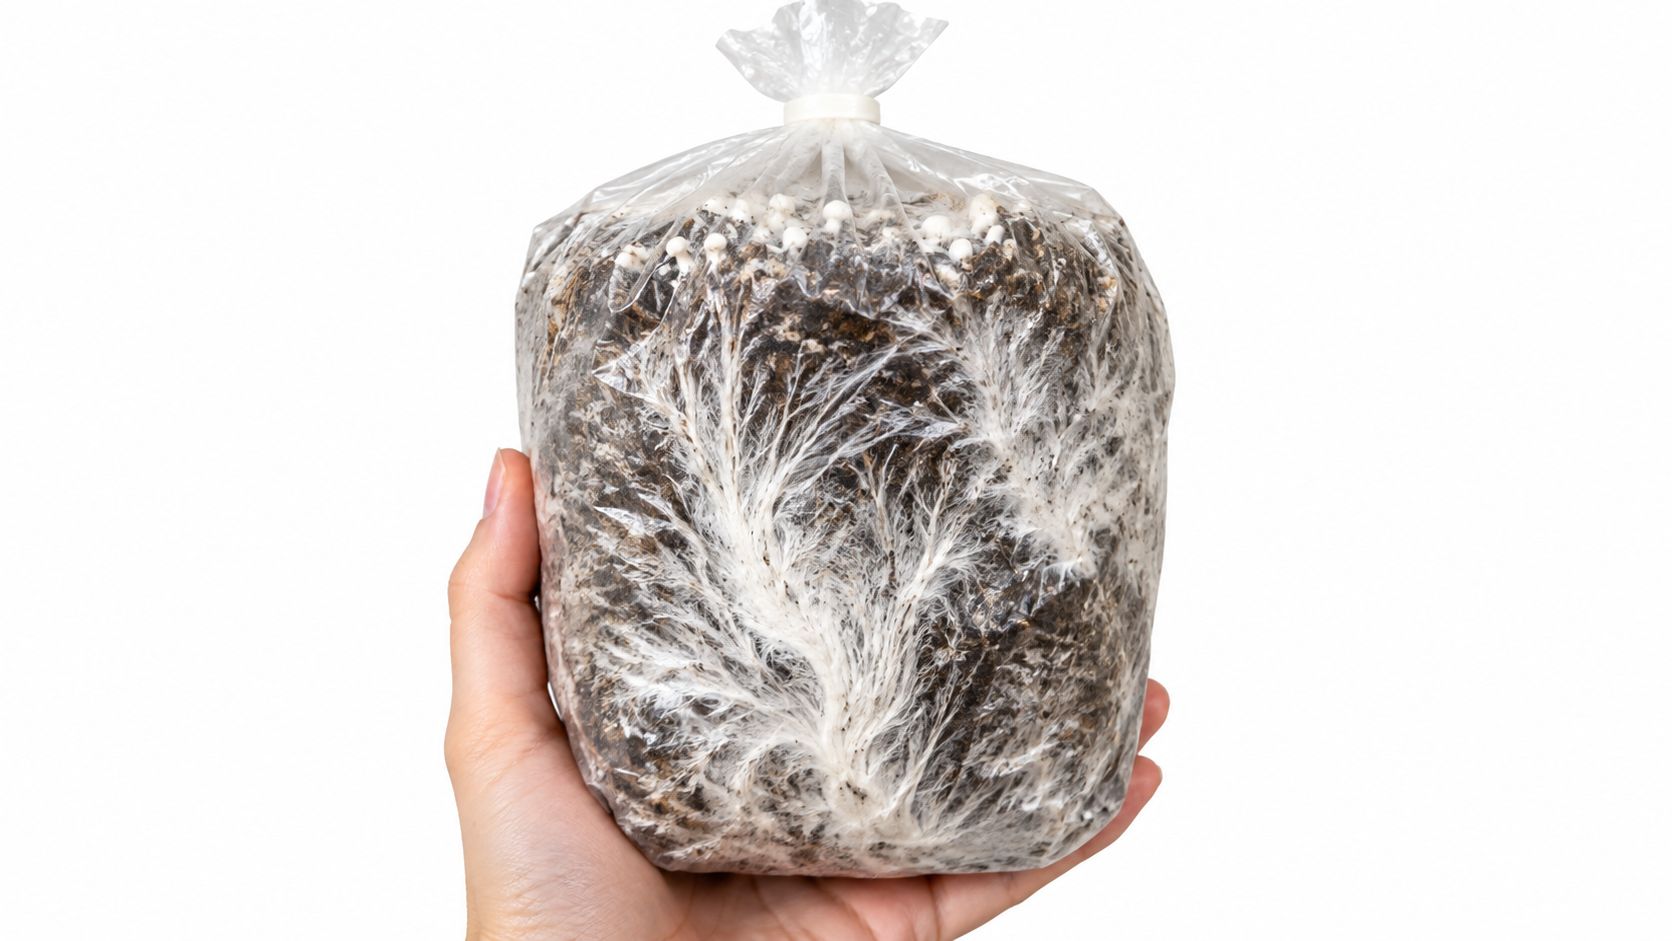
What healthy growth looks like
Healthy mycelium appears white and steadily expanding. A bag that is colonizing well usually changes from scattered points of growth to wider patches, then to a more even network across the substrate. If the surface stays dull, patchy, or develops odd colors or wet discoloration, that is a cue to inspect conditions before pushing ahead.
During this stage, the grower is watching for two things at once, spread and consistency. The white growth should keep advancing without strong pauses, and the bag should look more unified over time. That weekly rhythm is a useful check for a first-time grower because it turns the process into something observable rather than guesswork.
If the bag is only partly colonized and the growth looks strong, a gentle break and shake can redistribute the spawn through the substrate. The purpose is to spread active growth points into the remaining material, not to rough up the bag. After that, leave it alone so the mycelium can re-knit the broken sections.
Once the bag is fully colonized, stop trying to help by adding more movement. Fruiting depends on the environment around the bag. Fresh air, indirect light, and higher humidity become the signals that tell the culture to switch from expansion to mushroom formation. A fruiting guide for oyster mushrooms commonly calls for high humidity, regular fresh-air exchange, and moderate temperatures during this stage. Oyster fruiting guidance
The simplest harvest rule is to cut mushrooms at the base rather than pulling them out. Pulling can tear the substrate and disturb nearby growth. Cutting leaves the block cleaner and usually keeps it in better shape for another flush after rehydration.
A beginner can use the weekly rhythm as a rough map. Early days are quiet. Middle days are about whitening and expansion. Later days are about reading the fruiting cues, not shaking the bag again. If the bag stalls, smells wrong, or throws off odd colors, pause and inspect the conditions instead of forcing fruiting.
Troubleshooting Contamination and Common Mistakes
Contamination is easier to read once you stop treating it like a mystery. Green growth often points to mold, black patches are a serious warning sign, and slimy or unusually wet areas usually suggest bacterial trouble. Cobweb-like growth can also confuse new growers because it spreads fast and looks fuzzy, but the response is the same, isolate the bag and keep it away from clean cultures.
The first rule is simple. Do not open a suspect bag near your clean work area. Put it aside, seal it if you can, and inspect it away from other bags. If the contamination is active and spreading, it's usually safer to discard the bag than to try to “save” it and spread the problem.
Moisture problems are often the real issue
Many bag failures start with hydration, not with the inoculation itself. Too much water cuts down air spaces and creates pockets where bacteria can win. Too little water slows colonization and leaves the substrate unevenly active. Surface condensation can make a bag look too wet even when the center is fine, so the outside of the bag is not enough evidence by itself.
That's why weighing matters. A more reliable approach than the squeeze test is to weigh representative bags before and after sterilization, then track mass, drainage, and condensation. Cornell's Small Farms guidance notes that processed bags can redistribute water and leave the center too wet or too dry, which makes a quick hand squeeze less reliable than measured checks. Moisture validation through weighing bags
Don't correct hydration by opening a sterile bag unless you're ready to reintroduce contamination. If the bag is off by a lot, discarding it is sometimes the cleanest choice.
The other common mistake is mixing up pasteurization and sterilization. Hot-water treatment can work for some straw-based oyster methods, but nutrient-rich supplemented sawdust usually needs validated pressure sterilization. If you treat a rich substrate like a simple straw bag, you're leaving competitors room to win.
For a second opinion on warning signs and prevention habits, this contamination guide pairs well with the moisture check because the two issues often show up together. A bag that's too wet is more likely to contaminate, and a bag that's contaminated often also has a handling or hydration problem hiding underneath it.
Legal Notes and Local Colorado Resources
Colorado Cultures positions its products for adults 21+ and for research and gourmet cultivation use, so the legal and safety frame matters as much as the grow itself. A beginner who keeps the project within that scope, follows sterile technique, and asks questions early usually has a much smoother first run.
Local support helps when the bag stops making sense. The CC Classroom calendar is there for hands-on classes and events, and the Lakewood and Englewood storefronts give you a place to get in-person help. Printable instructions, video tutorials, and responsive support by email or phone matter because first-time growers do better when they can verify a step instead of guessing.
Weekly Tuesday Deals can make the core supplies easier to pick up, and wholesale applications are available for resellers and educators. Qualifying online orders can also include a complimentary house culture upon request, which is useful if you're ready to test a new bag workflow with a known culture source. A beginner who treats sterility like a measurable habit, rather than a vibe, is far more likely to see a healthy first flush.
If you want help choosing a bag, checking your substrate, or tightening up your sterile workflow, Colorado Cultures has the supplies and support to make the process clearer from start to finish. Visit Colorado Cultures to explore grow bags, substrates, classes, and instructions that fit a first-time mushroom project.
Comments