
How to Grow Lingzhi Mushroom at Home: Substrate to Harvest
The usual advice for growing lingzhi sounds simple: inoculate sawdust, keep it warm and humid, and wait for red caps. That advice leaves out the variable that can change the whole project: your strain may not behave like the strain behind the recipe. A useful answer to how to grow lingzhi mushroom at home starts with identifying your culture, separating its growing stages, and measuring conditions instead of guessing.
Why Lingzhi Rewards Precise Conditions
Lingzhi, commonly sold as reishi or Ganoderma lucidum, is a wood-decaying fungus whose cultivation depends on temperature, substrate, acidity, and humidity. A 2021 study found the strongest mycelial growth at 28–32 °C and an optimum pH of 4.5–5.5, useful starting points rather than a guarantee for every culture or growing setup (lingzhi cultivation research).
Those findings don't mean you should heat every bag to the upper limit or adjust an unfamiliar substrate with chemicals. They mean that an unmeasured spare-room shelf isn't a controlled environment. For a Denver home grower, the practical question is what happens around the bag throughout the day, not what the household thermostat says.
Colonization and Fruiting Are Different Jobs
During colonization, mycelium spreads through its food supply. The grower's job is to protect clean material and provide a stable environment while that network develops.
During fruiting, the culture builds the visible mushroom. Humidity, light, and air exchange become deliberate management decisions, particularly if you want expanded caps rather than elongated antlers.
Practical rule: A fully colonized bag is a milestone, not proof that the fruiting environment is ready.
Expect a project measured in weeks and potentially months, not a harvest date you can promise when you inoculate. Strain differences make calendar-based judgments unreliable, especially when the instructions don't identify the culture used.
Define Success Before Buying Supplies
Decide what you want to produce before choosing equipment:
Expanded caps: Plan for deliberate humidity management and adjustable fresh-air exchange.
Antler forms: Treat shape as a production choice, not automatically a defect.
A repeatable learning project: Prioritize a named strain, consistent materials, and a usable grow log.
That last option is the strongest starting point for a beginner. An impressive mushroom is satisfying, but a documented grow gives you something you can troubleshoot and repeat.
Choosing Substrate and Supplies Without Guesswork
Two bags labeled “sawdust” can behave differently. Check the wood species, any supplements, whether the substrate is hydrated and sterilized, and whether the supplier recommends it for your lingzhi culture. The strain and growing conditions matter too, so no substrate label guarantees a fixed result.
Sterile and nutritionally suitable are separate questions. Sterilization limits competing organisms; the substrate provides the material your culture grows on. For a first grow, choose a known hardwood-based formulation and record what you use. The hardwood mushroom substrate guide offers context for assessing hardwood options.
Substrate Choices: Practical Guidance
Substrate | What to check | Practical takeaway |
|---|---|---|
Hardwood sawdust | Confirm the wood species and whether the formulation includes supplements | A reasonable starting point when the ingredients are known |
Oak sawdust | Ask the supplier to identify the wood rather than relying on an unspecified blend | Treat it as one option to test with your culture |
Sawdust with agricultural fiber | Check the fiber type and proportions in the formulation | Handle each blend as a distinct recipe |
Coconut-wood sawdust | Confirm the material's source and whether the supplier recommends it for lingzhi | Evaluate it in a small, controlled comparison before changing a proven recipe |
These are purchasing checks, not a ranking of substrate performance. Trials can use different strains, formulations, and environmental conditions, so results do not establish which option will work best in your grow. To compare materials, hold the culture and setup constant, change one substrate at a time, and note colonization progress and any unusual growth. Slow or uneven results call for checking the culture and conditions as well as the substrate, rather than assuming the wood alone is responsible.
Match Supplies to the Work You Want to Do
Colorado Cultures offers sterilized grain bags, all-in-one grow bags, and substrates, alongside the option of preparing your own materials. Ask about lingzhi compatibility and tool recommendations in Lakewood or Englewood, or by email. A bag designed for one species or process may not suit another.
Sterilized grain bags: Choose these if you plan to establish spawn before transferring it to a fruiting substrate.
All-in-one bags: Consider these if reducing preparation and transfer steps matters more than controlling each ingredient.
Separate substrates: Use these when you're ready to compare formulations and manage the extra handling.
Add a thermometer, hygrometer, labels, and a clean transfer workspace to your supply list. Each tool should help you track or control something specific. Labels and a simple grow log make it easier to tell whether a change in strain, substrate, or conditions explains a different result.
Preparing Spawn and Sterilizing Your Materials
Clean preparation starts before you open the culture. Decide whether you're inoculating prepared grain, transferring established spawn to substrate, or using a bag designed for direct inoculation. Those routes aren't interchangeable, so follow the instructions for the actual product and culture.
The preparation sequence below is a useful workflow overview.
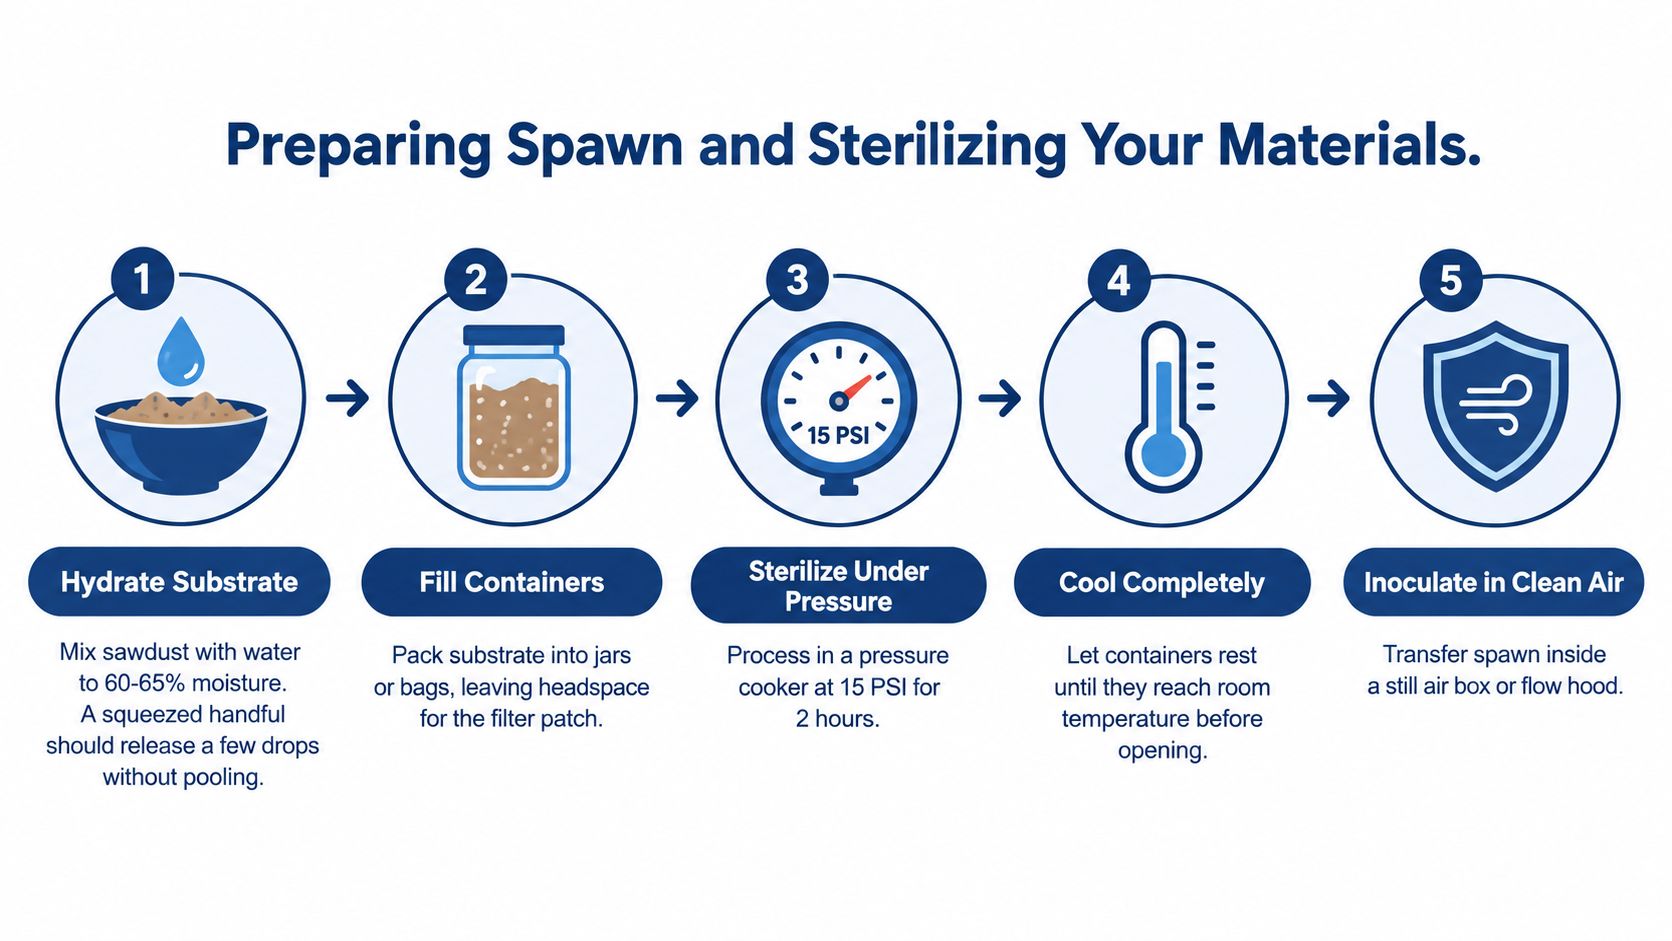
Hydrate and Load Consistently
For homemade sawdust substrate, distribute water thoroughly before checking texture. A squeezed sample should hold together without leaving pooled water. That's a rough handling check, not a substitute for a formulation with a defined hydration method.
Use heat-compatible mushroom bags or suitable jars with the specified filter arrangement. Keep material out of sealing surfaces and leave the filter unobstructed.
Don't seal an improvised container airtight and put it under pressure. Follow the container supplier's preparation instructions and the pressure cooker manufacturer's safety procedures.
A sterilization schedule must match the load. Grain, dense sawdust blocks, container sizes, and loading arrangements shouldn't automatically receive the same treatment. The infographic's fixed schedule isn't a universally validated cycle for every home setup.
Use a load-specific procedure: Obtain the processing schedule from a reliable substrate or equipment supplier.
Start timing correctly: Follow the cooker's venting procedure and begin the timed hold only after it reaches the specified operating pressure.
Respect cooling: Allow safe depressurization and complete cooling before inoculation.
Don't shorten cooling because the outside of a bag feels comfortable. Follow the procedure for the entire load.
Make Transfers Deliberate
Clear the workspace before bringing in sterilized materials. Wipe suitable surfaces with isopropyl alcohol, let them dry, and organize culture, tools, labels, and closures within reach.
Use a still-air box or properly operated flow hood for exposed transfers. Keep open containers open only as long as necessary, and avoid moving hands or tools over exposed material.
Clean handling isn't about moving frantically. It's about removing unnecessary movements before the bag opens.
Keep flames away from alcohol and alcohol vapors. A still-air box doesn't need a flame inside it, and adding one creates an avoidable fire hazard.
Label each container with strain, substrate, inoculation date, and preparation batch. Consider a flow hood when you're doing repeated transfers and can justify maintaining dedicated equipment, not as a substitute for learning an orderly workflow.
Incubating Colonization in the Dark
Once the bag is inoculated, restraint becomes part of the work. Put it somewhere warm and stable, protected from direct sunlight, and position it so you can inspect it without repeatedly handling it.
A dark incubation shelf is convenient, but don't mistake darkness for the main control. Temperature stability, intact filtration, and the culture's own requirements deserve more attention than whether a cupboard is perfectly lightproof.
Watch the Pattern, Not Just the Calendar
Look for expanding mycelial coverage and compare the same areas over time. Photographs taken from a consistent angle make small changes easier to judge than memory does.
Research comparing lingzhi strains found primordia after 19.6 versus 41.1 days, with differing responses to aeration and light (strain-dependent lingzhi cultivation results). Those are experimental observations, not promised home pinning dates.
A slower bag isn't automatically a failed bag. The useful distinction is slow but progressing versus stalled with a changing appearance.
Keep a Log You'll Actually Use
Record observations briefly and consistently:
Culture identity: Include the supplier and strain designation.
Conditions: Record measured temperature near the bag and any changes to its location.
Progress: Note where growth is advancing and whether previously bare areas are filling in.
Interventions: Write down handling, mixing, or equipment adjustments rather than relying on memory.
Don't break and shake every container just because that's common advice for grain. Ask whether the bag's design and the culture supplier's method call for redistribution. A grain-spawn step isn't automatically appropriate for a consolidated sawdust block.
Keep the filter patch clear and follow the bag's intended closure method. If progress remains visible, continued observation is usually a better first response than opening the container to investigate.
Triggering Fruiting With Humidity and Fresh Air
A colonized block doesn't become a successful fruiting setup just because you move it to another shelf. Prepare the fruiting chamber first, check its measurements, and then make the bag opening or exposure change recommended for your kit.
Use the kit image as an orientation point for observing emerging growth.
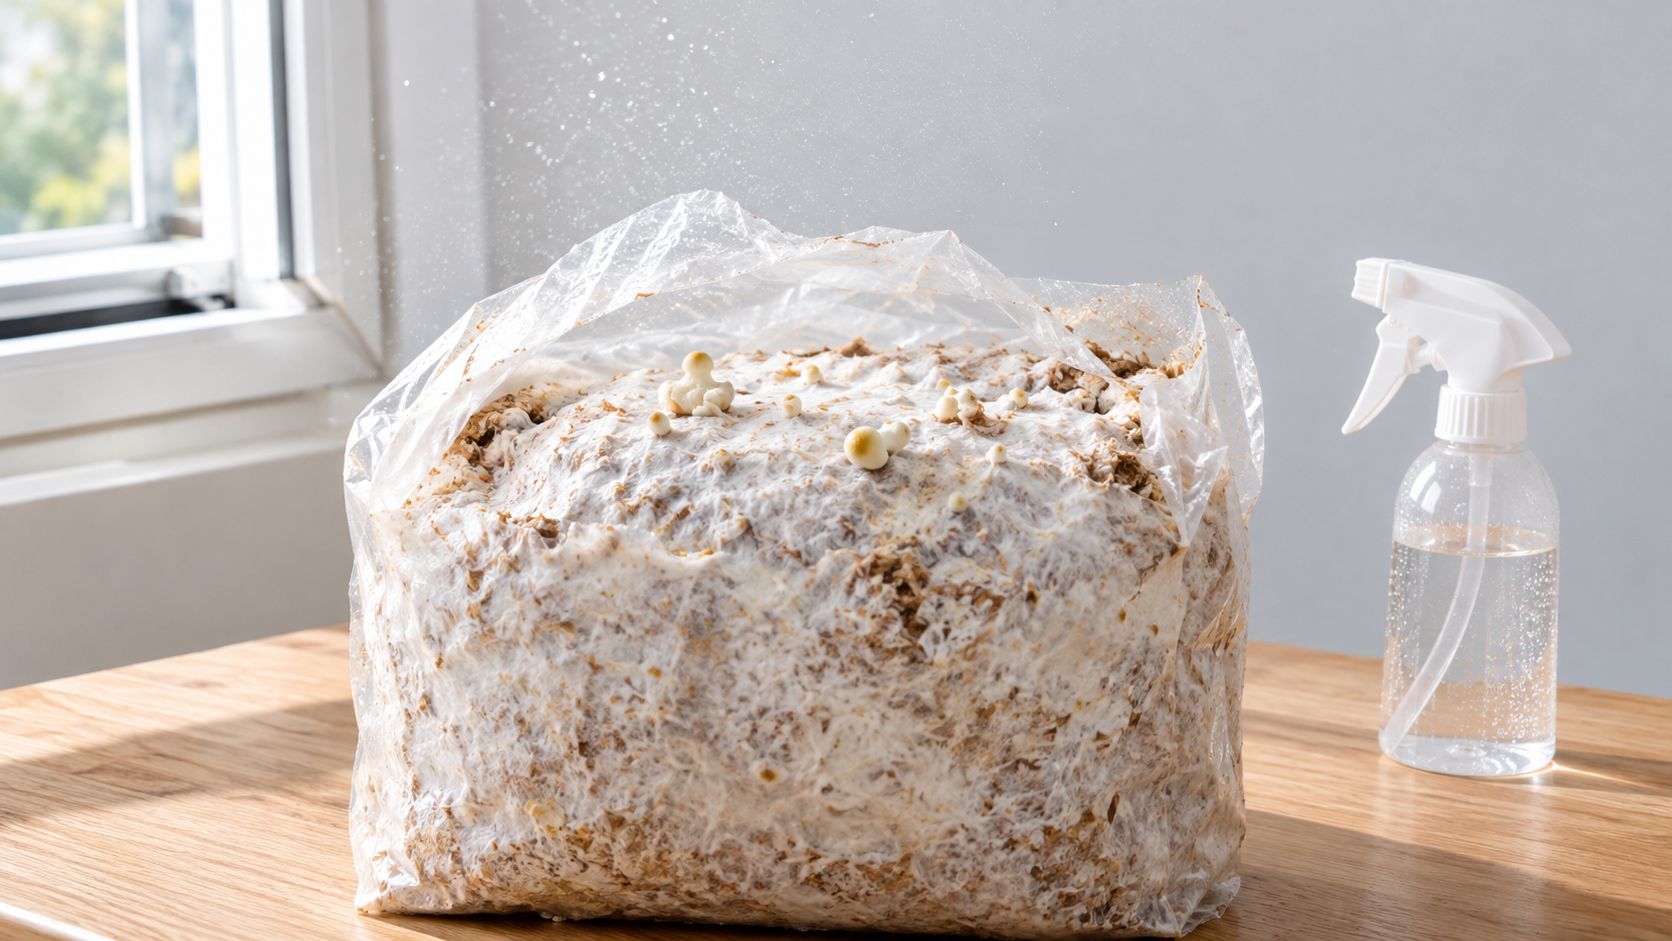
Support Expansion Without Saturating Everything
Historical cultivation research identified 85–95% relative humidity as essential for an intact, expanded cap under the conditions described, while insufficient humidity produced a staghorn-like form (research on lingzhi cultivation and cap development).
That finding supports deliberate humidity management. It doesn't prove that pushing every chamber toward saturation will improve every strain.
Measure the air near the developing mushrooms, not only beside the humidifier outlet. Adjust humidification to support the crop without treating condensation on plastic as your humidity reading.
Humidity: Use the hygrometer to assess the chamber rather than estimating from visible droplets.
Fresh air: Provide adjustable exchange instead of choosing between a sealed box and an exposed shelf.
Light: Follow strain-specific guidance and keep lighting changes separate from ventilation changes.
The humidity and airflow cultivation guide can help you plan those controls together.
Read the Developing Shape
Watch the small protrusions as they enlarge. Photograph their tips, developing margins, and overall direction of growth so you can distinguish continued development from a stalled structure.
Don't diagnose an early projection as a failed cap before it has developed enough to judge. If the shape differs from your target, check the measured environment before making an adjustment.
Use the video alongside the written instructions for your particular bag.
Change a single environmental variable at a time and record what you changed. Increasing ventilation while also moving the chamber and changing humidification leaves you unable to identify which adjustment mattered.
Diagnosing Slow Growth, Antlers, and Contamination
A slow bag or an unexpected shape does not point to one universal fix. Lingzhi response depends on strain and conditions, so first separate possible contamination from a mismatch during colonization or fruiting. Check the culture's own guidance and your recorded conditions before changing anything.
Use the chart to identify what to inspect, not as a universal temperature prescription or a diagnosis based on color alone.
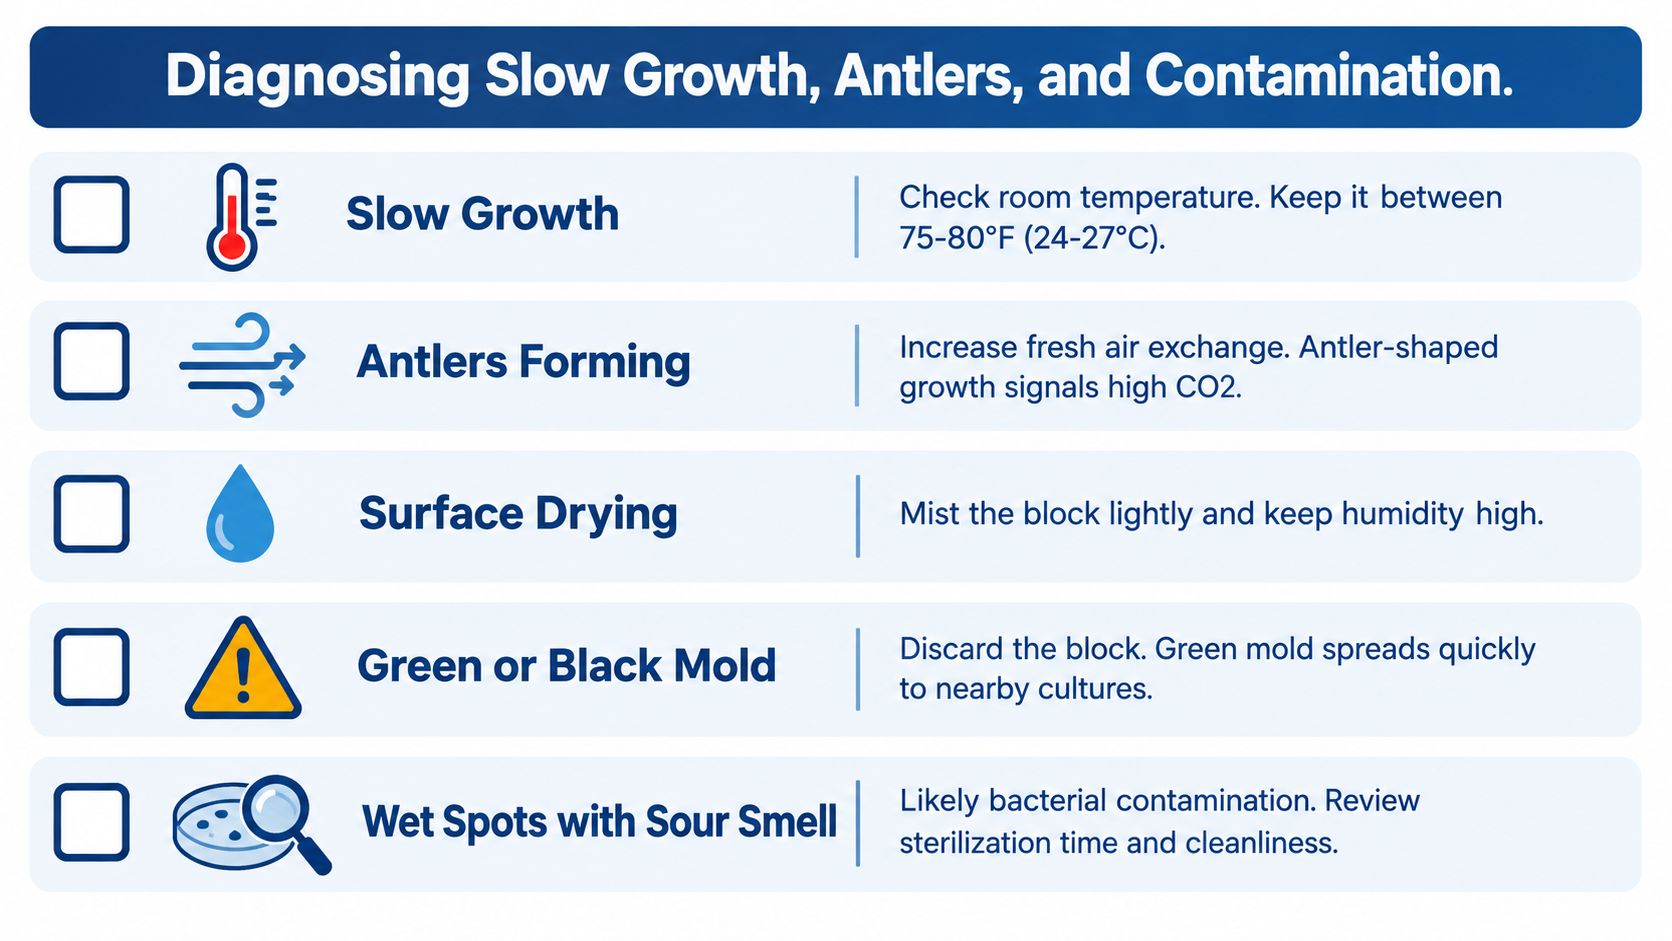
Work Through the Checks in Order
Possible contamination: Unexpected spreading patches or an apparent foul odor are reasons to isolate the closed bag. Don't open it indoors or sniff it to confirm a suspicion.
Temperature mismatch: Check the actual reading near the culture before adjusting the heat.
Restricted gas exchange: Check the filter and closure arrangement against the bag supplier's instructions.
Strain differences: Compare progress with your culture's guidance and your records, not an unrelated grower's harvest photo.
For disposal and prevention steps, use this mushroom disease management guide. Don't cut away a visible patch and return a suspect block to the growing area.
Antlers Aren't Automatically Failure
Lingzhi can develop antler forms under more than one controlled condition. In the cited research, dark conditions and airless conditions produced shiny, reddish-brown antlers without spores. A separate light-plus-airless treatment also produced antler-shaped bodies. The study reports specific dimensions and dry yield for its experimental setup, but those figures do not predict results from a different strain, substrate, or home grow (controlled lingzhi morphology research).
The findings show that unusual morphology can be a repeatable cultivation outcome. They do not establish equivalent potency, an ideal home setup, or a guaranteed yield.
Judge the shape against your intended crop, not against a photograph on a kit label.
If ornamental antlers suit your goal, record the outcome. If you want expanded caps or spore collection, reassess the fruiting setup using your strain guidance. Keep strain, substrate preparation, environmental readings, and days to pinning together. Those records help distinguish a condition-driven change from normal variation between grows.
Harvesting Lingzhi and Your Next Step
Harvest by visible development, not by a fixed number of days. On expanded caps, look for the pale growing margin to stop widening and the cap's color and surface to stabilize across observations. A dusty coating can signal spore release, but use it alongside those signs, not as the sole cue.
Antlers need a different check: harvest when the tips have stopped lengthening and the glossy reddish-brown surface has settled into its mature color. Strain and growing conditions affect timing, so record what you see rather than assuming every crop follows the same schedule.
Harvest Cleanly and Dry Thoroughly
Set out a clean cutting tool and drying space first. Cut at the base, keeping substrate debris off the crop.
Dry in a food dehydrator at about 45–50°C (113–122°F), checking progress rather than relying on a set time. Thick pieces take longer than thin ones. The pieces are ready when brittle throughout and snap cleanly; if unsure, weigh them, dry longer, then reweigh. A stable weight after another drying interval is a practical check that moisture has stopped escaping.
Before storage: Let the crop cool, then seal it only when fully dry.
During storage: Use a clean, airtight container in a cool, dark place. Check for condensation or deterioration.
For your records: Label the harvest with its strain and batch.
Make the Next Grow a Useful Comparison
Choose one change based on the result. If caps stayed small, adjust one fruiting condition, such as fresh-air exchange, while keeping the culture and substrate method the same. Record the strain, preparation, temperature and humidity readings, form, harvest date, and drying endpoint. Compare dry yields only when both batches reach the same dryness test.
Colorado Cultures offers sterilized grain, all-in-one grow bags, substrates, and grow kits, plus printable instructions, video tutorials, and support by email, phone, or in person. Visit Colorado Cultures to choose a lingzhi-compatible starting option or check the CC Classroom calendar. Label your first bag and log its inoculation date.
Comments