
Outdoor Grow Tent Guide for Mushroom Cultivators
Your first all-in-one bag fruited on the kitchen counter, and it worked. Now you've got three more bags colonizing, a partner or roommate asking when the spare bathroom stops smelling like substrate, and a porch or backyard corner that looks perfect. Moving outside sounds simple until the first Colorado afternoon thunderstorm hits and your humidity, temperature, and fresh air all change at once. An outdoor grow tent can solve the space problem, but only if you run it like a small environmental chamber exposed to weather, not like an indoor tent that happens to sit on a deck.
Why Hobbyists Are Moving Their Mushroom Tents Outside
It usually starts the same way. A first flush succeeds indoors, you order more grain and substrate, and suddenly colonizing bags are stacked on shelves, in closets, and on top of the refrigerator. The porch, balcony, or shaded side yard becomes the obvious expansion space, especially in the Denver metro where a small apartment can feel full after two cycles.
The first weekend outside teaches the lesson. A grower sets up a tent on a calm morning, dials in the humidifier by lunch, then watches a thunderstorm roll in, temperatures drop, and condensation form on the inside walls by dinner. Nothing in most indoor tent guides prepares you for that sequence because those guides assume the room around the tent stays stable.
The Appeal Is Real, and So Are the Trade-Offs
Outdoor space lets you fruit more blocks at once, keep humid fruiting conditions out of living areas, and use natural seasonal coolness for species that prefer it. You also gain separation between clean indoor colonization work and the messier, wetter fruiting stage. That's a legitimate upgrade in workflow, not a step down in seriousness.
The costs show up quickly too. Wind works at seams and zippers, direct sun heats a small enclosure fast, and outdoor air carries more spores, insects, and dust than a closed room. A tent that looked sturdy in a product photo can flap, pool water on the roof, or cook your blocks by midafternoon if you place it wrong.
Portability is part of why growers accept those trade-offs. Portable tents represented 28.3% of the grow tent market in 2025 in one estimate that valued the global market at approximately USD 1.2 billion and projected USD 2.2 billion by 2034, according to Marketintelo's grow tent market report. That share tells you temporary, relocatable growing space isn't a fringe idea. Hobbyists want capacity they can move, expand, or take down between seasons.
Most tent advice online is written for cannabis growers chasing light intensity. Mushroom growers need humidity, fresh air, and contamination control first, and light is a distant fourth.
That mismatch is where beginners lose flushes. Cannabis guidance pushes bigger lights and bigger exhaust fans, while a mushroom tent fails from stagnant air, pooling condensation, or a fan pulling in hot, dirty afternoon air. Once you understand you're managing weather, not just equipment, the rest of your decisions get clearer.
What an Outdoor Grow Tent Actually Does for Mushrooms
An outdoor grow tent is a temporary, portable enclosure that creates a more controlled microclimate outside a permanent greenhouse or building. It isn't a miniature greenhouse and it isn't a sealed indoor chamber. It sits between the two, and that middle position defines both its usefulness and its limits.
Researchers use the same basic concept to isolate variables in the field. A university field-tent system paired heated and outdoor-control tents and produced an average temperature increase of 3.773 °C compared with control areas in a wheat trial, as described in Kansas State University's field-tent research document. Even a simple enclosure measurably changes growing conditions. Your job is making sure it changes them in the direction mushrooms need.
The Three Jobs the Tent Must Do
Block direct weather: Keep rain off blocks and equipment, break wind that dries pinning surfaces, and shade the fruiting space from direct sun.
Hold humidity: Maintain moist air around the blocks even when Colorado's dry outdoor air would strip it away within hours.
Control fresh-air exchange: Vent carbon dioxide out and bring oxygen in on your schedule, not whenever the wind pushes through a loose seam.
A greenhouse mainly traps solar heat for plants. Mushrooms don't want that heat, and they don't photosynthesize. They want stable moisture and steady gas exchange, which means your tent needs active equipment working together rather than passive warmth from the sun.
Incubation Conditions Are Not Fruiting Conditions
One educational cultivation system ran a portable tent with a humidifier, ventilation fan, and LED lighting, holding incubation at 21 to 24 °C in darkness, then switching to higher humidity, light exposure, increased fresh-air exchange, and carbon dioxide below 600 ppm for fruiting, as detailed in a peer-reviewed mushroom cultivation system study. Two distinct setpoints, one enclosure. Your controller and equipment layout need to handle both modes without you rebuilding the tent mid-cycle.
That study system also shows why enclosure size alone doesn't determine results. Performance came from coordinated airflow, humidity, light, and substrate management. A large tent with one small humidifier and no exhaust plan will underperform a compact tent where every component has a defined job.
Treat the tent as experimental infrastructure for your backyard. You're comparing ambient conditions outside the walls with a modified microclimate inside them. When you think that way, you stop asking whether a tent is waterproof enough and start asking whether you can hold fruiting conditions through a hot afternoon and a cold night in the same day.
Comparing Tent Materials, Frames, and Weatherproofing
Fabric and frame choices decide whether your tent survives a season of Colorado wind or sagging after the first storm. Mushroom growers should shop differently from plant growers. You don't need a tent built around hanging heavy lights. You need sealed seams, cleanable surfaces, and ports positioned for humidification and exhaust.
Heavier fabric resists tearing where poles flex and where zippers stress the material. Thinner fabric saves money and weight, but it also flaps more, wears faster at contact points, and tears more easily when you're moving blocks in and out with wet hands. Whatever you choose, inspect stitching and zipper quality first, because those fail before flat panels do.
Outdoor Grow Tent Features Compared for Mushroom Cultivation
Feature | Basic Outdoor Tent | Mushroom-Ready Outdoor Tent |
|---|---|---|
Fabric | Lightweight single-wall material | Heavier fabric with reflective interior |
Frame | Thin poles, minimal bracing | Sturdier poles with corner reinforcement |
Ventilation ports | One generic opening | Separate intake and exhaust ports |
Floor | Open or loose ground sheet | Sealed, removable floor tray |
Zippers | Light-duty, single closure | Heavy-duty with overlapping flaps |
Interior surface | Plain fabric, hard to wipe down | Smooth reflective liner, easier to clean |
Why the Interior Liner Matters More Than You Think
A reflective, light-tight liner does two useful things for mushrooms. It spreads low-wattage fruiting light evenly so blocks on lower shelves don't sit in shadow, and its smooth surface wipes clean between cycles. In a peer-reviewed prototype, a 1.5 by 1.5 by 2 m plant-growth tent with reflective interior walls was described as practically light-tight, with 13 mm insulation foam boards added to the sides, top, and back, in PLOS ONE's plant growth tent prototype article. That same insulation logic slows heat exchange with outdoor air in your yard.
You probably won't need plant-level light output. That prototype produced 140 to 250 µmol·m⁻²·s⁻¹ of photosynthetically active radiation for research plants, well beyond what fruiting mushrooms require. Spend your electrical capacity on humidification, filtration, and ventilation instead, and let a small LED handle the light cue.
Ports and Layout Beat Raw Size
Separate intake and exhaust ports: Lets you pull fresh air low and push stale air high instead of short-circuiting both through one hole.
Room for ducting and a humidifier: Equipment crammed against blocks creates wet spots, dry pockets, and knocked-over gear.
A door you can open with full hands: You'll carry blocks through it constantly, so a wide, smooth zipper matters more than viewing windows.
Double-wall construction and heavy insulation earn their price in shoulder seasons when nights get cold. Fancy observation windows and tool pouches do not. Pay for fabric, frame, zippers, and ports. Skip features designed to photograph well.
Field rule: If you can't wipe the interior clean and anchor the frame against wind, the tent isn't mushroom-ready no matter what the listing claims.
Ventilation, Humidity, and Seasonal Control
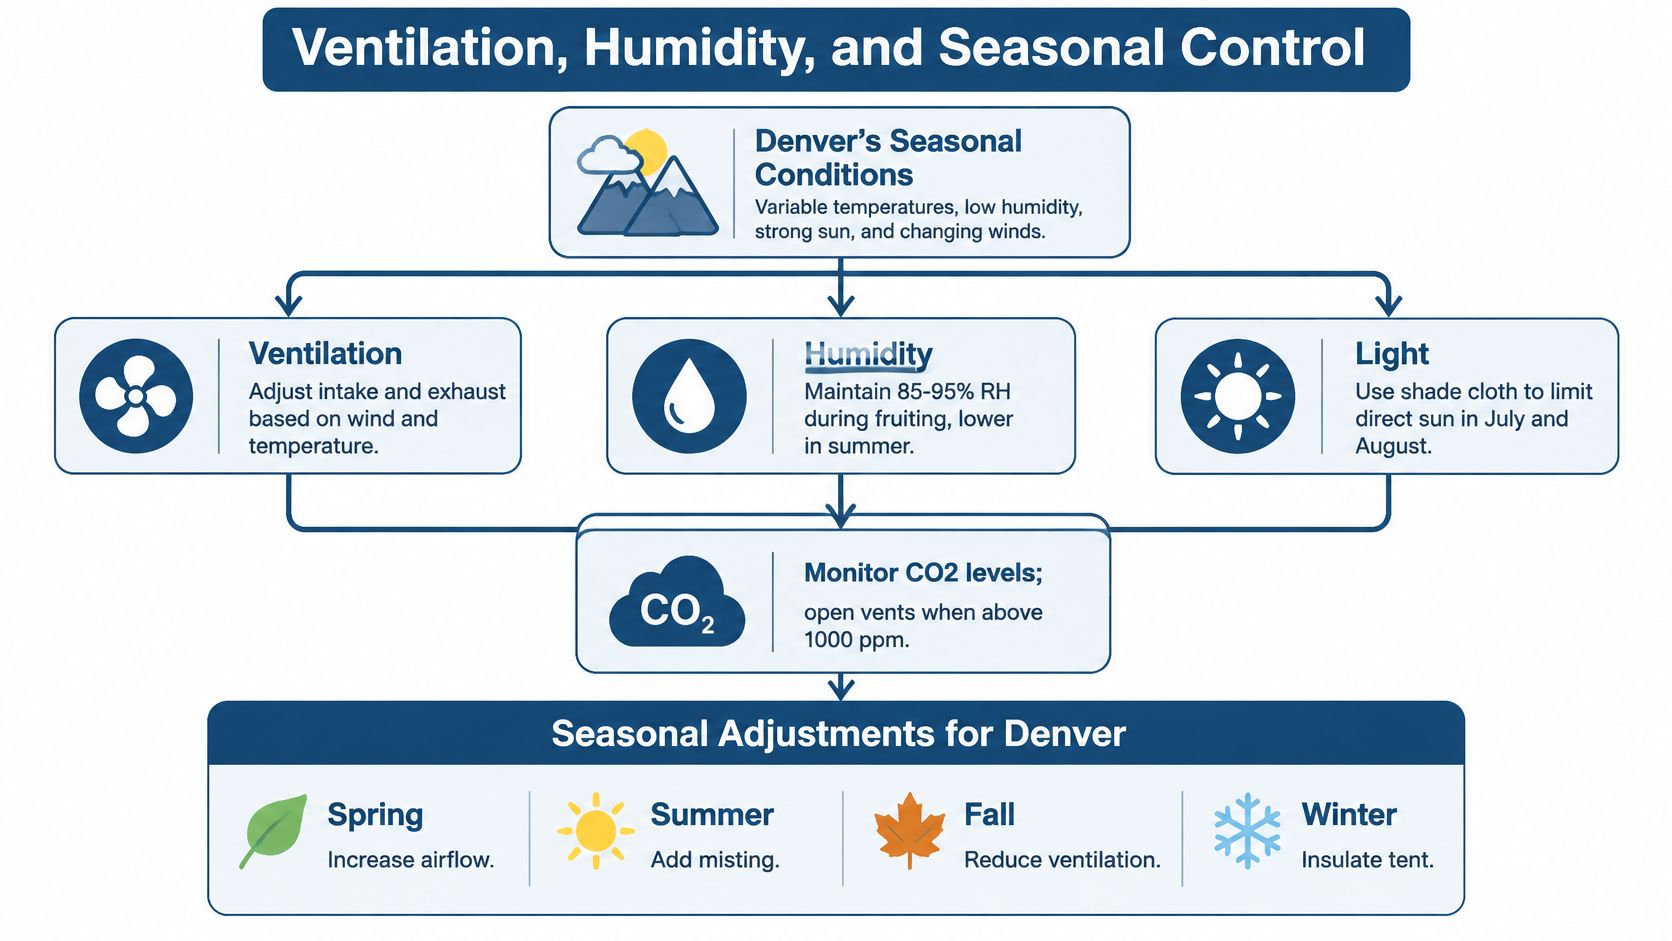
Ventilation, humidity, light, and carbon dioxide form one system outdoors. Change one and the others move, sometimes in the wrong direction. This is the part most guides skip, because indoor advice assumes the air outside the tent is a stable resource. Outside, that air is your biggest variable.
The diagram below maps how those decisions shift across Denver seasons.
Why a Bigger Fan Can Make Things Worse
Ventilation replaces inside air with outside air. On a hot, humid afternoon, a larger exhaust fan imports hot, humid air faster. Greenhouse guidance separates operation into winter, summer, and transitional weather, and notes that humidity above 90% promotes rapid fungal-disease development, in University of Florida IFAS greenhouse ventilation guidance. Your fan is a tool, not a solution by itself.
Condensation follows dew-point logic, not effort. Warm, humid air touching a surface colder than its dew point drops water on that surface, and air at 70°F and 70% relative humidity can condense on surfaces at 60°F or below, per that same guidance above. Overnight in Colorado, tent walls cool fast while your humidifier keeps pumping. That's when walls drip onto blocks and electrical gear.
A Weather-Based Decision Routine
Hot, sunny afternoons: Shade the tent with a reflective cover or shade cloth first, then vent. Shading removes heat load instead of fighting it with airflow.
Cool, dry mornings: Vent freely. This is your best window for fresh-air exchange without importing heat or excess moisture.
Humid storms and muggy evenings: Pause misting and reduce humidifier output. Outside air can't dry the tent, so adding more water only feeds condensation.
Sharp overnight drops: Cut humidity before temperatures fall, insulate exposed walls, and move sensitive blocks indoors if walls will sit below the dew point for hours.
In winter, vent in short bursts to dump humidity without overcooling the crop. In summer, shade and vent early, before solar gain builds, and consider active cooling if the tent sits anywhere near direct sun. Transitional spring and fall weather demands daily adjustment, which suits Denver fine because you're already checking the forecast for freeze warnings. For a deeper walkthrough of balancing these variables, this guide to temperature, humidity, and fresh air for mushroom growing covers the indoor fundamentals you'll adapt outdoors.
When you're sizing fans and ducting for this kind of seasonal control, browsing broader ventilation equipment options can help you compare airflow hardware beyond hobby grow brands. Match the fan to your tent volume and controller, not to the biggest number on the box.
Sensor Placement Changes Everything
Put sensors at crop height, near the blocks, not in the exhaust stream and not next to the humidifier outlet. A sensor in the exhaust path reads air that's leaving, so your controller responds to conditions your mushrooms aren't experiencing. A sensor beside the mister reads saturated air and shuts humidity down while the far shelf dries out.
Keep the fan and humidifier sheltered from direct rain even inside the tent, and route ducting so condensate drains away from blocks. Small placement decisions like these prevent the false readings and localized dripping that beginners often blame on bad genetics or weak substrate.
Pest Control, Contamination, and Electrical Safety
Outdoor fruiting adds three risks on top of standard sterile technique. Pests find the tent, wild spores ride in on intake air, and powered equipment sits in a wet enclosure. None of these is a reason to stay indoors, but each one punishes growers who assume the tent fabric handles it automatically.
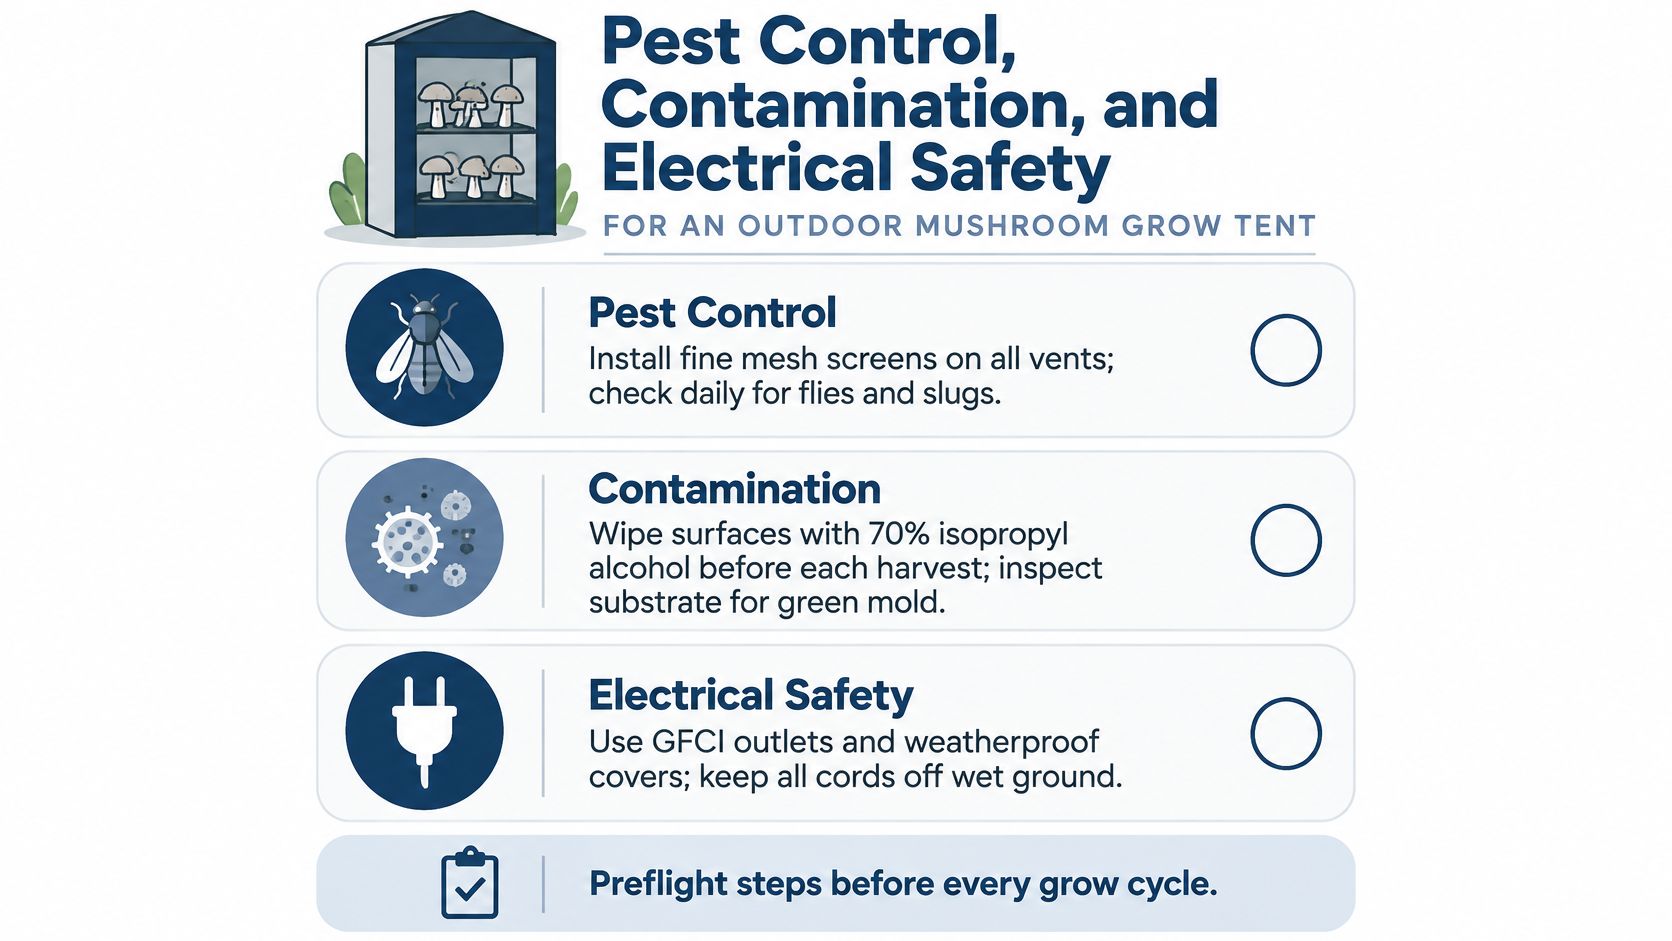
The checklist below summarizes the preflight habits that keep those risks manageable.
Keeping Pests and Spores Out
Fungus gnats and flies locate fruiting blocks by smell, slugs arrive after rain, and rodents investigate anything that smells like grain. Fine mesh on every intake, a sealed floor tray, and a door you zip shut between visits stop most of them. A filtered intake also cuts the spore load in incoming air, which lowers contamination pressure on exposed substrate surfaces.
Check blocks daily during fruiting and remove anything that looks off before it sporulates inside a closed, humid space. If you're unsure what you're looking at, this mold identification guide helps you separate healthy mycelium from common contaminants. For the yard around the tent, managing the broader pest picture matters too, and these eco-friendly extermination insights offer a useful homeowner-level perspective on reducing pest pressure without drenching your growing area in chemicals.
Position blocks so irrigation and condensation runoff flow away from cords and equipment. Raise shelves instead of setting blocks on the floor, where slugs and standing water collect. Clean the liner and tray between cycles, because a tent that starts dirty rarely finishes clean outdoors.
The Electrical Preflight Checklist
A tent wall does not make indoor-rated equipment outdoor-safe. Safety authorities state that outdoor and damp-location receptacles require ground-fault protection, and the U.S. Consumer Product Safety Commission warns that moisture entering outdoor outlets can cause malfunction, shock, or fire, in the CPSC guide to ground-fault circuit interrupters. That document also advises weatherproof-in-use covers where outlets operate in wet weather.
Run this check before every fruiting cycle:
Use a GFCI-protected outdoor circuit and test the device before plugging anything in.
Keep every connection raised off the ground and shield it from direct precipitation.
Keep powered devices out from under misting or humidifier discharge so they aren't dripping by design.
Inspect cords for damage where they pass through ports or under the door.
Shut the system down during severe weather rather than letting wind-driven rain test your setup.
If a fan or humidifier isn't rated for damp conditions, the inside of a wet tent is still a damp condition. The fabric changes nothing about that rating.
Best-Use Scenarios for Outdoor Mushroom Tents
Outdoor tents work best as a supplement to indoor colonization, not a replacement for it. Keep sterile work and colonization inside where you control the air, then move finished blocks out to fruit. These scenarios match how Denver-area hobbyists use the extra space.
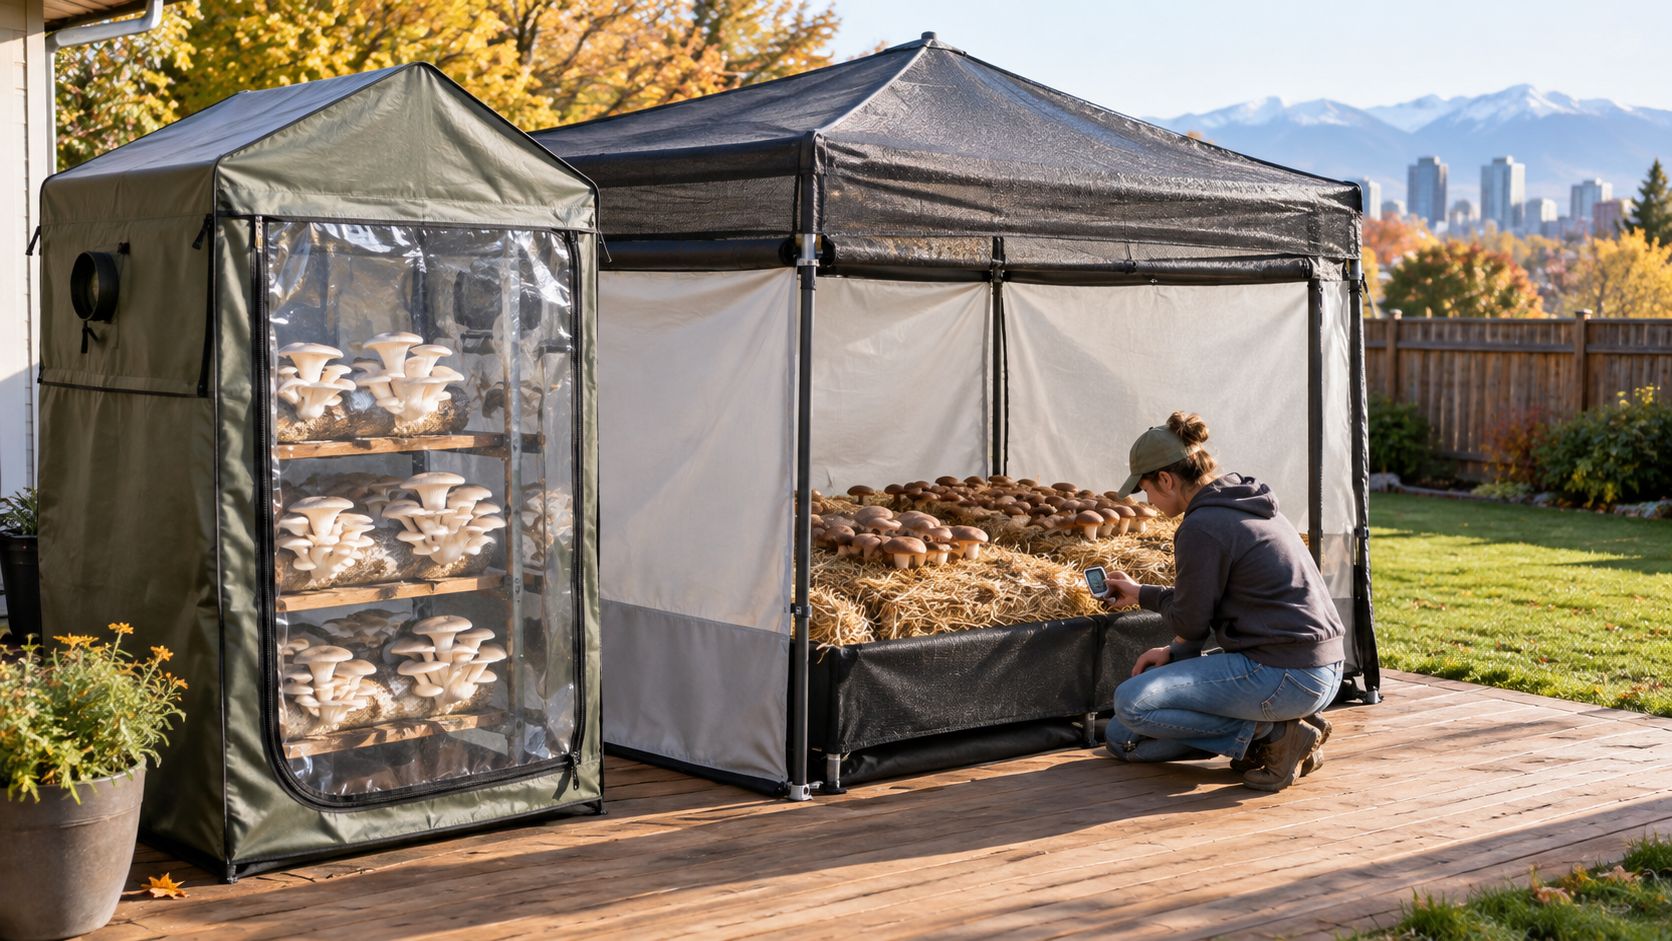
The photo below shows a typical deck setup at the scale most beginners start with.
Matching the Scenario to the Setup
Shoulder-season gourmet fruiting suits oyster and wine cap mushrooms on supplemented sawdust, when spring and fall temperatures do part of the cooling work for you. A modest tent with a humidifier and one exhaust fan handles this well. Bulk fruiting of finished blocks is the second common pattern, where blocks colonized indoors move outside in batches so your indoor shelves turn over faster.
Side-by-side strain trials make good use of a larger tent with shelf tiers, letting you compare genetics under identical weather. That only works if your sensors sit at crop height and every tier gets comparable airflow, otherwise you're comparing shelf positions. Season extension for cold-tolerant species stretches fruiting later into fall with insulation on exposed walls and reduced overnight ventilation.
For broader context on taking cultivation outside beyond a tent, this overview of outdoor mushroom cultivation covers beds and logs alongside enclosure methods. Tents win when you want control and repeatability. Beds win when you want low effort and can accept seasonal timing.
The walkthrough below shows a small tent fruiting setup in operation, which makes the equipment layout easier to picture.
What doesn't belong outside is uncolonized substrate, fresh inoculations, or anything still vulnerable to competitors. The tent fruits finished work. Your indoor space protects work in progress, and keeping that division clean is the single habit that makes outdoor growing reliable.
Legal, Safety, and Final Recommendations
Grow responsibly and know what you're cultivating. Colorado Cultures serves adults 21+ and positions its products for research purposes, offering sterilized grain bags, all-in-one grow bags, substrates, and tools prepared under rigorous sterilization standards, plus a Martha Tent, 4-Tier with Durable PE Cover, for growers who want a compact shelved fruiting enclosure. Printable instructions and in-person help at the Lakewood and Englewood storefronts support beginners through a first outdoor cycle.
Deciding Where Your Tent Belongs
Set up outdoors if you've got shaded, anchored space, a GFCI-protected circuit, and finished blocks ready to fruit in spring, summer mornings, or fall.
Modify an indoor tent if your only outdoor spot takes direct afternoon sun or heavy wind, and add insulation plus a proper exhaust plan instead.
Stay fully indoors for winter fruiting, sensitive species, or high-contamination urban settings where intake air stays dirty and nights run cold.
Safety rules from the sections above don't relax because a flush looks promising. Keep connections off the ground and protected, shut down in severe weather, and never treat an indoor-rated device as weatherproof because it's under fabric. A lost cycle costs you substrate. An electrical failure in a wet enclosure costs far more.
Start smaller than you think you need. One modest outdoor grow tent, a humidifier, a correctly sized fan, a controller with sensors at crop height, and a weather-based routine will teach you more in one season than a large tent run on guesswork. Expand after you've fruited successfully through a thunderstorm, a heat spike, and a cold snap. That's when you know your system.
Ready to fruit your first blocks outside without guessing on supplies? Colorado Cultures stocks sterilized grain bags, all-in-one grow bags, substrates, and tent gear prepared for Denver-area hobbyists, with printable instructions and staff who can talk through your setup in Lakewood, Englewood, or online. Stop by, bring your questions about ventilation and humidity, and leave with a plan sized to your porch, deck, or backyard.
Comments