
Aseptic Technique Equipment: A Practical Reference
You open a jar expecting clean growth and find a spreading patch of color instead. The frustrating part is that contamination rarely points to one dramatic mistake. A hand touched the wrong surface, a tool cooled on the bench, a lid stayed open too long, or the work area carried more dust than you realized.
Aseptic technique equipment helps control those opportunities. It doesn't replace careful habits, and it doesn't make every procedure sterile by itself. It gives each step a physical defense, from preparing tools and cleaning surfaces to controlling airflow and protecting open cultures. Use this guide as a practical bench reference, then adapt the equipment to the work you perform.
Why Aseptic Technique Equipment Matters for Home Cultivators
Aseptic technique equipment is the collection of tools, barriers, surfaces, and environmental controls used to keep unwanted microorganisms away from cultures during preparation, transfer, and handling. A glove protects against contact. A disinfectant reduces contamination on a surface. A still-air box or filtered hood limits what reaches an open container through the air. Each item solves a different problem.
Home cultivators usually don't have a sealed laboratory room with controlled ventilation. That makes the bench, containers, clothing, hands, and air around the work especially important. The equipment becomes a substitute barrier, but only when the user understands what each part can and can't do. A hood won't correct careless contact, and clean gloves won't correct a dusty work surface.
For a plain-language introduction to the underlying practice, this explanation of sterile technique is useful before you start assembling equipment. Think of aseptic work as a sequence of protected handoffs. You prepare the tool, clean the surface, put on the barrier, open the container briefly, complete the transfer, and close the container again.
Practical rule: Before buying equipment, identify the protection job your workflow currently lacks.
Write down your actual procedure. Are you preparing media, transferring to agar, inoculating a sealed bag, or handling several open plates? The right purchase depends on that answer. A beginner may need better contact control and a calmer work area, not a large cabinet. Someone handling frequent open transfers may eventually need validated filtered airflow. Start with the gap, not the price tag.
How Modern Aseptic Equipment Evolved
Modern equipment grew from a simple problem, keeping airborne particles and microbes away from exposed materials. Steam sterilization of surgical materials in Berlin in 1885 marked an early step toward modern aseptic surgery, while later work associated with the U.S. Army Chemical Corps, Naval Research Laboratories, and the Atomic Energy Commission helped advance HEPA filtration in the 1940s and 1950s (historical review of aseptic equipment).
By the late 1950s, HEPA-filtered laminar flow clean benches were enabling sterile-air workspaces for small-scale pharmacy compounding. Class II laminar flow biological safety cabinets then spread through oncology and hematology pharmacy in the late 1970s, and were described as almost universal by the end of the 1980s in the same historical account.
That progression explains why today's equipment is organized around a few recurring ideas: filtered air, controlled surfaces, physical barriers, and repeatable sterilization. Consumer products didn't appear in isolation. They reflect practices developed for pharmacy, cell culture, surgery, and other settings where contamination can compromise the work.
The important lesson for a home cultivator is that no single item represents aseptic technique. A modern setup works as a chain. If one link fails, the filter, glove, or disinfectant can't compensate for every other weak point.
The Four Protection Jobs Your Equipment Must Cover
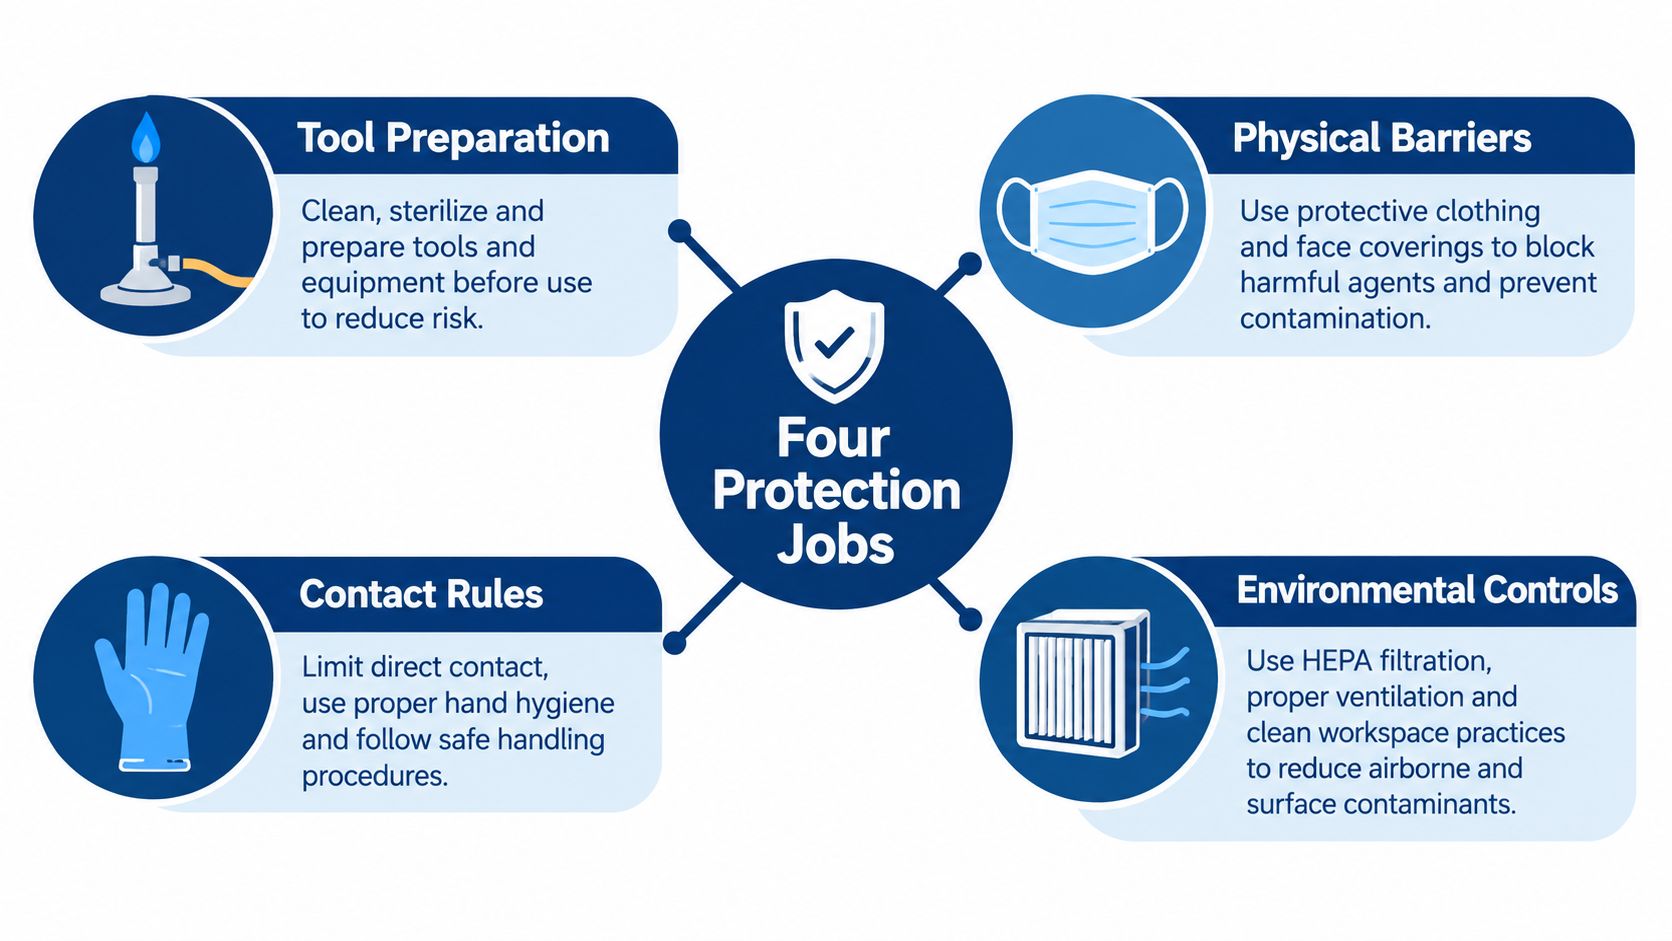
A useful buying framework divides aseptic technique equipment into four protection jobs. The categories prevent a common beginner mistake, treating every item labeled sterile as interchangeable.
Tool preparation makes instruments safe before they touch a culture. Autoclaves, pressure sterilizers, heat sources, and sterile disposable tools belong here.
Physical barriers separate the work from people and clothing. Gloves, masks, gowns, hair coverings, sleeve covers, and the enclosure around a clean-air workspace all serve this purpose.
Contact rules control what hands, tools, containers, and surfaces touch. Disinfectants support these rules, but the operator still has to maintain them.
Environmental controls manage the air and surrounding workspace. Still-air boxes, laminar flow hoods, biosafety cabinets, and room-cleaning practices fit this category.
The distinction matters because a glove can't sterilize an instrument, and a HEPA filter can't stop a contaminated fingertip from touching a lid. Guidance for aseptic technique similarly separates preparation, barriers, contact practices, and environmental control rather than treating them as one universal equipment list (clinical overview of aseptic technique).
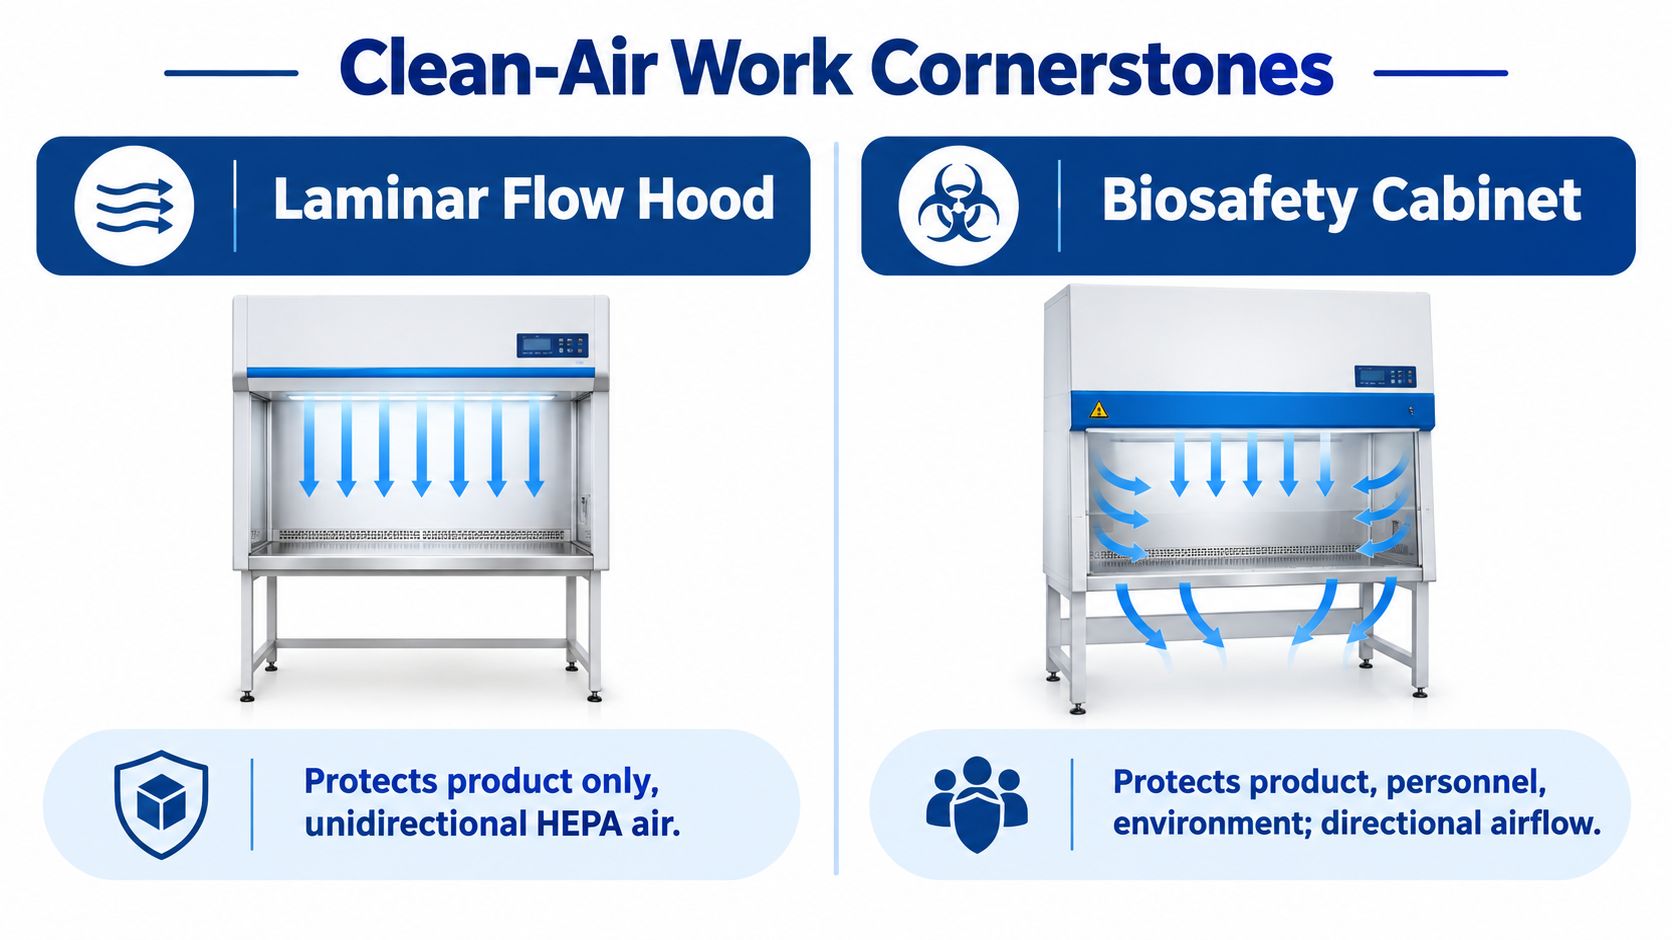
A clean-air device also needs a clear purpose. A laminar flow hood generally protects the product, while a biosafety cabinet is designed to provide broader protection for the product, personnel, and environment, depending on its class and certification.
The same logic appears outside laboratories. A practical guide to preventing cross contamination in hospitality reinforces the value of separating clean and dirty contact points. On a cultivation bench, that means planning where used tools, clean containers, gloves, and waste will go before the transfer begins.
Map your procedure against the four jobs. If tools are prepared but the air is uncontrolled, improve the environment. If the air is clean but you keep reaching across dirty items, improve contact rules. This simple audit keeps purchases focused.
Laminar Flow Hoods and Biosafety Cabinets
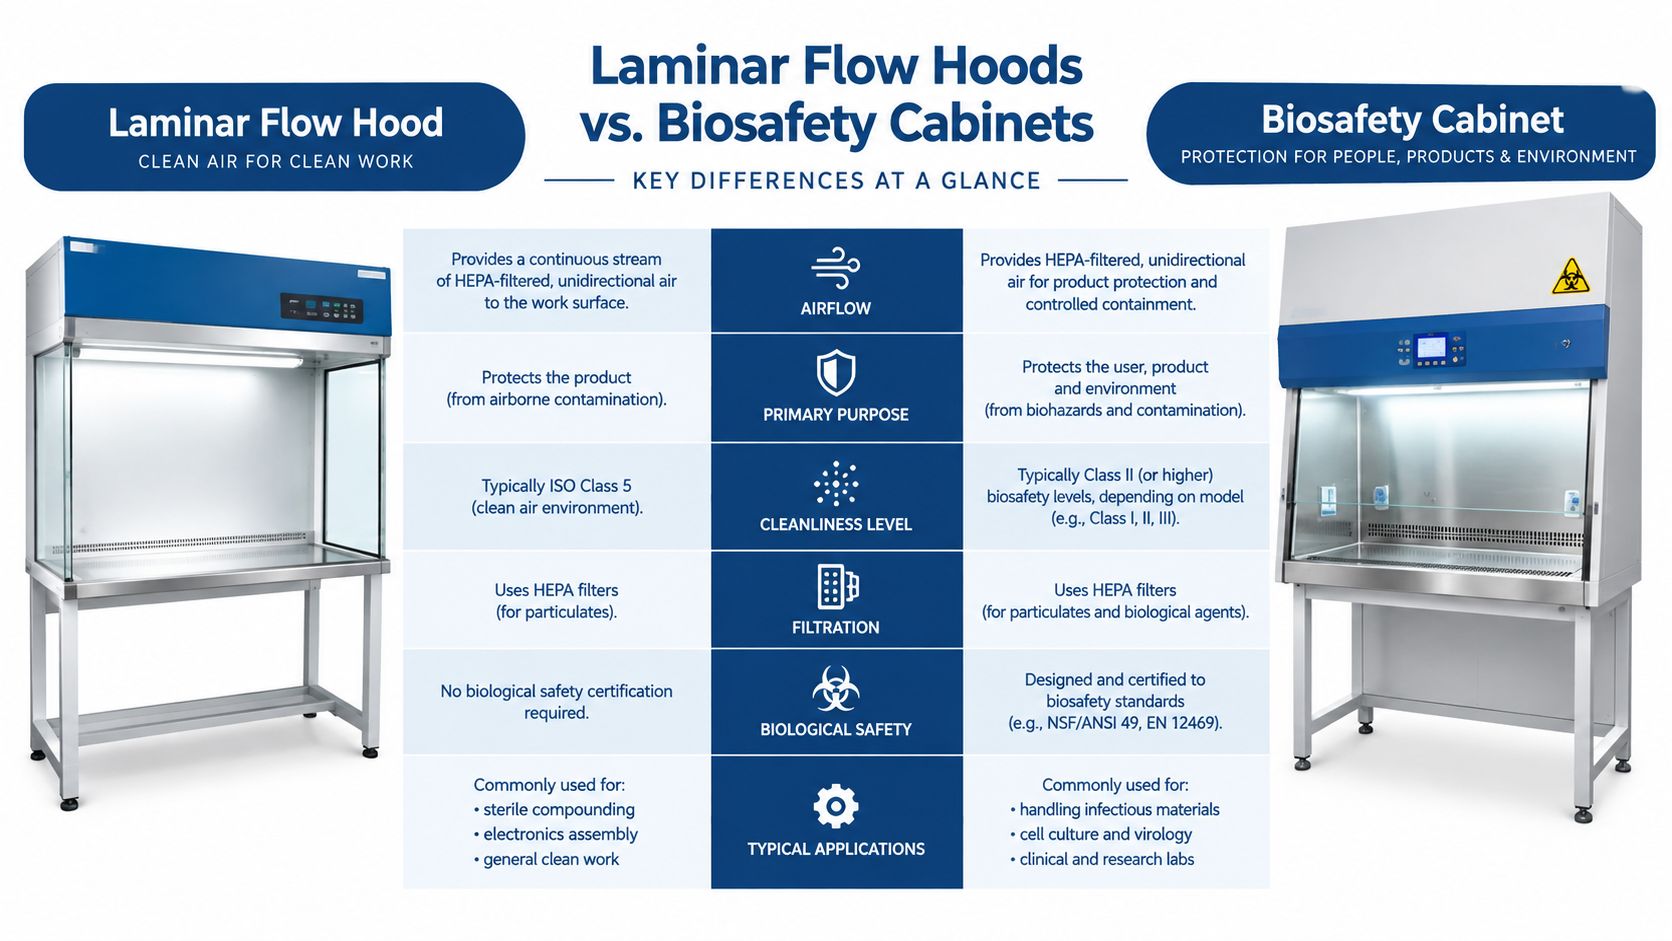
A laminar flow hood moves HEPA-filtered air in a unidirectional stream across the work zone. The goal is to push particles away from an exposed culture or sterile component. HEPA filters are classically described as capturing 99.97% of particles measuring 0.3 micrometers (HEPA filtration reference). That benchmark explains why filtered airflow became central to clean-air work.
A horizontal flow hood sends air from the rear of the workspace toward the operator. It can suit product-focused transfer work, but the outgoing air moves toward the person, so it isn't a substitute for a biosafety cabinet when the material itself may present a personnel or environmental hazard.
A vertical flow hood sends filtered air downward toward the bench. Its layout can be more comfortable on a compact workstation, though the exact airflow pattern and enclosure design matter more than the label. A Class II biosafety cabinet uses directional airflow and is designed to protect the product while also managing exposure to the operator and surrounding environment. It requires correct installation, operation, and certification.
A still-air box remains a reasonable starting point for many small procedures. It doesn't filter the air continuously, but it reduces drafts and creates a more predictable enclosed workspace. An entry-level hood offers more active airflow, yet it also adds cost, noise, filter maintenance, cleaning demands, and the need for appropriate placement.
When comparing equipment, inspect filter access, airflow verification, working depth, noise, electrical requirements, and service support. A narrow bench may favor a compact enclosure, while a larger lab bench may justify more working room. General household filtration advice can help explain HEPA terminology, but this guide to home HEPA filters shouldn't be treated as a substitute for selecting a certified laboratory device.
For a focused explanation of the equipment itself, see what a flow hood is. Buy a device that matches the material, procedure, and frequency of use. A larger hood isn't automatically a cleaner workflow.
Personal Protective Equipment for Sterile Work
PPE creates a contact and particle barrier between the operator and the work. Gloves are usually the first item people think about, but they only help when they stay clean. Nitrile gloves are a common choice for hobby work because they avoid latex exposure concerns and provide a practical barrier. Choose powder-free gloves with a close fit, then replace them whenever they touch a non-clean surface, tear, or become visibly soiled.
Masks reduce contamination from breath and droplets during open handling. A surgical-style mask may be appropriate for routine transfers, while a respirator belongs to situations where respiratory protection is required by the material or risk assessment. A cloth lab coat can protect clothing, but a disposable gown creates a cleaner outer layer for more demanding work. Eye protection matters when disinfectants may splash or a procedure can generate aerosols.
PPE Item | Primary Role | Replacement Guidance |
|---|---|---|
Nitrile gloves | Hand-to-surface barrier | Replace after dirty contact, damage, or visible soil |
Surgical mask | Reduces breath and droplet release | Replace when damp, damaged, or contaminated |
Lab coat or gown | Protects the work from clothing | Launder or discard according to contamination |
Eye protection | Shields eyes from splashes and aerosols | Clean after use, replace when scratched |
Hair covering | Limits hair and particle shedding | Use a clean covering for each session |
Sleeve covers | Adds protection near open work | Replace after contact with non-clean surfaces |
Put on PPE only after preparing the workspace, so you don't contaminate clean gloves while arranging supplies. Keep a small waste container within reach, and don't reuse gloves after touching a phone, drawer handle, or untreated bottle. Broader PPE guidance for catering and storage offers useful context on choosing protective items by task, even though laboratory procedures require their own risk assessment.
For a basic sealed-container transfer, a mask, clean nitrile gloves, and clean clothing may be sufficient for the task. Open agar work or repeated inoculations may justify eye protection, a dedicated coat, hair covering, and sleeve protection. PPE should reflect exposure and contamination risk, not a desire to look more professional.
Disinfectants and Surface Sterilants
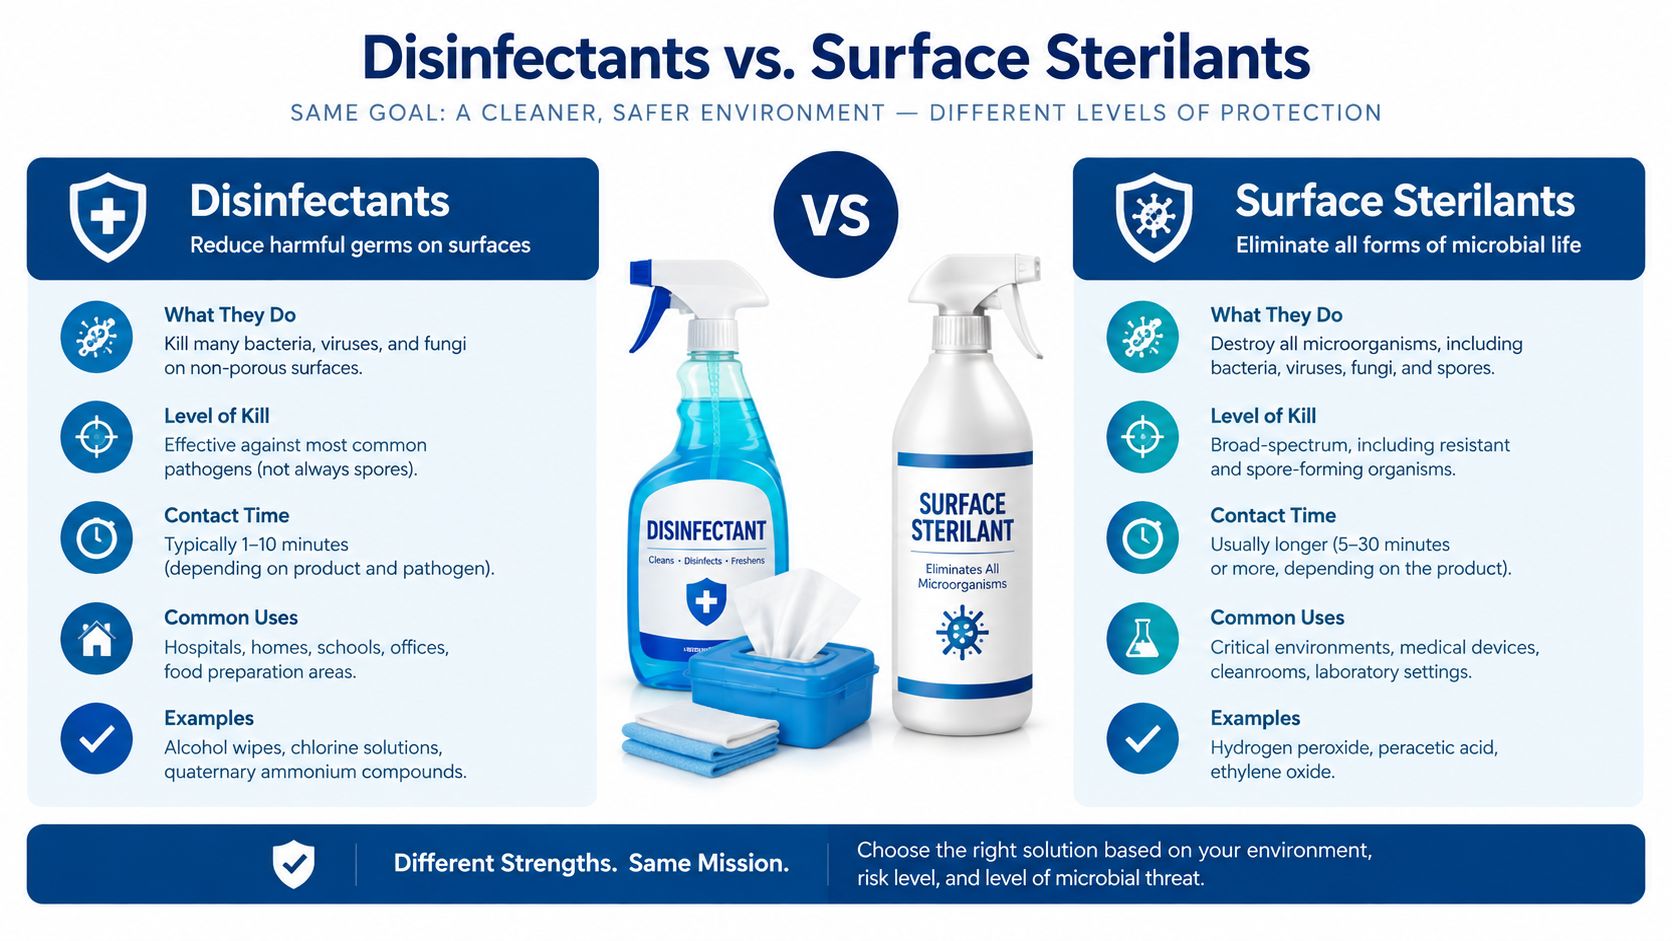
A disinfectant is a cleanup tool, not a substitute for careful technique. Before applying one, remove visible dirt from the surface. Then keep the area wet for the product's stated contact time. A fast wipe that dries immediately may leave the surface under-treated.
70% ethanol suits routine cleaning of compatible benches and gloves, especially around controlled-air equipment. It evaporates quickly, which is convenient, but that same feature can shorten wet contact time if you wipe it away at once. Check material compatibility before using it on plastics, finishes, or other sensitive surfaces.
For spills or heavier contamination, a bleach-based product can provide stronger surface treatment. Use the label directions, and wipe compatible metal surfaces with water afterward when the product instructions call for it, because bleach can corrode metal and damage finishes.
Quaternary ammonium products may be a better fit for surfaces that do not tolerate bleach. Their performance depends on the formulation, soil present, wet contact time, and intended use on the label. Do not copy a dilution from a generic recipe. Use the concentration specified for the product in your hand.
Choose the chemical by the job:
Routine bench and glove wipe: Use a compatible 70% alcohol product, and keep the surface wet for the label's contact time.
Spill or stronger surface treatment: Use a bleach-based product as directed, then protect compatible metal from corrosion.
Sensitive equipment: Consider a compatible quaternary ammonium product when its label supports that application.
Any chemical combination: Never mix bleach with alcohol, acids, ammonia, or another cleaner.
Store products in labeled containers away from heat and direct sunlight. Discard expired or visibly degraded solutions. Chemical cleaning supports clean-contact rules, prepared tools, controlled movements, and a suitable work area. It cannot correct a workflow that introduces contamination after the surface has been treated.
Heat Sources, Sterile Tools, and Work Surfaces
A clean bench can still fail if the tool you reach for is unsuitable for your sterilization method. Match each item to the process before buying it. A pressure sterilizer or autoclave can handle compatible liquids, containers, and instruments. A flame or dedicated heat sterilizer prepares small metal tools between transfers. Lab guidance gives separate time requirements for liquids and dry glassware or instruments, including 121 °C for at least 15 minutes for liquids and 121 °C for at least 30 minutes for dry items (sterility and aseptic technique guidance).
A butane torch delivers concentrated heat and may suit a hobby bench, but fuel storage and flame placement need careful control. An alcohol lamp provides a gentler flame. An infrared sterilizer avoids an exposed flame, which can make it a better choice near heat-sensitive or flammable equipment. Keep open flames away from cabinet airflow and HEPA filters. Open flame inside a biosafety cabinet can disrupt airflow and create a fire hazard (biosafety cabinet practice).
Tool | Heat Source | Sterilization Time | Best Use |
|---|---|---|---|
Inoculating loop | Flame or infrared unit | Follow the device or lab protocol | Small transfers |
Scalpel | Disposable sterile unit or infrared sterilizer | Single-use, or validated autoclave cycle if reusable | Cutting and transfer work |
Forceps | Autoclave, flame, or infrared unit | Use the validated cycle for the tool | Handling sterile components |
Needle | Disposable sterile unit | Single-use only, discard after inoculation | Small inoculation tasks |
Glass bottle | Pressure sterilizer or autoclave | Use the validated cycle for the load | Media and liquid handling |
The table separates tools by decision, not just by name. A reusable scalpel may require a validated cycle, while a sterile needle should be discarded after one inoculation. Reusable loops, forceps, and containers must be labeled as autoclave-compatible before entering a cycle. Single-use scalpels reduce residue and cleaning work, but they increase waste and require safe disposal.
Containers also vary. Mason jars, Petri dishes, media bottles, and sterile bags have different lid, heat, and sealing limits. Never heat a container unless both its material and closure are designed for that process.
Define the bench with a stainless tray or disposable poly liner. Sterile pads can simplify setup, but they do not protect an item after it touches a dirty underside. After heating a tool, allow it to cool before it contacts culture. Sterility does not prevent a hot instrument from damaging tissue or media.
Matching Equipment to Your Experience Level
Your first setup should solve the procedure you perform now. A person transferring between sealed containers has a different equipment need from someone opening many plates and handling cultures repeatedly. Buying a professional cabinet before building consistent cleaning and contact habits can add complexity without improving results.
The first setup
A beginner may start with a still-air box, 70% alcohol, powder-free nitrile gloves, a mask, a scalpel or sterile disposable tool, and suitable sealed containers. A pressure sterilizer or autoclave becomes important when you're preparing materials that require pressure sterilization. The exact budget depends on what you already own and which items must be purchased, so treat starter-kit pricing as a personal calculation rather than a fixed rule.
The growing hobby workflow
Occasional agar work may justify a more organized bench, better lighting, dedicated storage, sterile pre-poured plates, and a more convenient tool-preparation method. Colorado Cultures offers still-air workspace options and sterile supplies such as agar plates, filters, injection ports, and sterile tools, making it one possible source to compare with other suppliers.
The small lab
If you produce cultures frequently, a certified horizontal or vertical laminar flow hood may make repeated work more consistent. A Class II biosafety cabinet belongs to a different protection category and should be selected when personnel or environmental protection matters, not just because it costs more.
Before a major purchase, ask:
What procedure will this equipment support?
How often will I use it?
Does it protect the product, the operator, or both?
Can I clean, maintain, and verify it?
Will its size make my workflow easier or more crowded?
A compact setup that you use correctly beats an oversized setup that becomes difficult to clean.
Maintenance, Cleaning, and Replacement Routines
Equipment only protects the work when its performance remains predictable. Wipe cabinet interiors and clean-air work surfaces with a compatible disinfectant before and after use. Inspect seams, trays, fan guards, and filter areas for residue or damage rather than treating the enclosure as permanently clean.
For a hood, follow the manufacturer's filter and certification schedule. A clogged pre-filter, unusual noise, weak airflow, or visible damage deserves attention before the next open transfer. A cabinet interior should be cleaned routinely, and stainless surfaces should be checked for corrosion after bleach exposure.
Replace PPE based on contact and condition, not just the date on the calendar. A glove that touched a phone is no longer clean for the next transfer. A damp mask, torn gown, or scratched eye shield should be removed from service.
Inspect scalpels, loops, and forceps for bends, residue, rust, or discoloration. Store dry tools in closed, clean containers, and keep fuel containers sealed and away from ignition sources. For a practical walkthrough, use this guide on how to sterilize equipment.
Maintenance signal: Reduced airflow, persistent residue, corrosion, or a damaged enclosure is a reason to stop and assess the equipment, not work around the defect.
Record filter changes, cleaning, sterilization cycles, and repairs in a simple log. Documentation won't fix poor technique, but it helps you notice patterns before equipment failure becomes a contamination event.
Quick Reference Guide to Aseptic Technique Equipment
Use the matrix to audit your bench against the four protection jobs. “Beginner tier” means useful for a basic small-scale workflow, not universally required for every procedure.
Equipment Category | Protection Job | Home-Lab Example | Beginner Tier |
|---|---|---|---|
Laminar flow hood | Air filtration | Horizontal or vertical filtered workspace | Optional upgrade |
HEPA air purifier | Environmental support | Room air and dust reduction | Optional, not a hood substitute |
Nitrile gloves | Physical barrier | Powder-free disposable gloves | Essential |
Surgical mask | Physical barrier | Mask during open handling | Strongly recommended |
Lab coat | Physical barrier | Dedicated washable coat | Useful |
70% isopropyl alcohol | Contact control | Bench and glove wipe | Essential |
Bleach solution | Contact kill | Spill and stronger surface decontamination | Useful |
Quaternary ammonium spray | Contact control | Compatible surface disinfectant | Optional alternative |
Alcohol lamp | Tool preparation | Small flame for approved tools | Optional |
Scalpel | Tool preparation | Sterile disposable or reusable tool | Essential for relevant transfers |
Pressure cooker or autoclave | Tool preparation | Pressure sterilization of compatible loads | Procedure-dependent |
Still-air box | Environmental control | Enclosed low-draft workspace | Strong beginner option |
Autoclavable containers | Tool preparation | Heat-rated jars or bottles | Procedure-dependent |
A HEPA room purifier can reduce airborne dust in a room, but it doesn't create the directed, verified airflow of a laminar flow hood. Likewise, gloves and alcohol help with contact control, while neither one prepares a reusable instrument for a validated sterilization cycle.
Start at the row where your workflow is weakest. If the container stays sealed until inoculation, environmental control may be simpler than it is for open plate transfers. If you prepare your own media, tool preparation and heat-rated containers move higher on the priority list.
Common Equipment Mistakes Beginners Should Avoid
A large hood doesn't guarantee clean work. The operator can still touch a dirty surface, reach across an open container, reuse contaminated gloves, or place a sterile tool on the bench. Filtered airflow reduces one route of contamination, but it doesn't erase poor contact rules.
A still-air box also isn't automatically inadequate. For a beginner performing small, controlled transfers, an enclosed low-draft workspace may be more practical than a large hood. The better choice depends on the procedure, frequency, available space, and willingness to maintain the equipment.
Avoid these shortcuts:
Reusing gloves: Replace them after contact with a phone, drawer, bottle exterior, or other non-clean surface.
Skipping the mask during open work: Breath and droplets can enter the work zone.
Treating alcohol as instant sterilization: Keep surfaces wet for the product's required contact time.
Using flame inside a biosafety cabinet: It can disrupt airflow and create a fire hazard.
Buying for aspiration: Match equipment to current workflow volume rather than a future setup you may never use.
A clean bench is built from consistent small decisions. Spend first on the protection job that fails most often, then upgrade when your procedure demands it.
Colorado Cultures provides sterilized grain bags, all-in-one grow bags, substrates, grow kits, cultures, and sterile lab supplies that support controlled inoculation and transfer work. Visit Colorado Cultures to compare supplies, find practical instructions, and get guidance for building an aseptic workflow suited to your next cultivation project.
Comments