
DIY All in One Mushroom Grow Bag: A Practical Beginner Guide
You've got a sealed mushroom bag on the shelf, a syringe in your hand, and one uncomfortable question: what exactly goes where, and how do you avoid turning the whole project green? A DIY all-in-one mushroom grow bag looks simple because the grain and substrate share one container. The simplicity only works when moisture, sterilization, airflow, and clean handling all support one another.
This guide walks through a complete beginner workflow, from choosing the bag film to preparing the substrate, pressure-cooking the filled bag, inoculating in stages, and deciding whether a spent block should be reused or discarded. The method is intended for legal edible and specialty mushroom cultivation. Species differ, so use a culture and substrate suited to the mushroom you're growing.
Why an All in One Bag Is the Smart First Project
A conventional indoor grow often asks a beginner to manage sterile grain in one container, bulk substrate in another, and a transfer between them. Every transfer creates another opportunity for airborne mold, dirty tools, a torn filter, or an accidentally opened container to ruin the work. An all-in-one bag keeps the grain layer and bulk substrate together, so you inoculate once, colonize in place, mix without opening the bag, and fruit from the same container.
The format comes from a much older cultivation transition. Outdoor log culture for shiitake has been practiced in China for at least a millennium, while modern indoor production increasingly uses plastic bags filled with nutrient-complemented sawdust substrates, as described in this review of mushroom cultivation and circular-economy systems. A grow bag is therefore not a novelty disconnected from commercial practice. It's a compact version of the artificial-log idea, adapted for controlled indoor growing.
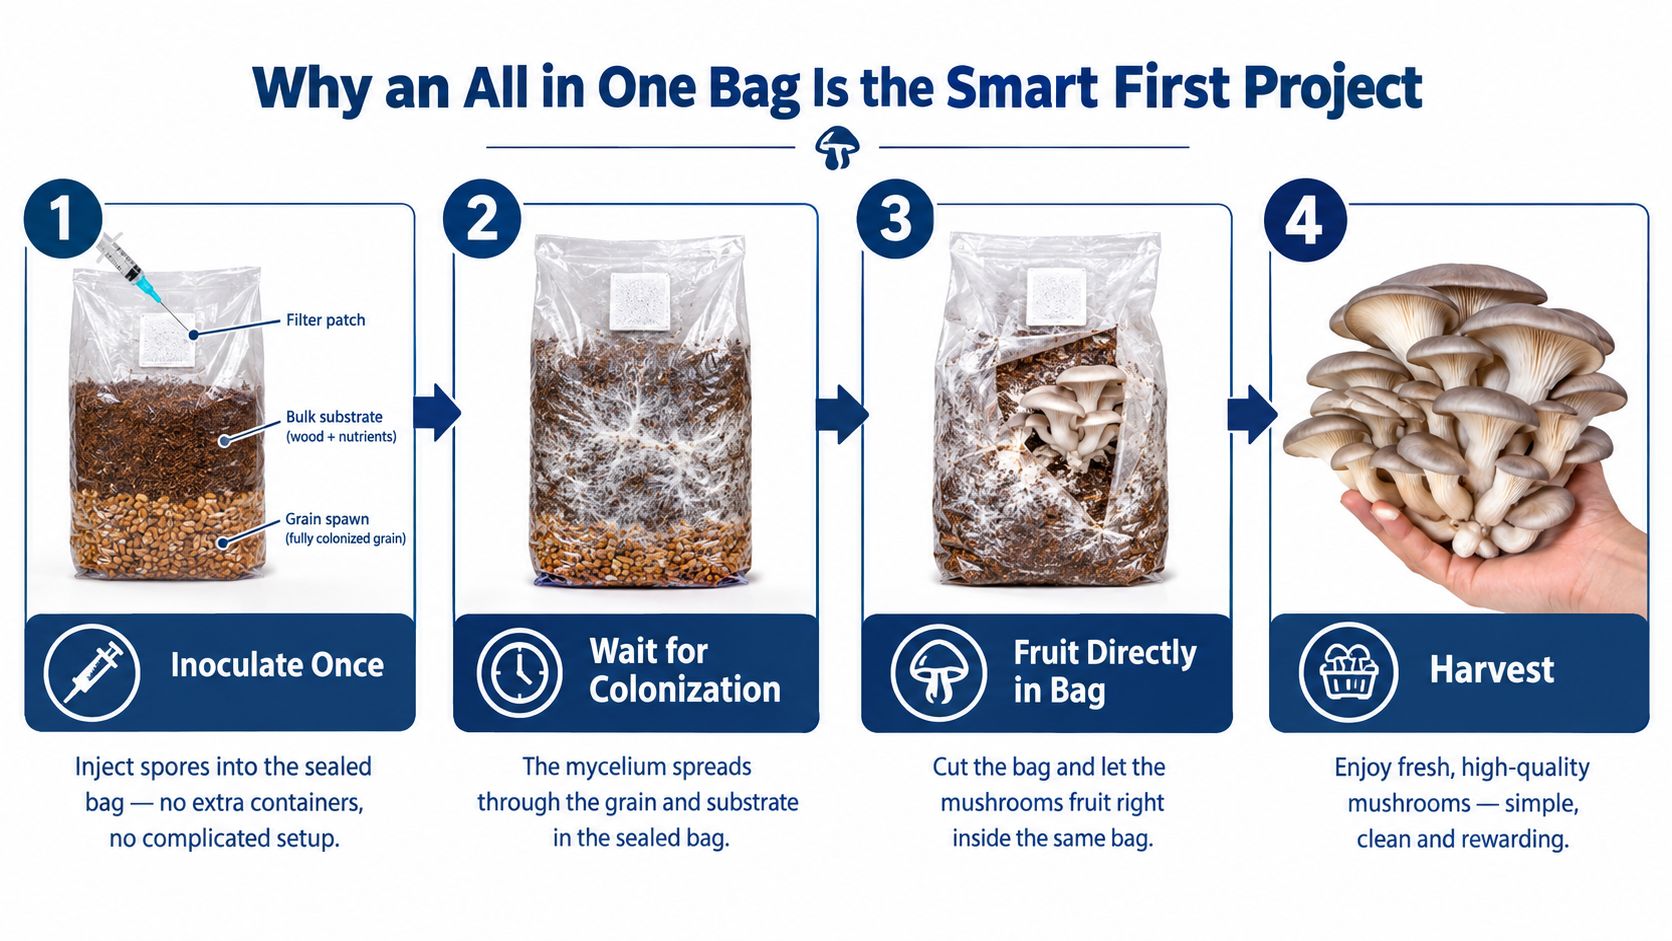
What the bag removes from your first grow
A sealed bag simplifies four pressure points:
Fewer transfers: The colonized grain can be redistributed through the upper substrate without exposing the contents to room air.
One incubation vessel: You won't need to coordinate jars, tubs, or a separate mixing container.
Controlled gas exchange: A filter patch lets the mycelium breathe while the bag remains closed.
Direct fruiting: Once the block is fully colonized, you can create a fruiting opening rather than moving the block elsewhere.
Sterile sawdust bag systems also use spawn efficiently. The National Center for Appropriate Technology's mushroom cultivation guidance recommends a 2% to 5% spawn rate for sterilized sawdust or supplemented sawdust blocks, compared with 5% to 10% for pasteurized straw or unsupplemented substrates. That difference helps explain why controlled bag systems appeal to small growers and beginners. They pair a cleaner environment with a relatively economical amount of spawn.
Practical rule: Keep the bag sealed for every step that doesn't require an opening. Each avoided transfer is one less contamination opportunity.
By the end of the process, you should understand four skills: how to weigh and hydrate each layer, how to sterilize a filled bag safely, how to use staged inoculation and break-and-shake timing, and how to inspect the bag's film, filter, and closure before trusting it with a culture.
DIY Build or Buy the Bag
The choice isn't just about price. A DIY all-in-one bag teaches you why a grow works or fails, while a pre-sterilized bag lets you focus on inoculation, incubation, and fruiting. Pick the option that matches the lesson you want.
Factor | DIY Bag | Pre-Made Bag |
|---|---|---|
Setup | You measure, hydrate, pack, sterilize, and cool the bag | The bag arrives prepared for inoculation |
Control | You control grain, substrate, moisture, filter, and closure | You accept the manufacturer's formulation and construction |
Contamination exposure | More handling during preparation and sterilization | Less assembly handling before inoculation |
Learning value | High, because you troubleshoot every variable | High for learning fruiting and care, lower for learning sterile preparation |
Equipment | Requires a suitable pressure cooker and clean workspace | Requires inoculation supplies and a clean workspace |
Consistency | Depends on your weighing, hydration, packing, and sterilization | Usually more standardized from bag to bag |
DIY makes sense if you already have a pressure cooker, want repeatable control over the recipe, or enjoy improving a process through careful notes. It also helps you identify whether a failure came from wet grain, poor gas exchange, insufficient sterilization, or the culture itself.
Buying makes more sense if your priority is the growing cycle rather than bag construction. A ready-made bag removes the most demanding preparation stage, but it doesn't eliminate the need for clean inoculation or suitable fruiting conditions.
Don't treat a commercial bag as magic. Inspect it for tears, a sealed filter patch, and a sound injection port before use. If you build your own, record the grain weight, substrate weight, water added, cooker time, and culture used. That simple log turns a disappointing first attempt into useful information.
Materials and Substrate Recipe Basics
Start with a bag designed for heat and steam. Use 0.2 to 0.3 mm autoclavable polypropylene, a 0.2-micron filter patch, and an injection port or self-healing rubber stopper. Polypropylene is appropriate for pressure sterilization, while the filter patch supports gas exchange after inoculation. Avoid an ordinary storage bag. Its film, seams, and closure may not tolerate the cooker.
For the grain layer, prepare 500 g of hydrated rye berries at approximately 60% to 65% moisture. Simmer the berries for 20 minutes, then drain them for 30 minutes so surface water leaves before packing. Grain should feel hydrated inside but dry on the outside. Wet grains clump, trap water, and create pockets where colonization can slow.
The upper layer uses 1.2 kg of coco coir, 100 g of vermiculite, and 100 g of gypsum. Add water gradually until the mix reaches field capacity. When squeezed firmly, it should hold together without releasing a stream of water. The oyster mushroom substrate recipe guidance offers a useful reference for thinking about substrate texture and hydration, though the exact recipe should match your species.
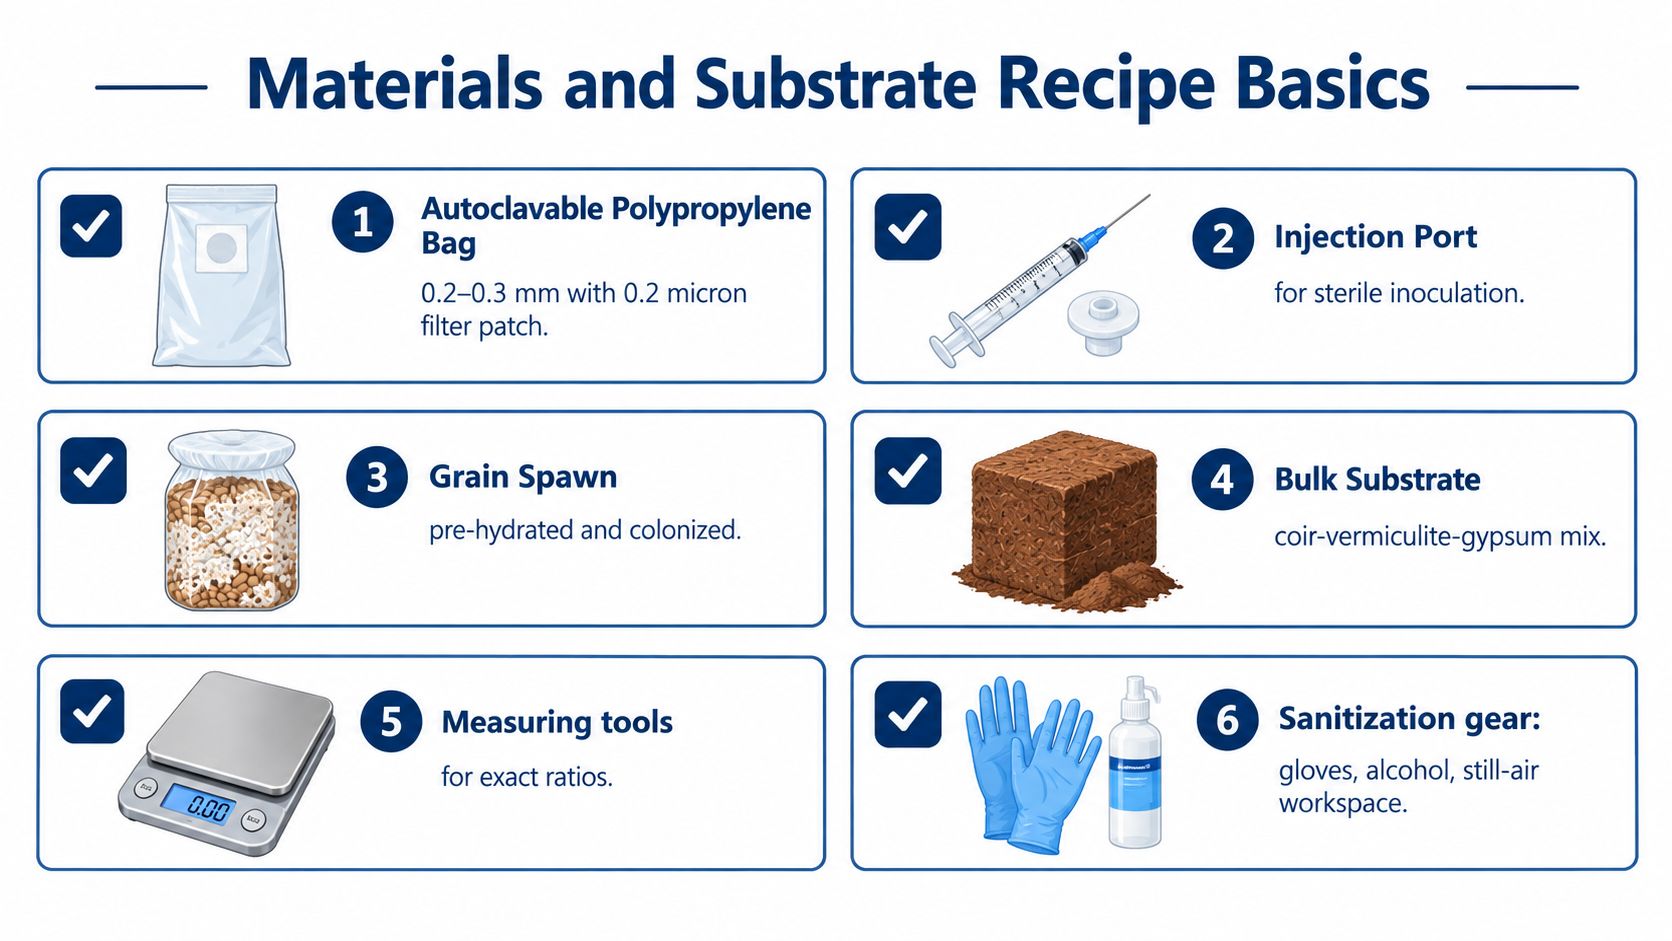
Pack the layers without compacting them
Place the hydrated grain in the bottom third of the bag. Add the coir mix above it, leaving a generous empty area at the top for folding and air movement. The approximate packing densities are 0.4 g/cm³ for grain and 0.25 g/cm³ for the coir mix, useful as a rough check when you're comparing volume with weight.
Use a scale rather than guessing by eye. Keep the layers distinct during packing, and don't tamp them down hard. Loose packing preserves small air spaces and makes the later break-and-shake more effective.
Fold the bag in a gusset style, position the filter so it remains exposed, and cover any external tape strip cleanly with micropore tape. The filter must not be pressed flat against a shelf or cooker wall. Grow-bag guidance recommends about 15 cm of headspace for folding, sealing, and gas exchange, as shown in these all-in-one grow-bag instructions.
Sterilization With a Home Pressure Cooker
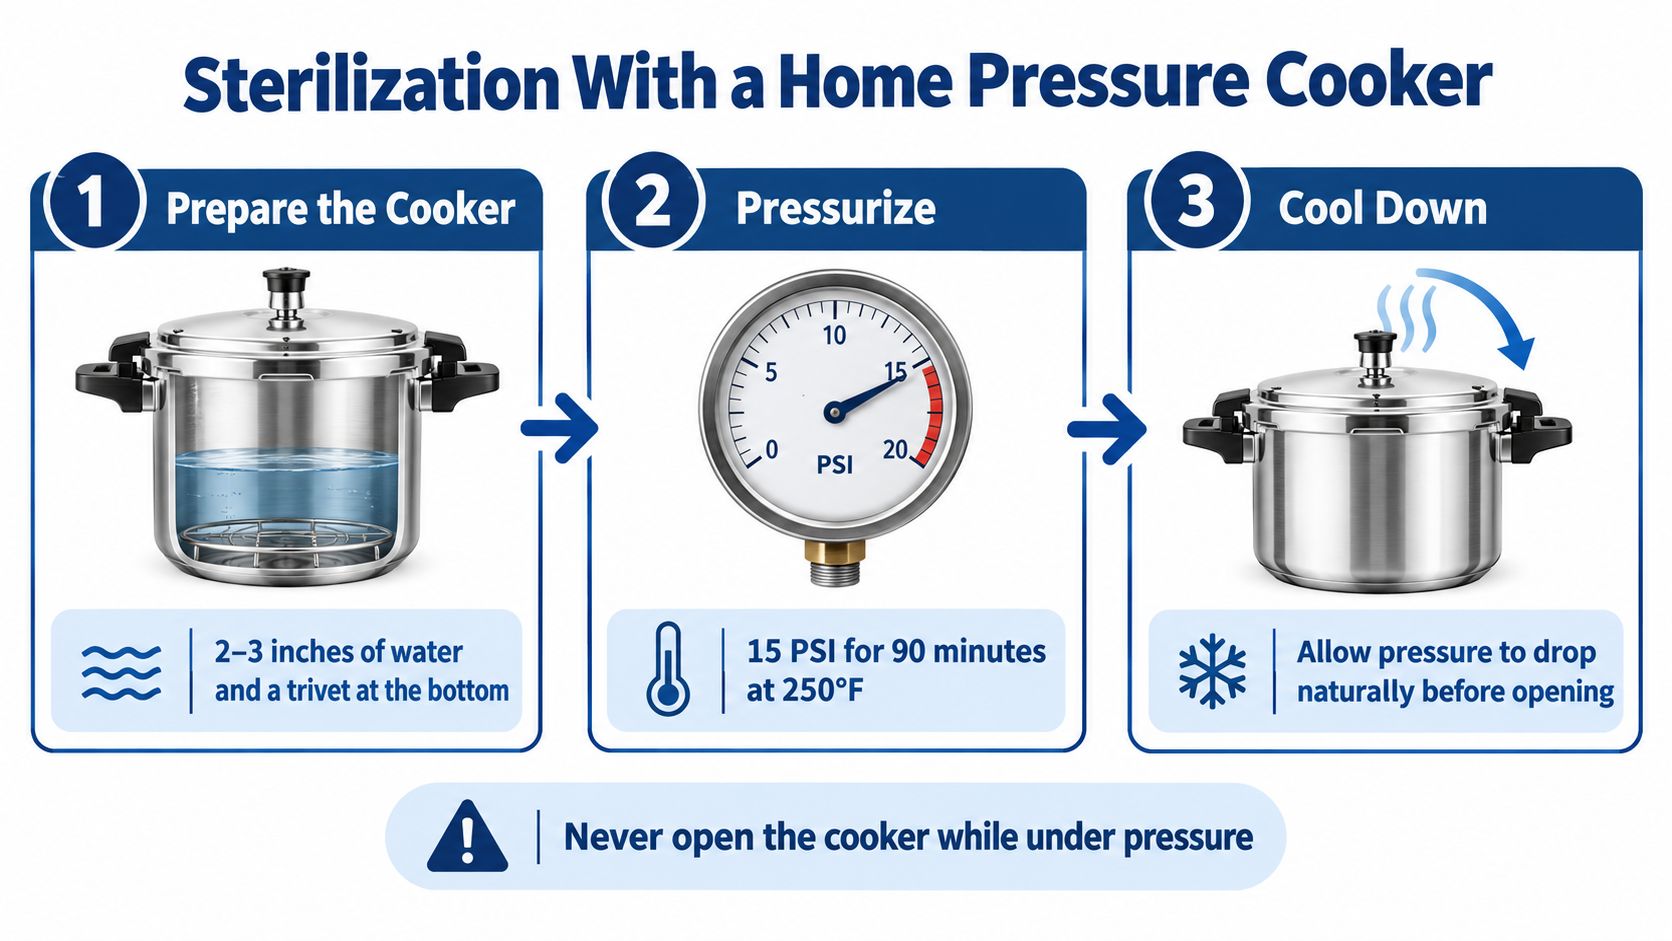
A filled bag heats like a packed jar: steam must reach its center, not just its surface. Use a 23-quart stovetop pressure cooker that reaches 15 PSI. Add 2 to 3 inches of water, then place a trivet inside so the polypropylene bag stays above the heated metal.
Fold the bag's top and cover it loosely with aluminum foil. The foil catches water droplets while leaving the filter and closure exposed to steam. Arrange the gussets so steam can circulate around the bag. Avoid crowding the cooker, and keep two bags from touching the wall or blocking each other.
Use pressure, time, and cooling together
Bring the cooker to 15 PSI, then hold that pressure for 90 minutes at 250°F. Shorter published windows, such as 121°C at 15 PSI for 15 to 30 minutes, are used for smaller or less dense loads. A filled bag contains more substrate than a lab flask, so the 90-minute schedule is the safer default for this build. The study of sterile bagged substrates provides context for pressure sterilization, but your cooker's instructions control safe operation.
Home ovens and boiling-water baths do not create the same pressurized steam environment, so they are less reliable against resistant spores. Never open the cooker under pressure. Let pressure drop naturally, then place the sealed bag in a clean, draft-free area for a 12-hour cool-down before inoculation. The bag must be fully cool because residual heat can damage the culture.
Inspect the filter patch, seams, and film before use. Clean-looking grain and settled condensation are reassuring signs, while a sour or rotten smell means the bag should be discarded. Extra incubation will not correct contamination.
For operating details, follow this pressure cooker guide for mushroom cultivation.
Inoculation and Incubation Workflow
A first bag can fail before the needle enters it. Set up a clean, still workspace by wiping the surface, closing windows and doors, and using a still-air box or flow hood if available. Put on clean gloves, wipe the bag and injection port with 70% isopropyl alcohol, and keep the sterilized needle away from every surface.
Choose the culture carefully. A clean liquid culture is usually a simpler beginner option than a spore syringe because spores can carry more unwanted organisms. A vendor instruction booklet estimates contamination risk at roughly 30% to 50% with spore syringes, but that figure reflects the supplier's field reports, not a controlled study. Treat it as a warning about variability, not as a measured prediction. The culture's cleanliness matters as much as the bag's preparation.
Inoculate the grain first
Inject through the sealed port into the grain layer, not the upper substrate. For a 1.5 to 3 lb bag, start with 3 to 5 mL of liquid culture. Use a flame-sterilized needle, let it cool, then inject. If the port design requires it, cover it with fresh micropore tape.
Keep the upright bag in a dark, clean cupboard or on a shelf away from direct sunlight. Aim for 70°F to 75°F. White growth may show within 5 to 10 days, yet color and speed alone cannot confirm healthy colonization. Healthy mycelium generally appears even and white. Bright colors, wet decay, or a sour smell point to a problem.
Wait until about 20% to 30% of the grain is colonized. Gently break apart that section and distribute it through the remaining grain while keeping the bag sealed. Allow recovery until the grain is mostly or fully colonized. Then mix it into the upper substrate without opening the bag.
Clean technique matters more than speed: A sealed break-and-shake keeps room air away from the substrate. Rough kneading can tear the film or compress the contents into dense, wet clumps.
Return the mixed bag to the same stable environment. The grain now acts like a set of starter points spreading through the bulk substrate. Give it time, but do not try to rescue suspicious growth with extra incubation. Green, pink, or yellow areas should be treated as contamination. Seal the suspect bag inside another container before disposal to reduce the chance of spreading spores around the growing area.
Bag Components That Drive Failure Rates
A sterile substrate can still fail if the bag is poorly built. During a first build, inspect three parts separately: the filter patch, the injection closure, and the film and seams. Each one controls a different risk, much like vents, a lid, and the walls of a pressure vessel.
A 0.2-micron filter patch permits gas exchange while helping block many airborne contaminants. Keep it flat, firmly bonded, and away from pooled condensation. If the filter is pressed against a wall or flooded, air exchange may suffer. Leave enough headspace to fold and close the bag. An overfilled bag forms a dense block and can restrict the filter.
The injection closure also faces repeated handling. A self-healing rubber port generally gives better protection than tape alone, while exposed rubber bands and loose twist ties can collect debris. Follow a guide to self-healing injection ports before choosing or installing one. With a folded gusset, cover the outside closure with micropore tape, but leave the filter uncovered.
Material choices deserve their own inspection
A cultivation study comparing closure materials reported 41.0% contamination for sponge-plug bags, compared with under 4% for cotton-plug bags, as summarized in this contamination analysis of all-in-one grow bags. The comparison also reported bacterial isolation of 13.0% from autoclaved sponge pieces, versus 2.0% or 0.0% for cotton pieces. These results do not prove that every sponge closure will fail. They show why substrate sterilization alone cannot compensate for a weak closure design.
Component | Better Choice | Failure Rate Range |
|---|---|---|
Filter | Properly bonded 0.2-micron filter patch | No universal range, inspect for flooding or blockage |
Plug material | Cotton closure over sponge where the design permits | Sponge-plug bags, 41.0%, cotton-plug bags, under 4% |
Bacterial isolation | Clean cotton components | Autoclaved sponge, 13.0%, cotton, 2.0% or 0.0% |
Injection closure | Self-healing port or protected sealed port | Tape-only closures are more vulnerable to handling |
Film | Autoclavable polypropylene | Ordinary polyethylene may deform or fail under pressure |
For material comparisons, review durable bag solutions from Crayex Corporation to see industrial bag and liner formats. Before sterilizing a completed bag, check every seam, port, and filter bond. A small weak point can admit contaminants after the pressure-cooker cycle, even when the contents began sterile.
Fruiting, Troubleshooting, and Reusing the Bag
When the block is fully colonized, move it into a fruiting space suited to the species. Open or cut the bag to provide fresh-air exchange through the filter area, maintain high humidity, and keep the block from sitting in pooled water. For many indoor mushroom setups, 85% to 95% humidity supports pin formation, while species-specific temperatures must take priority over a universal setting.
Use indirect daylight or a 12-hour LED cycle if the room is dim. Dense white knots near the opening can indicate the beginning of pinning. Avoid soaking the block. A light mist inside the bag can restore surface moisture, but standing water encourages bacterial problems.
Symptom | Likely Cause | Recommended Action |
|---|---|---|
Stalled primordia | Excess carbon dioxide or a drying surface | Improve fresh-air exchange and check surface moisture |
Green blotches | Trichoderma or another contaminant | Isolate and discard the bag rather than opening it indoors |
Sour odor | Bacterial wet rot | Discard the block and sanitize the surrounding area |
Side-pinning clusters | Light or humidity gap beside the block | Adjust the bag position and reduce exposed side gaps |
Harvest and second-cycle decisions
Harvest mature mushrooms by twisting them low at the base when the veil is breaking, or at the species-appropriate maturity stage. Remove loose material from the opening, then restore moisture carefully and re-close the bag if the block remains healthy. A second flush may produce 60% to 80% of the first-flush weight, according to the grow-bag guidance linked earlier, but treat that as a benchmark rather than a promise.
Use this final inspection before trying to continue:
Water access: Is the block moist without being saturated?
Drainage: Can excess water escape instead of pooling?
Surface condition: Is the mycelium clean and free from colored patches?
Airflow: Can the filter or opening exchange air?
Reuse decision: Is the block healthy enough to keep?
Discard any bag showing internal black, pink, or yellow discoloration, especially when paired with an unusual smell. A clean spent block can be crumbled outdoors as material for suitable garden mushroom projects, or buried about 4 inches deep in a garden patch, but don't spread a contaminated block through soil or compost.
The most useful lesson from a first bag isn't whether the harvest was large. It's whether you can identify which variable changed, keep the container sealed when possible, and recognize contamination before it reaches the rest of your workspace.
Colorado Cultures offers sterilized grain bags, all-in-one grow bags, substrates, grow kits, and supporting tools for home and lab cultivation, along with printable instructions and classes through its CC Classroom calendar. Visit Colorado Cultures to compare supplies for your first sealed-bag workflow and get practical guidance before you inoculate.
Comments