
Fully Colonized Monotub: Signs, Fruiting Steps, and Fixes
You're standing over a clear tub that has changed almost overnight. The dark substrate is now covered by a broad white network, condensation beads along the walls, and the lid looks as though it's daring you to make the next move. You're excited, but the questions arrive quickly: Is this fully colonized? Is it safe to open? Will waiting hurt it, or will opening it too soon introduce contamination?
A fully colonized monotub isn't automatically finished, and it isn't automatically ready for every change you can make. It's a diagnostic decision point. The surface, smell, moisture pattern, and stalled areas all provide evidence, but no single sign proves that the interior is healthy or that fruiting will succeed. The practical approach is to read the tub like an instrument panel before you alter airflow, humidity, light, or handling.
The Moment Your Tub Looks Ready
A first-time grower usually notices the color first. The surface has gone from scattered white islands to a nearly continuous layer, and the temptation is to unclip the lid immediately. That impulse makes sense. During colonization, the tub appears quiet, so a mostly white surface feels like a clear signal that something important has happened.
It has. Full colonization means the inoculated grain spawn has spread through the available bulk substrate and formed a continuous mycelial network. Historically, the monotub method developed through online cultivation communities rather than through a single standardized industrial protocol, with an early documented reference appearing in 2006 through a Shroomery community member known as Ohmatic, as described in this history of monotub cultivation.
But “mostly white” and “fully colonized” aren't interchangeable. A surface can look impressive while a wet pocket, stalled corner, or hidden uncolonized layer remains underneath. A tub can also carry contamination that resembles healthy white growth, especially when the grower checks only color through the lid.
Practical rule: Don't make the calendar decide. Let consistent coverage, stable moisture, clean odor, and the absence of suspicious zones decide.
The next decision is not merely whether to open the tub. It is whether the evidence supports a controlled transition. If the surface looks uniformly consolidated and the tub has no sour odor, slimy area, or spreading discoloration, a gradual move toward fruiting conditions may be appropriate. If one section is wet, stalled, or changing color, increasing airflow may expose the problem without solving it.
That's why the hours around apparent readiness can feel so tense. You're balancing two risks. Too much disturbance can introduce contaminants or dry the substrate, while ignoring a clear failure signal can let a problem spread unnoticed. The safest habit is to inspect through the clear walls and lid first, then change one environmental variable at a time.
What a Fully Colonized Monotub Actually Looks Like
Start with coverage, not whiteness alone. A mature surface usually appears consistently colonized rather than showing isolated islands of bright growth separated by exposed dark substrate. Small corner patches may catch up without intervention, so a tiny amount of unevenness isn't automatically a reason to open the tub or discard it.
Look for continuity and vigor:
Surface coverage: Healthy mycelium forms a connected layer across the substrate. Bare areas that remain unchanged deserve more attention than areas that are merely slower.
Consolidation: The surface may look thicker and more integrated as the network matures. It shouldn't appear like loose powder scattered over the substrate.
Moisture pattern: Fine condensation can be normal. Standing water, persistent pooling, or a sharply wet section suggests a moisture problem rather than readiness.
Color changes: Bright white to cream growth can be consistent with healthy mycelium, but color alone can't confirm safety.
Smell through the vents: A clean mushroom-like or mildly earthy scent is less concerning than sour, ammonia-like, or rotten odors.
Don't press, scrape, or break the surface just to test it. A fully consolidated substrate often appears firm through the tub, but a tactile test requires opening the container and can damage the surface. You can learn more by comparing the same area from day to day than by disturbing it once.
A clean-looking tub can still contain a hidden problem. The Colorado Cultures guide to mycelium contamination pictures can help you compare visual patterns, but photographs can't replace odor, moisture, and progression checks on your own tub.
Signals that deserve caution
A stalled patch is more informative than a slow patch. If one area has stopped expanding while surrounding mycelium thickens, inspect the pattern through the wall and check whether moisture has collected there. Soft-looking, shiny, or slimy zones are more concerning than ordinary condensation on the plastic.
Odor is also a useful early warning, but don't repeatedly open the lid to smell the substrate. If the tub has filtered vents, assess the air at the vent with minimal disturbance. Sour, ammonia-like, or rotting notes should be treated as failure indicators, not as problems to cover with more fresh air.
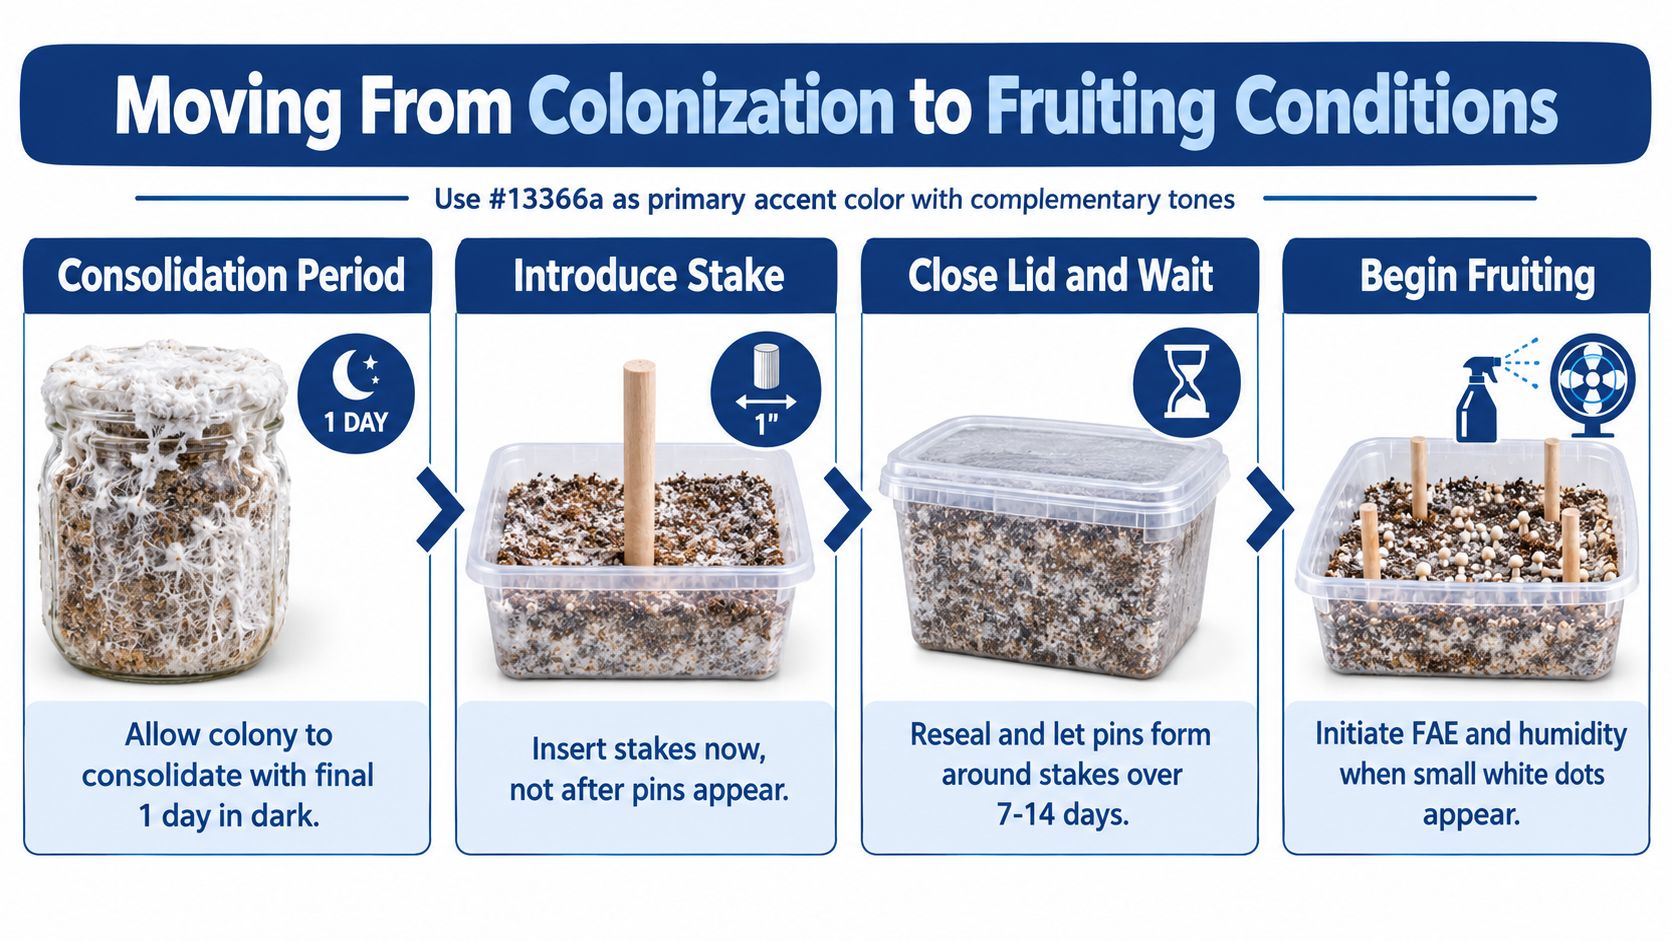
Moving From Colonization to Fruiting Conditions
Once the tub passes its visual and odor checks, make the transition gradually. Keep the lid closed while you decide what needs changing. A fully colonized monotub is a key developmental milestone, but it doesn't guarantee yield, clean fruiting, or a successful first flush.
Begin with consolidation rather than immediately forcing air through the chamber. A short rest can allow the mycelium to strengthen its hold on the substrate, especially when the surface has only recently become continuous. There isn't a universal waiting period that applies to every species, substrate, spawn ratio, and room, so the useful trigger is a stable, mature-looking surface rather than a date on a calendar.
Adjust the air gently
Fruiting requires oxygen and lower carbon dioxide. One cited extension protocol uses a target below 1,000 ppm CO₂, a surrounding temperature of 60–80°F, and relative humidity below 80% in the room, while emphasizing that these are practical starting points rather than guarantees for every setup. The USU beginner's guide to growing mushrooms at home also describes a gradual transition, including filtered or opened vents, moderate temperature, indirect light, and light misting only when needed.
For a modified tub, replace sealed painter's tape with micropore or paper tape, or adjust the existing filter arrangement so passive exchange increases. Don't remove every barrier at once. Your goal is a controlled change in gas exchange, not a blast of dry room air.
Add light without adding heat
Indirect ambient light can help orient growth. Keep the tub away from direct sunlight and hot surfaces. A simple light cycle can be consistent, but light won't compensate for waterlogged substrate, trapped carbon dioxide, or contamination.
Watch the surface after the change. If the condensation pattern remains fine and the substrate doesn't develop dry matte patches, the room may be balanced. If the surface dries quickly, reduce the rate of air loss before adding more water.
The commonly cited bulk-substrate depth for monotubs is roughly 4–7 centimeters, and a typical 35–60-quart container may use approximately 7.5–10 pounds of prepared substrate, according to the practical extension protocol linked above. These are design starting points, not instructions to rebuild a tub that is already colonizing normally.
The transition should leave the substrate in place. Don't flip it, break it up, or add a new bulk layer because you've reached the fruiting stage. Treat the tub as a living system that needs observation and small corrections. Record the date of each change, what the walls looked like before and after, and whether the surface became wetter, drier, or unchanged.
Reading Humidity and Fresh Air by Surface Signals
A fixed fanning schedule sounds simple, but it ignores the variables that control the tub. Lid fit, hole placement, substrate moisture, room humidity, and species all change how quickly water evaporates and how carbon dioxide escapes. The surface gives better feedback than a routine copied from another grower.
Fine, scattered beads on the walls usually tell you that moisture is present without necessarily proving that the surface is too wet. Heavy droplets that run downward or collect at the bottom show stronger moisture retention. A matte, dry-looking substrate suggests the opposite problem, especially when pins or young growth stop developing.
Use the pattern over time:
Condensation disappears almost immediately: The chamber may be losing moisture too quickly. Reduce unnecessary air loss and avoid responding with repeated heavy misting.
Large droplets remain and pool: Humidity is high, but air may not be exchanging well. Adjust the vents gradually and remove standing water without flooding the surface.
Fine beads remain while the surface looks healthy: Leave the setup alone. Stability is often better than constant correction.
Dry patches appear near vents: Airflow may be concentrated in one area. Change the filter opening or lid position rather than increasing airflow everywhere.
Misting is a corrective action, not a required ritual. If the surface visibly dries, apply a light mist that restores a fine film. Don't create runoff, and don't spray forcefully onto delicate pins. If the substrate remains visibly moist, more water can make the problem worse.
Fanning works the same way. If the tub holds heavy condensation and growth looks stalled, a measured increase in fresh-air exchange may help. If the surface is already dry, aggressive fanning can push it farther from the conditions needed for pin formation.
Pin density can provide another clue, but it must be read with the rest of the evidence. Sparse pins may reflect genetics, moisture, temperature, nutrition, or gas exchange. Don't diagnose the entire tub from one empty patch.
Why Mostly White Is Not Always Safe
White growth is reassuring, but it isn't a safety certificate. Healthy mushroom mycelium and some contaminants can both appear white during early development, and a top layer can conceal a wet or compromised zone below. The National Library of Medicine resource on mushroom cultivation contamination emphasizes that contamination can arise in the substrate and during spawning, cultivation, harvesting, or handling.
The first inspection should happen without opening the tub. Examine the same areas through the walls and lid, preferably in consistent light. Look for a spreading color shift, a darkening patch at the base or side, a shiny wet pocket, or an area that remains unchanged while the rest of the surface advances.
Separate normal changes from warning signs
Condensation on plastic is not the same as contamination. Droplets can form because of ordinary temperature differences between the tub and the room. The concern is unusual color, persistent pooling, or moisture concentrated around a zone that also looks stalled.
Metabolites can also confuse beginners. Yellowish liquid or amber staining may reflect stress, but a large amount combined with sour odor, sliminess, or declining growth deserves more concern than a small isolated mark. Don't scrape away a suspicious patch and assume the rest of the tub is safe. Disturbing the area can spread material and makes later diagnosis harder.
Odor is useful when obtained with minimal exposure. A clean mushroom-like scent supports the healthy interpretation, while sour, ammonia-like, or rotten odors point toward bacterial or other contamination issues. Sweetness by itself isn't a reliable safety test, so judge odor alongside texture, progression, and moisture.
Mostly white means “inspect carefully,” not “open confidently.”
If you must inspect a questionable tub, isolate it from other cultures and choose a controlled area. Avoid repeatedly lifting the lid during colonization. A contaminated tub can waste the time and materials invested in it, and additional handling can spread contaminants to nearby projects.
A useful decision is not “Can I rescue this?” but “Does the evidence support risking the rest of the grow?” If the tub has a spreading discoloration, foul odor, slimy section, or persistent stalled zone, starting over is often more sensible than trying to fruit through the warning signs. For additional visual context, compare the examples in this guide to white mushroom mold, while remembering that an online image can't identify your exact sample.

Troubleshooting a Stalled or Stuck Tub
A tub can appear fully colonized and still fail to produce pins. The useful response is to identify the limiting signal rather than changing everything at once.
Observable pattern | Likely direction to investigate | Conservative response |
|---|---|---|
Dry, matte surface | Excessive evaporation or inadequate moisture | Reduce air loss and mist lightly only if the surface is visibly dry |
Heavy condensation with slow growth | Excess moisture or insufficient exchange | Improve passive fresh-air exchange gradually and remove pooling water |
One unchanged zone | Uneven colonization, a wet pocket, or contamination | Monitor that area closely without repeatedly opening the lid |
Thin, stretched growth | Gas exchange or light may be inadequate | Make one small airflow or lighting adjustment and observe the result |
No change despite balanced conditions | Biological limitation, old spawn, or contamination | Stop adding interventions and assess whether the tub should be discarded |
Moisture is often the first place to look. Excess free water can slow mycelial expansion and increase contamination risk. A SARE-supported cultivation trial found that high-moisture spent brewer's grain produced longer colonization times, reduced colonization, and more contamination across oyster, shiitake, and lion's-mane trials. The broader lesson applies here: saturated substrate can create both a growth delay and a contamination opportunity.
Temperature changes can also slow a tub without making it look diseased. A colder room may leave the surface apparently healthy while biological activity becomes sluggish. Aging or weak spawn can create the same appearance, as can an uneven spawn distribution that leaves some sections under-inoculated.
Don't break up the top layer to “wake it up.” That damages the established surface and creates new exposed areas. Likewise, don't add water just because pins haven't appeared. Confirm dryness first by observing whether the surface has lost its fine moisture film.
If the tub has clean odor, stable moisture, no spreading discoloration, and a plausible environmental issue, make one adjustment and observe. If conditions look balanced and the surface remains stalled after a week, the cause is more likely biological than environmental. Patience alone won't correct contaminated material, exhausted nutrition, or weak spawn.
The Colorado Cultures guide to an all-in-one grow bag not fruiting offers a related troubleshooting perspective, but the same diagnostic habit applies to a monotub. Identify the visible symptom first, then change the smallest possible variable.
Habits That Make the Next Tub Easier
Consistency starts before the tub turns white. Record when inoculation began, the spawn-to-substrate ratio, the temperature range during colonization, and the moisture condition of the substrate at mixing. You don't need a complicated spreadsheet. A dated note with clear observations is enough to reveal patterns that memory smooths over.
Photograph the tub from the same angle under similar light. Compare surface coverage, condensation density, color shifts, and stalled zones rather than judging each image in isolation. A photo log can show whether a patch is expanding slowly or hasn't changed at all.
Keep your materials and variables consistent where possible. Prepared substrate should be hydrated evenly, spawn should be vigorous, and ventilation changes should be recorded instead of improvised. A cultivation reference reports that favorable monotub runs may produce approximately 3–5 flushes, but performance varies with genetics, substrate, spawn ratio, moisture, hygiene, temperature, and fruiting conditions, as explained in this mushroom cultivation performance guide.
Treat each flush as information. Note fresh and dry weights, contamination events, surface moisture, and environmental conditions. Biological efficiency, calculated from fresh mushroom mass divided by dry substrate mass and multiplied by 100, can provide a more useful comparison than an informal impression of whether one tub “did well.”
The core habit is simple: read the tub before acting. Don't open it because a calendar says it should be ready, and don't fan or mist because another grower follows that routine. Let observable signals guide the next small change.
If you're preparing your first tub or refining your setup, Colorado Cultures offers monotub grow kits, sterilized grain, substrates, filter patches, and practical instructions for legal gourmet and specialty mushroom cultivation. Choose the supplies that match your container, record the signals your tub gives you, and use that evidence to make the next grow easier to diagnose.
Comments