
How to Grow Button Mushrooms at Home
You've brought home a button mushroom kit, set it on a shelf, and reached for the spray bottle. The surface looks dry, so you mist it again. A few days later, nothing happens, or the mushrooms appear with long stems and tiny caps. The problem usually isn't a lack of water. It's that button mushrooms depend on a carefully managed casing layer, the distinct surface that connects colonized compost to fruiting.
Learning how to grow button mushrooms at home becomes much easier when you stop treating the crop like an oyster mushroom kit. Agaricus bisporus grows through a compost-colonization stage, then needs a relatively nutrient-poor casing layer and a controlled change in temperature and fresh air before it produces pins. The grower's job is to protect that sequence.
What You Are Actually Growing
On the first day with a tray, you may see something that resembles ordinary soil covered with white growth. It isn't ordinary soil, and the white network isn't a plant root. You're cultivating Agaricus bisporus, the species behind familiar white button and cremini mushrooms, and its food source is prepared compost.
That distinction matters because button mushrooms follow a different rhythm from many beginner-friendly mushroom kits. Oysters can fruit directly from a straw or sawdust block when moisture and fresh air are suitable. Button mushrooms first spend time spreading through compost, then fruit from a separate casing layer placed over the fully colonized surface.
Practical rule: Treat the compost as the mushroom's food and the casing as its fruiting environment.
During spawn run, the mycelium expands through the compost. At this point, your priorities are stable warmth, high humidity, cleanliness, and limited drying. After colonization, the casing supplies a moist but airy zone where pins can form. It also helps moderate the surface between watering and evaporation, which is why a constantly wet room can't compensate for a poor casing.
If you're comparing this crop with portobello cultivation, the same species is involved, but harvest timing and maturity change the appearance and texture. The portobello growing guide is useful for seeing how the same mushroom can be managed for a different stage of development.
The crop has two different jobs
First, the mycelium must colonize a nutritious compost. Second, the grower must encourage that established mycelium to switch from vegetative growth to mushroom formation. The casing layer sits at the center of that change.
That's why frequent misting isn't the main skill. You can keep the room humid and still fail if the casing is absent, too shallow, compacted, crusted, or saturated. Conversely, a well-prepared casing can hold useful moisture while allowing enough air exchange for pins to develop.
Patience also matters. A healthy bed may look inactive while the compost is colonizing. Avoid digging into it to check progress, because handling creates opportunities for contamination and disrupts the even structure that later supports fruiting.
Preparing Compost the Right Way
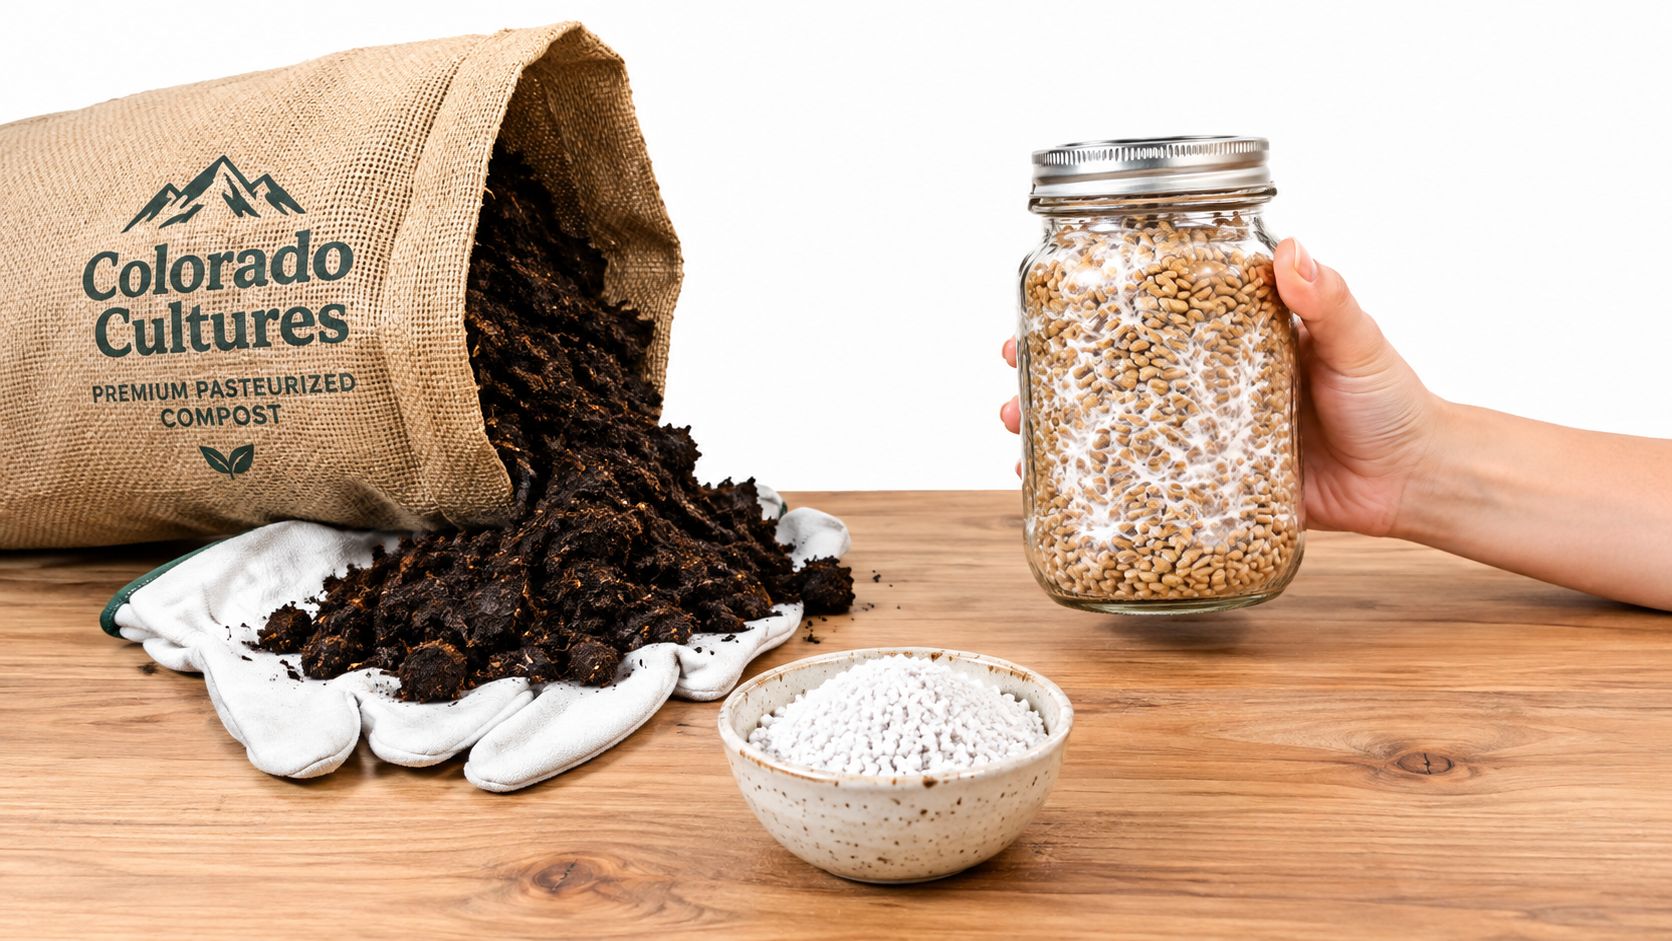
A beginner can do everything right later and still get weak results if the compost starts out wrong. For button mushrooms, the compost is the food reserve under the casing, and the casing can only guide fruiting well if that reserve is balanced. Prepared, pasteurized or commercially prepared compost gives Agaricus bisporus the structure and nutrition it needs in a way ordinary garden soil does not.
For a first crop, ready-to-use compost is usually easier to handle. It removes several failure points at once, including heating, turning, moisture adjustment, and ammonia removal. Home-mixed straw and manure can work, but it asks for space, clean handling, time, and a dependable conditioning process before spawn ever touches the bed.
Judge compost with your senses
Your hands and nose tell you a lot here.
Finished compost should smell earthy, not sharp or chemical. It should feel moist enough to hold together when squeezed, but it should not release a stream of water. That balance matters because the casing layer later depends on steady moisture rising from below. If the compost is too dry, the surface dries unevenly and pinning becomes harder to manage. If it is muddy or sour, air spaces collapse, and mycelium struggles before the casing ever gets a fair chance to do its job.
If you are making ingredients yourself, a practical North Georgia compost guide can help you understand how organic materials break down before you adapt that knowledge to mushroom compost. General composting knowledge helps you read texture, moisture, and decomposition stage, but button mushroom compost still needs mushroom-specific pasteurization and conditioning.
Pay close attention to ammonia. A harsh ammonia smell means the compost is not finished conditioning, and spawn can be damaged instead of fed. New growers sometimes try to fix this by adding extra spawn or more water. That does not solve the underlying problem. Let the compost finish conditioning according to the supplier's directions or the method you are using.
Depth changes the bed's reserve
Compost depth is not just a container-filling detail. It changes how much water and nutrition the bed can store under the future casing layer, much like a thicker sponge holds a larger reserve and releases it more steadily. In an agricultural trial, 18-inch compost depth produced 21.23 kilograms of mushrooms per 100 kilograms of compost, compared with 16.33 kilograms at 12-inch pressed depth in the reported experiment. The exact result will vary in home setups, but the pattern is useful. A shallow bed can run short on reserves before fruiting is underway.
Use the depth recommended for your substrate or kit, and avoid packing the compost down hard just to fit more into the container. A good bed is firm enough to stay even, loose enough to keep air spaces, and deep enough to support the casing layer that comes later.
Remember: Substrate problems begin long before pins appear, and misting cannot repair contaminated, under-conditioned, or nutritionally poor compost.
Choosing Spawn and Inoculating
Spawn is the living mushroom culture used to colonize the compost. Grain spawn consists of grains covered with vigorous mycelium, giving you many small inoculation points when mixed through the bed. For a beginner, it's easier to distribute than a single culture sample and more practical for a solid compost system than trying to build the crop from liquid culture alone.
Before opening a bag or jar, inspect it carefully. Healthy spawn generally has a clean mushroom smell and an even white mycelial network. Reject material with green, black, or brightly colored patches, wet bacterial areas, or a sour odor. Don't mix questionable spawn into a good compost bed. Contamination spreads much more easily after the material enters a humid growing chamber.

Distribute the culture evenly
Break up fully colonized grain gently, using clean hands or sanitized tools. The goal isn't to create powder. It's to separate the grains enough that the mycelium reaches compost throughout the container rather than starting in a few dense pockets.
You can place spawn across the surface and cover it with compost, or mix it through the bed. Through-spawning usually creates a more even network, while surface spawning can be useful when a product's instructions specify that method. Follow the substrate supplier's guidance rather than changing several variables at once.
The right amount depends on the compost, the container, and the spawn product. A prepared rye grain spawn guide can help you understand how grain spawn behaves and how to handle it without damaging the culture. For a home experiment, record the spawn amount, compost depth, and colonization time so the next batch teaches you something useful.
Keep the work area clean. Wipe the container, sanitize tools, wash your hands, and keep the lid or bag open only as long as necessary. The long colonization period gives contaminants plenty of opportunity if you handle the bed casually.
After inoculation, level the compost without packing it hard. The surface should remain stable enough to receive casing later, but not so compacted that water and air movement become uneven. Keep notes from this point onward, because a date for inoculation makes later pinning observations much easier to interpret.
Why the Casing Layer Matters Most
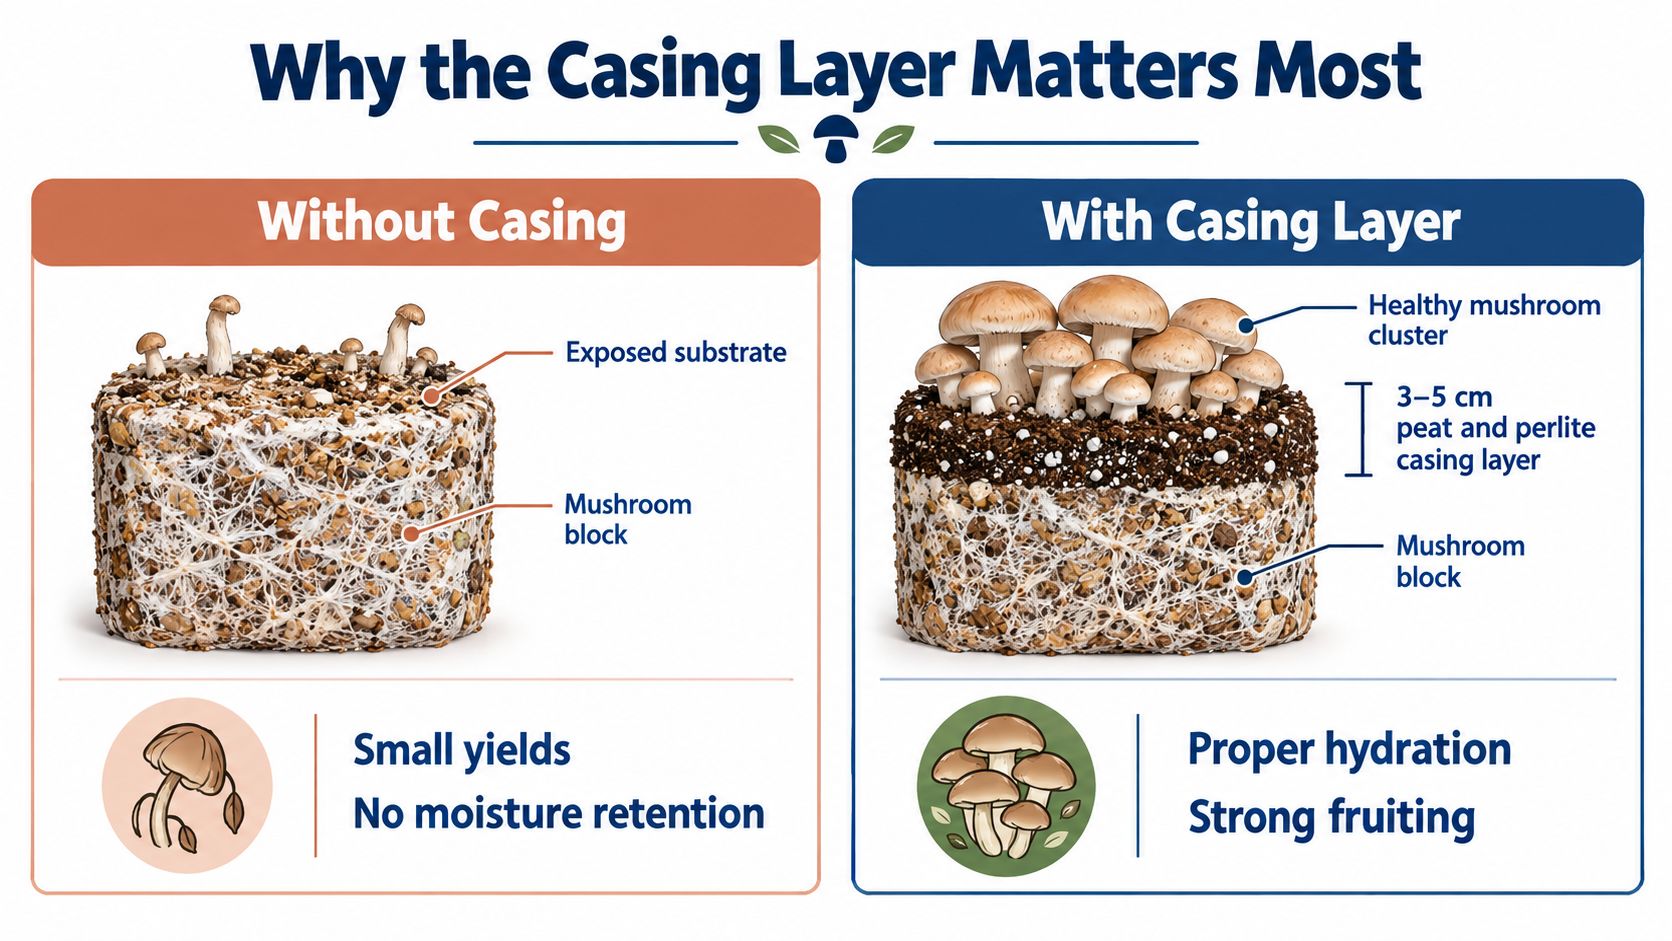
The casing layer is a shallow, relatively nutrient-poor material placed over fully colonized compost. It isn't an optional decoration, and it isn't the same thing as adding more food. For button mushrooms, casing creates the moist, buffered surface where the mycelium can form primordia and develop pins.
A practical casing depth is about 3 to 5 centimeters, while university extension guidance specifies a layer of about 3 to 4 centimeters. The same guidance reports pins generally appearing 12 to 15 days after casing, with cropping continuing for 6 to 8 weeks under suitable conditions according to its cultivation guidance.
Moisture behavior beats a misting schedule
Peat-based casing is common because it can hold moisture while maintaining useful pore space. Blends may include materials such as coir or other alternatives, but the important question is not whether the material sounds familiar. Ask how it behaves after watering. Does it absorb moisture evenly, remain open, and dry gradually? Or does it form a dense, wet crust?
Research has examined reduced-peat casing materials and found that peat can be replaced by substantial amounts of alternatives without necessarily reducing yield or increasing ginger blotch, although unsteamed grass performed poorly in the cited work. That finding supports testing safer blends, not dumping an untested material onto your bed.
Casing Material | Moisture Behavior | Yield Performance | Beginner Friendliness |
|---|---|---|---|
Peat-based casing | Holds moisture while remaining relatively open when prepared correctly | A dependable reference point | High when commercially prepared |
Peat and coir blend | Can retain water, but texture varies with coir quality | Requires comparison in your own setup | Moderate |
Untested garden material | Inconsistent moisture and contamination risk | Unpredictable | Low |
Apply casing only after the compost has colonized. Spread it gently and evenly. Don't press it into a hard layer, because compaction reduces aeration and creates wet pockets.
The surface should feel moist throughout, but it shouldn't have standing water. A dry surface and a waterlogged surface are different problems. The first needs careful rehydration, while the second needs time and airflow to recover. If you want a deeper explanation of structure and timing, this casing layer guide offers a useful reference.
The casing is the crop's control surface. Learn to read it by texture, moisture, and recovery after watering, not by how often you reach for a mister.
Managing Temperature, Humidity, and Air
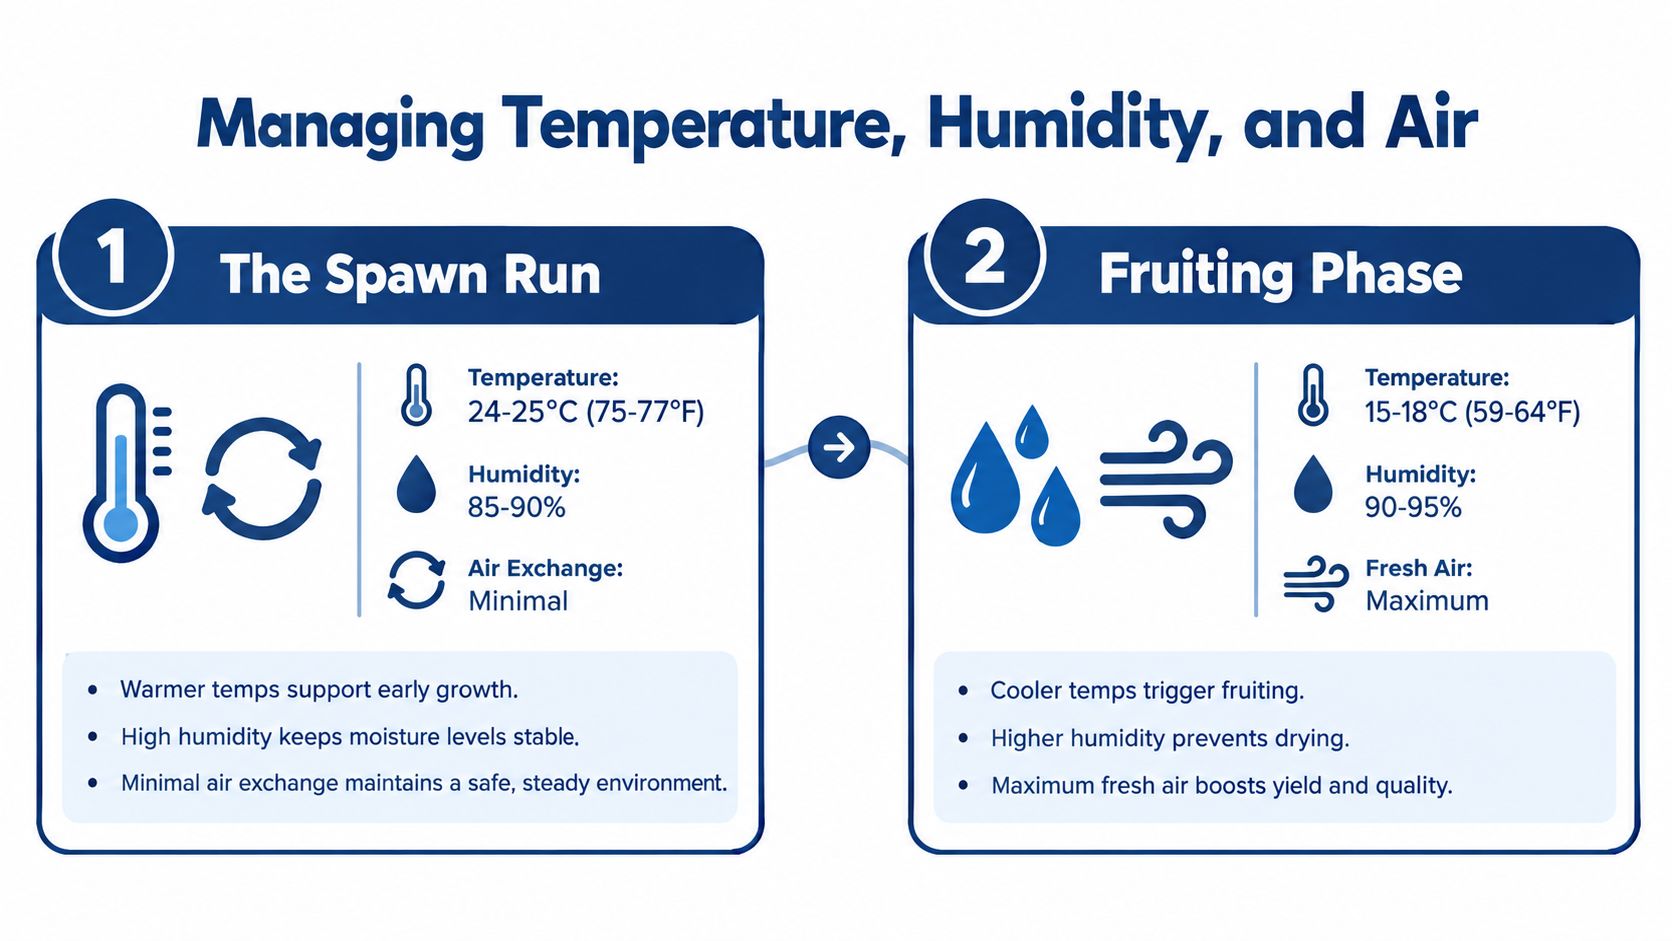
Button mushroom cultivation uses two climates in one container. During spawn run, you're protecting mycelial expansion. During fruiting, you're creating a deliberate environmental change that tells the established bed to make mushrooms.
Spawn run calls for stability
Keep the compost near 24 to 25°C, with high humidity and minimal fresh-air exchange while the spawn colonizes. One published cultivation trial held the crop at 25°C and 90% relative humidity during spawn run, then lowered it to 16°C after casing to encourage pin formation in the reported protocol.
Don't seal the container so tightly that condensation drips constantly onto the compost, but avoid strong ventilation at this stage. Excess air movement dries the bed before the mycelium has built a protective network. Your inspection should be brief and purposeful.
Fruiting needs a controlled shift
Once the compost is colonized and the casing has established, lower the temperature toward 16 to 18°C and increase fresh-air exchange. The combined reduction in temperature and carbon dioxide acts as the fruiting signal. Humidity should remain roughly 85 to 90%, but free water shouldn't sit on the casing.
The same trial recorded pinning in roughly 12.5 to 13.25 days, depending on the compost and casing combination. Use that as a reference, not a deadline. A different casing texture or climate can shift the timing.
A sealed fruiting chamber traps carbon dioxide. The mushrooms may respond with long stems and underdeveloped caps. Strong direct airflow creates the opposite problem, drying the casing and suppressing pins. Use gentle exchange rather than pointing a fan directly at the bed.
Indoor humidity can affect the surrounding room as well as the chamber. If condensation becomes a persistent household problem, general Sylacauga HVAC humidity advice can help you think about room-level moisture management without substituting for proper chamber control.
Log temperature, humidity, ventilation events, pinning date, and visible casing moisture. Your records will reveal whether a problem follows the climate shift, watering, or handling.
Harvesting Flushes Over Time
Harvesting starts with reading the mushroom, especially the veil under the cap. For button mushrooms, pick when the cap still feels firm and the veil is intact or only beginning to stretch. That stage usually gives you the texture most growers want, but you can wait a little longer if you prefer a more open cap.
Treat harvest as part of casing management, not as a separate chore. The casing works like a sponge and a support layer at the same time. Rough picking tears that surface, and a damaged surface dries unevenly and produces fewer clean pins on the next round.
Hold each mushroom low, close to the casing, then twist gently while lifting. Try not to yank straight up. That can pull out a plug of casing or leave a wide hole that dries faster than the surrounding surface. If several mushrooms in one cluster are ready at different times, remove them one by one. Beginners often clear the whole cluster for convenience, but that disturbs younger pins that still need a few more days.
The first flush usually carries the biggest share of production, but it is only the beginning. In a study using millet straw compost, researchers recorded yields of 22.10, 21.30, and 24.47 kilograms per square meter across three trials, with biological efficiency ranging from 68.4% to 72.58% in the reported experiments. The same experiments found that the first flush contributed the most, with the second following behind. Keep caring for the bed after the first harvest, because that is how you protect the later flushes rather than spending the casing all at once.
Reset the surface carefully
After each picking, clean the surface. Remove stem butts, bruised tissue, and any scraps that could decay in place. Then rehydrate the casing gradually. A light, even watering lets moisture soak back in without collapsing the pore spaces the next pins need.
Avoid flooding. Water sitting in holes or around tiny pins is a common beginner mistake.
Some commercial systems physically manipulate beds after later flushes, but that does not mean a home tray should be flipped or reworked. As noted earlier, results from bag-based methods depend on bag shape, compost depth, and how the casing is held together. In a small container, casual overturning usually does more harm than good. Follow the design of your tray or kit, change one practice at a time, and weigh each flush separately. Cropping can continue for weeks when the casing stays evenly moist, open to air, and clean.
Troubleshooting the Most Common Problems
Button mushroom failures often look mysterious because growers respond to visible symptoms with the wrong control. No pins doesn't automatically mean “add more water,” and a dry-looking surface doesn't always need a heavy misting. Start with casing condition, temperature, fresh air, and contamination.
Read the symptom before changing the system
No pins after casing: Check whether the casing has colonized, whether the temperature has been reduced, and whether fresh air can lower carbon dioxide. If you changed all three at once, return to a stable routine and record the response.
Long stems and small caps: The chamber may be retaining too much carbon dioxide. Increase gentle air exchange, but don't aim a strong fan at the casing.
Brown or spotted caps: Over-misting and standing moisture can encourage bacterial spotting. Use clean water, reduce surface wetness, and improve gentle air movement.
A dry, hard crust: Direct airflow or insufficient moisture may have dried the casing. Stop the draft and rehydrate carefully, avoiding a sudden flood.
Sour or ammonia smell: The compost may be contaminated or incompletely conditioned. Don't bury the odor under more water or spawn. Isolate the container and assess whether it should be discarded.
Green or black mold: Remove the contaminated block promptly and clean the area. Don't open it beside healthy beds, because spores and fragments can spread through a humid chamber.
Research identifies over-misting and strong direct airflow as common fruiting pitfalls that can lead to bacterial spotting, collapsed pins, or a surface crust that suppresses pin formation in its analysis of casing and fruiting. That's why the casing deserves a daily visual check rather than an automatic spray schedule.
Diagnostic order: Check moisture, then airflow, then temperature, then cleanliness. Change one variable and give the bed time to respond.
Keep tools sanitized and remove spent tissue after harvest. Small flying insects can also carry attention away from the underlying issue, so if you're identifying pests, a guide to fungus gnats in potting soil can help you distinguish larvae and adult activity from ordinary mushroom growth.
Colorado Cultures offers sterilized grain bags, prepared substrates, all-in-one grow bags, grow kits, tools, printable instructions, tutorials, and support for home cultivators learning each stage of mushroom cultivation. Visit Colorado Cultures to choose supplies that fit your setup and get practical help as you move from clean inoculation to casing, fruiting, and harvest.
Comments