
Mushroom Fruiting Block Guide: From Start to Harvest
You've opened a bag that's covered in healthy white growth, but the next move isn't obvious. Should you cut the plastic, mist the surface, add more air, or leave the block alone? Most first attempts fail because growers treat a mushroom fruiting block as a humidity project. In practice, reliable harvests depend on balancing substrate moisture, contamination pressure, fresh-air exchange, and the block's biological efficiency.
A fruiting block already contains the colonized material needed to produce mushrooms. Your job is to expose the right surface, create a clean transition into fruiting conditions, and make small environmental adjustments before problems become irreversible. The workflow below focuses on what the block is telling you, not on blindly following a misting schedule.
What a Mushroom Fruiting Block Actually Is
A mushroom fruiting block is a fully colonized bag or container of substrate that's ready to produce fruiting bodies. The substrate may be supplemented hardwood sawdust, straw, or another lignocellulosic material, with grain spawn mixed through it or used to start colonization. Spawn, liquid culture, and bulk substrate all support the growing phase, but a fruiting block is the finished colonized unit that you place into fruiting conditions.
Spawn is the living mycelium used to inoculate a larger food source. Liquid culture is mycelium suspended in a liquid nutrient medium. Bulk substrate is the material the mycelium colonizes after inoculation. A fruiting block sits at the final stage, where the dense mycelial network has converted the substrate into a coherent mass capable of forming mushrooms.
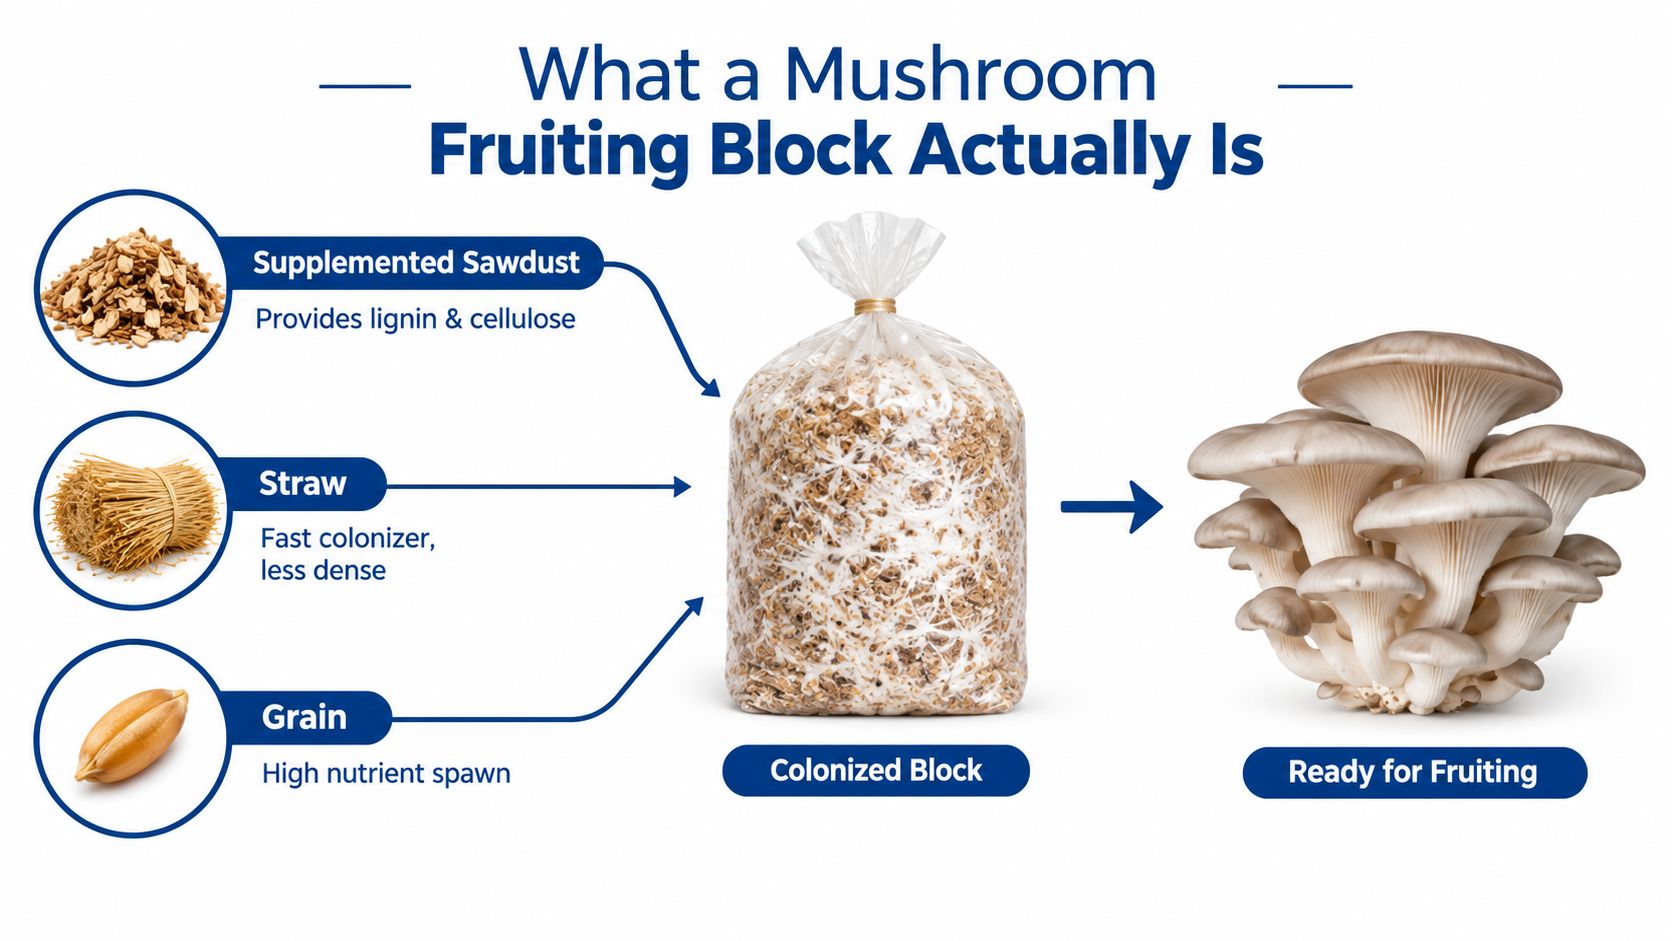
The parts you'll see in a finished block
The plastic bag protects the substrate and limits contact with airborne contaminants. A filter patch allows gas exchange while helping keep unwanted spores and organisms out. Many bags also have an injection port or sealed inoculation point, although a ready-to-fruit block usually doesn't need further inoculation.
Inside the bag, the mycelium should look integrated with the substrate rather than sitting as a loose white layer. Some species fruit from cut openings on the sides, while others perform better from an exposed top surface. Shiitake blocks can also develop a hardened outer skin before fruiting, unlike the softer appearance common in some oyster blocks.
Block size and formulation create the ceiling for production. A 2019 peer-reviewed cultivation study reported colonization times of about 34.38 to 36.12 days, yields of 180.22 to 186.21 grams per bag, and biological efficiency of 68.65% to 70.94% across four support materials, with a corncob block spawn performing particularly well at 186.21 ± 12.24 grams per bag and 70.94 ± 4.66% biological efficiency (peer-reviewed block spawn cultivation data). Biological efficiency compares fresh mushroom production with the dry substrate used, so it's more useful than judging a wet block by appearance alone.
Preparing Your Block for a Clean Start
Before cutting into the bag, inspect the block under good light. Healthy colonization is generally dense and white, although species and maturity can change the surface appearance. Green, pink, or black growth, sour odors, slimy patches, or unexplained wet areas deserve caution. A suspicious block should stay away from other cultures rather than being placed directly into a shared fruiting chamber.
Press the bag gently. A mature block should feel substantially colonized and hold together rather than shifting like loose, wet substrate. Don't squeeze repeatedly to test it, because every extra handling event creates another opportunity to damage the bag, spread contamination, or expose the substrate unnecessarily.
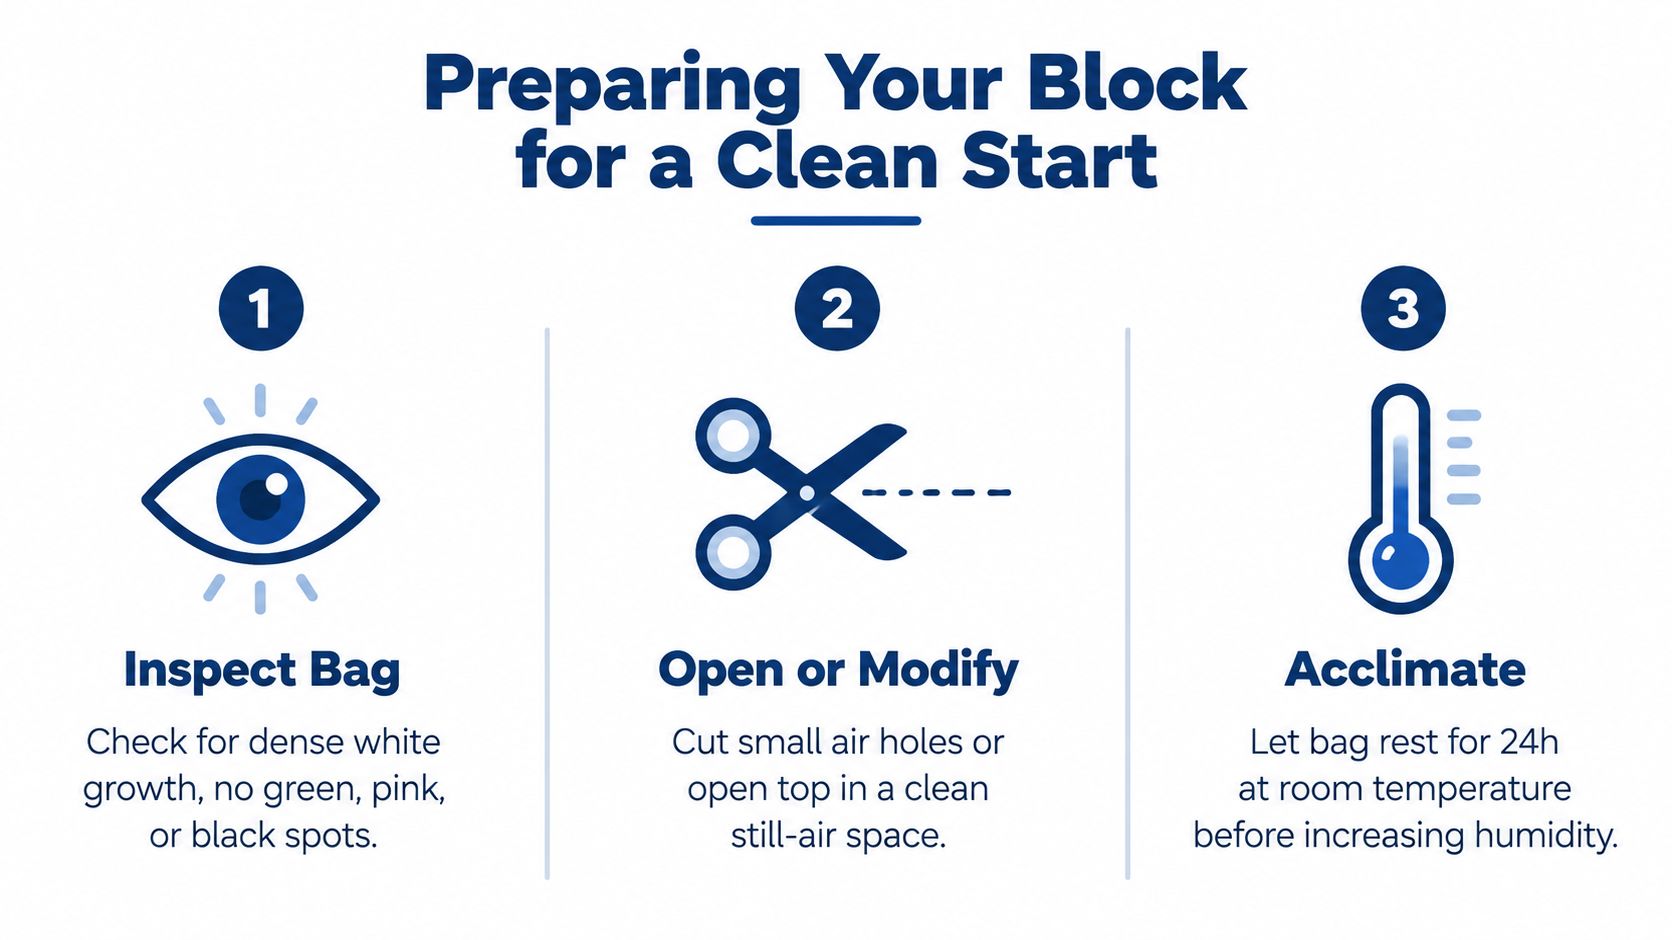
Make the opening match the species
Clean your hands, wipe down the work surface, and sanitize the knife or scissors before opening the block. Specialty equipment helps in larger operations, but at this stage clean technique and minimal handling matter more than elaborate hardware.
Some oyster varieties fruit aggressively from side openings, so a small X or several small slits can expose the intended surface without removing the entire bag. A top-fruiting block may need the upper plastic cut away while the sides remain protected. Removing too much plastic can dry the substrate and expose more surface area to contaminants than the crop needs.
If the substrate looks excessively wet, don't compensate by adding more water. Pooling liquid can increase contamination pressure and interfere with gas exchange. Drain or remove visible pooled liquid only if you can do so without tearing the colonized mass. Growers who prepare their own material should also standardize hydration and heat treatment, using a consistent mushroom substrate pasteurization process rather than trying to correct inconsistent moisture after colonization.
A brief period with the cut surface exposed to clean room air can help remove surface excess, but don't deliberately dry the block. The useful target is a moist, cohesive substrate with no standing water. Once opened, place it in the fruiting area and avoid moving it repeatedly.
Initiating Fruiting and Triggering Pins
Pinning responds to a coordinated environmental change, not one magic switch. A colonized block usually needs a clearer supply of fresh air, indirect light, suitable temperature, and a surface that stays humid without becoming waterlogged. Change those conditions together, then observe the block before making another adjustment.
Diffuse light provides direction and a day-night signal. A regular 12-hour light cycle can help keep growth oriented, but direct sun can heat the bag and dry the exposed surface. Place the block where it receives indirect daylight or gentle artificial light rather than treating brightness as a substitute for airflow.
Read the early signals
The first signs may be subtle. Look for small mycelial thickenings, knots, droplets of metabolites, or tiny primordia developing near the cut. These changes indicate that the block is allocating energy toward fruiting, but they don't guarantee a successful flush. Pins still need stable moisture and air conditions to continue expanding.
If pins appear only on the sides, the block may be receiving stronger environmental cues there, or the exposed surface may be too dry or poorly positioned. Avoid cutting additional openings immediately. First check whether the existing fruiting face is receiving diffuse light and fresh air without a direct draft.
Species respond differently. Some oyster strains can benefit from a noticeable cooling period, while lion's mane generally performs better with steady conditions and careful protection of its developing teeth. Don't apply a dramatic temperature shock unless the strain's instructions support it. The aim is to create a controlled transition, not to stress the block.
Practical rule: During pin initiation, a damp-looking surface is useful. A dripping or pooled surface is not.
Mist the surrounding chamber or walls when possible instead of repeatedly soaking pins and exposed substrate. Over-misting can wash across the surface, encourage bacterial problems, and make it harder to tell whether the block is maintaining moisture internally.
Controlling Humidity, Temperature, and Air
A fruiting chamber should be managed at the level of the block, not by a single room reading. Humidity that's high near a humidifier may be much lower where the mushrooms are forming, while stagnant air can leave the block surrounded by carbon dioxide even when the room feels comfortable.
Most species fruit best around 85% to 95% relative humidity, while sustained levels above 95% can cause pooling water, bacterial contamination, and soft or discolored caps (fruiting-block environmental guidance). Hygrometers should sit close to block height, away from the direct humidifier output, so the reading represents the crop rather than a moisture plume.
Fresh-air exchange is the other half of humidity management. Adding water without removing stale air often produces fuzzy mycelium, elongated stems, weak caps, and stalled development. The block needs enough air movement to remove carbon dioxide while retaining enough moisture for pins to expand.
Environment targets by fruiting phase
Variable | Pinning phase | Fruit development |
|---|---|---|
Relative humidity | Keep the surface humid and prevent drying or pooling | Usually maintain about 85% to 95% RH (fruiting-block guidance) |
Fresh air | Increase exchange so pins receive a clear environmental cue | Continue steady exchange while preventing a harsh drying draft |
Temperature | Use the strain's fruiting range and avoid abrupt swings | Hold conditions consistently for the species |
Light | Provide diffuse light on a regular day-night cycle | Keep the same orientation signal |
Surface condition | Condensation can be visible, but standing water is a warning | Caps and stems should stay firm rather than waterlogged |
Measure the block's immediate environment with a digital hygrometer, preferably with a probe positioned beside the fruiting face. An infrared thermometer can reveal whether the substrate surface is running warmer or cooler than the surrounding air. If the room itself stays damp, a whole-home dehumidifier for Arizona offers useful background information on controlling household moisture, although a grower still needs to manage humidity inside the fruiting area.
Temperature should follow the strain rather than a universal chart. Cool-loving oysters and lion's mane generally prefer cooler fruiting conditions, while tropical strains tolerate warmer environments. Read the cultivar description before changing the room, and make gradual adjustments when possible. For a practical discussion of how temperature affects fruiting, use this guide to mushroom fruiting temperature.
Biological efficiency improves when moisture, air, and temperature remain stable long enough for the block to convert its stored nutrients into fruit. It doesn't improve because the chamber looks foggy.
Harvesting Across Multiple Flushes
The first flush usually announces itself with a fast change. Pins swell, caps expand, and the block can go from sparse knots to a harvestable cluster before a new grower feels ready. Pick when caps are still slightly convex and the gills or pores are visible, but before the mushrooms release a heavy spore load. Stems should feel firm, not stringy or waterlogged.
For a cluster, either twist and pull close to the base or use a clean, sanitized blade. Twisting can remove the whole cluster, but aggressive pulling may tear the block. A sharp cut leaves the colonized base in place and can be gentler when mushrooms are tightly attached. The practical mushroom harvesting guide can help you compare the two approaches by species.
What happens after the first picking
After harvest, remove loose stem material and inspect the exposed area. Give the block a quiet rest rather than immediately flooding it with water. A clean, intact block may produce another flush, but each cycle can expose more substrate and create more opportunities for contamination.
Rehydration is species-dependent. Some blocks respond to a short soak, while delicate lion's mane can break apart if submerged too long. Other instructions use a substantially longer soak to encourage another flush. The right decision depends on the block's weight, surface condition, species, and contamination risk. If the substrate still feels heavy and moist, misting the chamber may be safer than dunking it.
A spent block is not automatically a failed block. It's failed when the next intervention adds more contamination pressure than the remaining nutrients justify.
A 2019 SARE report found an average harvest of 0.88 pounds per block across five participating farms, and documented weekly systems using hundreds of blocks, showing why growers use the block as a planning unit for yield, labor, and production scheduling (SARE commercial mushroom production report). Your home block may behave differently, but the lesson holds: evaluate output against the block's formulation and dry-substrate basis, not against a single impressive cluster.
When a later flush becomes sparse, deformed, or repeatedly contaminated, retire the block. Healthy spent material can be composted or used as a garden amendment where appropriate, but contaminated material should be isolated from active cultures.
Troubleshooting the Most Common Block Problems
The usual advice is to keep everything humid and mist often. That's incomplete, and sometimes harmful. A fruiting block can remain visibly moist while pins abort because stale air, contamination, temperature instability, or damaged substrate is limiting development.
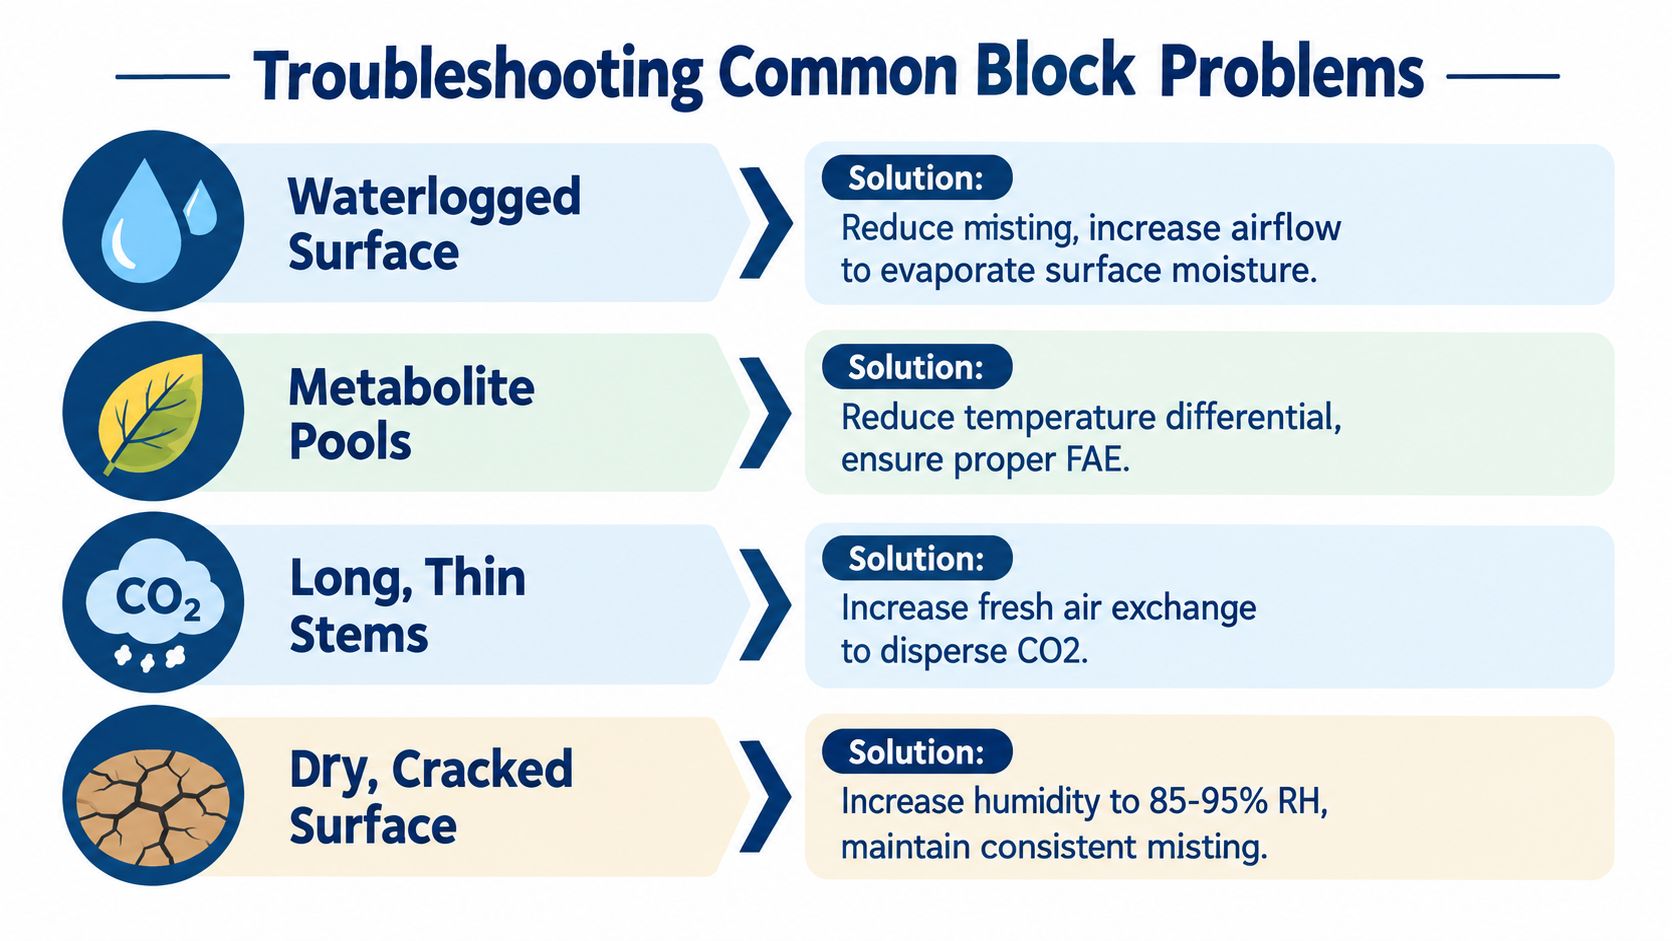
Diagnose the symptom before changing the chamber
Fuzzy white growth with no pins often points to insufficient fresh-air exchange. The mycelium continues growing vegetatively because the fruiting signal is weak. Increase air exchange carefully before adding more water, and check that the fruiting opening is not pressed against a wall or sealed by plastic.
Long stems and small caps also suggest stale air. The block is producing mushrooms, but carbon dioxide is accumulating around the fruiting surface. Improve ventilation and observe whether the next growth becomes more compact. Don't solve this by raising humidity alone.
Waterlogged surfaces, yellowing liquid, or soft caps indicate that misting has exceeded what the block can use or evaporate. Reduce direct spraying, remove standing water where safe, and restore gentle air movement. Over-supplemented or poorly hydrated substrates can also create problems that chamber adjustments can't fully repair.
Pins that yellow, shrivel, or abort may be responding to dry air, sharp temperature changes, or a surface that alternates between saturation and drying. Stabilize the environment and stop making several changes at once. A consistent moderate condition is easier to diagnose than a cycle of heavy misting followed by aggressive ventilation.
Treat contamination as a stop signal
Green mold, sour odors, slimy areas, and rapidly spreading discoloration mean the block should be isolated. Trichoderma can cause yield losses ranging from 34.5% to 94.1%, depending on the oyster strain and the degree of overgrowth (contamination and oyster yield study). Cutting away a visible patch doesn't guarantee that the contamination hasn't spread through the substrate.
Contamination can enter through damaged filter patches, torn side seams, careless cuts, dirty tools, or repeated contact with unclean surfaces. A randomized comparison of hemp stalks and straw found fewer contaminated hemp bags in one season, with 1 contaminated hemp bag versus 4 straw bags out of 54, while another season recorded 2 versus 2 (substrate contamination comparison). Substrate selection can help, but it doesn't replace clean inoculation and careful handling.
When the block looks wet but the mushrooms look starved, increase fresh-air exchange before increasing water.
Your Practical Block-Growing Checklist
Keep this checklist beside the fruiting chamber and use it as a decision tool, not a ritual. Each check protects one of the variables that determines whether the colonized substrate becomes a productive flush.
Before fruiting
Inspect the block: Confirm dense colonization, a normal smell, and no suspicious green, pink, black, or slimy growth.
Confirm moisture: The block should feel cohesive and hydrated without visible pooling. Don't add water to correct a problem you haven't identified.
Prepare the opening: Cut a small fruiting face suited to the species, leaving protective plastic around areas that aren't meant to fruit.
Clean the workspace: Sanitize tools and hands, then handle the block once and place it in position.
Set the environment: Put the hygrometer at block height and provide diffuse light with steady fresh-air exchange.
During pinning and fruiting
Check the exposed surface daily without opening the chamber unnecessarily. Condensation can be acceptable, but standing water, soft caps, sour smells, or rapidly spreading discoloration require action. If mycelium becomes thick and fuzzy without pinning, improve air exchange before misting more.
Keep humidity generally within the 85% to 95% range during fruit development (fruiting-block environmental guidance). Place the sensor near the crop, not beside the humidifier, and adjust one variable at a time.
Harvest and reset
Pick clusters while caps remain firm and slightly convex, before heavy spore release. Cut close to the block with a sanitized blade when twisting would tear the surface. After harvest, remove debris and let the block rest.
Soak only when the block feels noticeably lighter or the species and block instructions support rehydration. Keep the soak conservative for fragile species, drain thoroughly, and return the block to stable fruiting conditions. Retire it when later flushes become weak, the substrate loses integrity, or contamination appears.
Colorado Cultures offers Ready-to-Fruit Gourmet Mushroom Blocks, along with sterilized grain bags, substrates, grow kits, and practical cultivation supplies for home growers. If you want a prepared block and guidance for applying this workflow, visit Colorado Cultures and choose the setup that matches your experience and fruiting space.
Comments