
Mushroom Substrate Jars: Prep, Sterilize, Inoculate
You're looking at a jar that feels a little too wet, a pressure cooker you haven't fully trusted yet, and a syringe you don't want to waste. That's the usual night before a first run. Mushroom substrate jars are not one recipe with one cook time. Nutrition works like a contamination dial. A plain spawn jar, a low-nutrient fruiting jar, and a jar loaded with bran or soybean meal do not want the same moisture or the same heat. More food in the jar is not automatically a better jar.
Pick the job before you pick the ingredients. A spawn jar grows living mycelium you'll later move into a bulk bag or tub. A fruiting jar, the PF-style cake, is meant to produce mushrooms from the jar itself. Mix those goals and you'll either underfeed a cake or overfeed grain and invite mold.
Stay on one formula for this run. Match the heat to how rich that formula is, check what belongs in an edible jar, then inoculate and read the jar without opening every suspect.
The Right Formula for Mushroom Substrate Jars
Ask one question before you measure a single ingredient: will this jar feed a bulk substrate later, or fruit mushrooms by itself? If you want living inoculum to break into a larger substrate, you're making spawn. If you want mushrooms from a small cake, you're making a fruiting jar. Those two jars can sit on the same shelf and still fail for opposite reasons.
Grain spawn is an old idea for a practical reason. In 1930, Penn State researcher James Sinden propagated mushroom mycelium on sterilized cereal grain, then patented a cereal-grain spawn process in 1932, and by World War II that grain spawn was widely accepted in the United States, according to Penn State Extension. The jar still earns its shelf space because it holds a repeatable, breathable batch of that living "seed." The glass itself does nothing special.
One row for the first run
Pick a single row and don't "improve" it mid-mix. Rye, millet, wheat, or sorghum all work as spawn grains. One published oyster-mushroom cultivation protocol used sorghum with 5% shredded wheat and 1% gypsum in 300–500 milliliter glass jars, hydrated to approximately 60% moisture, then steam-sterilized at 15 pounds per square inch for one hour. The same protocol reported a contamination rate of about 5% on clean grain, and held the jars at approximately 22 ± 2°C until the grain turned fully white. Read that as the dial in action: modest nutrition, cooked hard, colonized clean.
Formula | Job | Moisture | Jar and fill | Heat |
|---|---|---|---|---|
Rye, millet, wheat, or sorghum grain | Spawn | About 60%, few drops on a squeeze | 300–500 ml, two-thirds to three-quarters full | 15 psi, 121°C, 60–90 min |
Sorghum, 5% shredded wheat, 1% gypsum | Spawn | About 60% | 300–500 ml glass, loose fill | 15 psi for 1 hour |
Brown rice flour and vermiculite | Fruiting cake | Field capacity, few drops on a squeeze | Half-pint jars, not packed | Atmospheric steam 60–90 min, or run in the pressure cooker |
Plain hardwood sawdust | Low-nutrient fruiting | Few drops on a squeeze, no puddle | Loose fill with headspace under the lid | Sterilize, or pasteurize only for a fast species |
Grain or sawdust plus bran or soybean meal | Supplemented spawn or fruiting | Few drops on a squeeze, no puddle | Smaller, loose fill | Full sterilization, higher mold risk |
Notice the pattern down the Heat column. The richer the mix, the more the cook has to do, because every gram of bran or meal is food for contaminants too.
How wet is wet enough
Hydrate, drain hard, then squeeze a handful for several seconds. Only a few drops should appear. A puddle trapped in the jar creates anaerobic pockets where sour bacteria take over before the mycelium gets a foothold. Dust-dry grain does the opposite damage: colonization crawls and stalls in the center, and the jar never knits. Leave headspace under the lid so gas can move, and keep the fill loose rather than packed.
Before you commit a whole cooker load, weigh a small test batch of the dry grain and work out the water needed for about 60% moisture, so you know the fill weight going in. This walkthrough on calculating mushroom substrate amounts shows the math step by step.
Practical rule: Bran and soybean meal are not a bonus scoop on a first jar. Each extra unit of nutrition turns the contamination dial toward mold, and supplemented mixes belong on the full-sterilization side of the heat decision.
A brown-rice-flour and vermiculite cake in a half-pint jar is a fruiting project, the kind you harvest straight off the cake. Plain hardwood sawdust is the low-nutrition fruiting option, and it forgives more than first-time growers expect. Supplemented jars can wait until you've finished one clean batch.
When Sterilization Beats a Richer Mix
A jar of plain rye and a jar of rye stirred with soybean meal can sit side by side in the same cooker, and only one of them is likely to come out green. Supplements feed mycelium, and they feed everything else. A 2025 study in the Journal of Advances in Biology & Biotechnology found that supplements can improve oyster growth and yield while creating a nutrient-rich environment that favors molds, bacteria, and competing fungi. Soybean meal in particular requires sterilization, and that extra cook raises production cost. Nutrition works like a dial: every step up feeds the mushroom better and feeds contaminants better too.
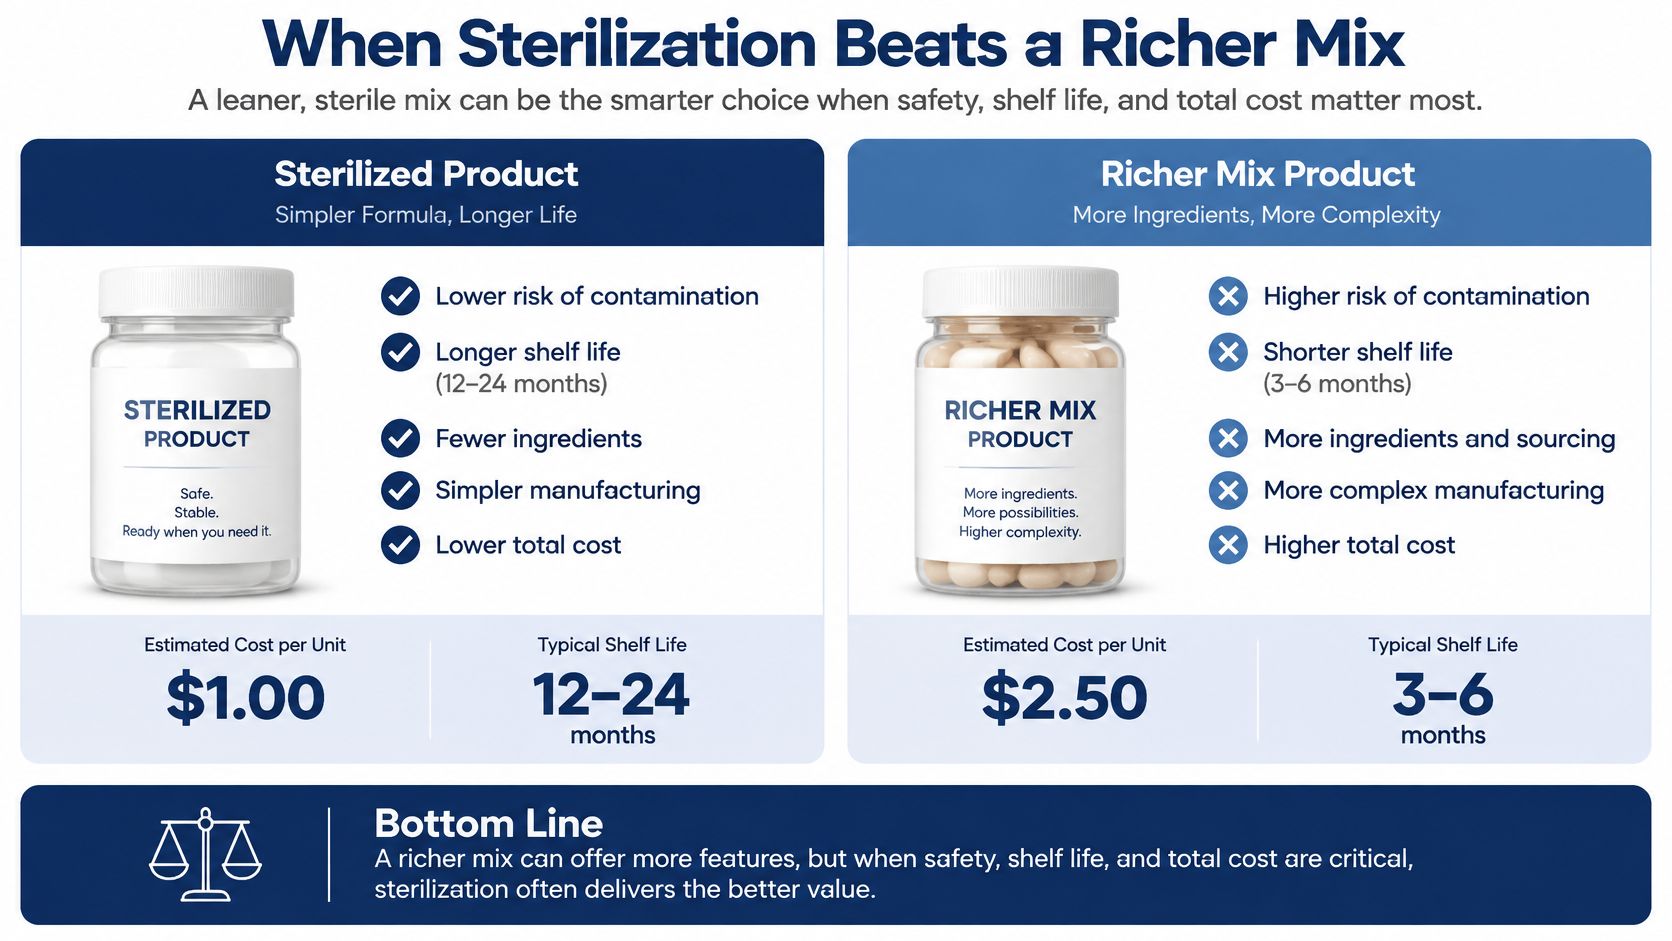
Heat has to follow the recipe, not the other way around. A comparative review on PubMed Central reports that autoclaving can increase dry oyster-mushroom yield by up to 50% versus pasteurization, and that 121°C for about 1–2 hours is a commonly reported range for dense, bagged loads. Grain, and anything with bran or soy mixed in, sits on the pressure-cooker side of that line. Pasteurization earns its fuel savings only on plain straw or low-nutrient sawdust, and only for a species that colonizes fast enough to reach the food before whatever survived the heat.
Choice | Use it for | Heat and time | Trade-off |
|---|---|---|---|
Pressure cooker at 15 psi, 121°C | Grain and any bran or soybean meal | 60–90 min for small loose jars; about 1–2 hours if dense | Fastest clean colonization; needs a cooker |
Pasteurization or atmospheric steam | Plain straw or low-nutrient sawdust for tolerant species | Below full sterilization, with a longer hold | Saves energy; unreliable on grain or supplements |
Fermented substrate | Experimental bulk only | Ferment first; colonization runs longer than on a sterilized mix | Results are less established than sterilized grain |
Pre-sterilized grain jar or bag | First run without an autoclave | No home cook step | Removes the cook step, so you depend on the supplier's sterility |
What you spend to stay clean
Sterile grain colonizes faster and fails less often, and it costs cooker time and attention. Pasteurized jars save fuel only while the nutrition stays low, because pasteurization leaves some microbes alive and a rich feed gives them room to regrow. Fermented substrate belongs in a slow bulk experiment after you have clean plain runs behind you. No pressure cooker in the kitchen? Buy grain that is already sterile instead of steaming rye and hoping the center got hot.
If the recipe includes grain, bran, or soybean meal, sterilize it and keep the supplement modest. On a first run, hold the dial at plain: one formula, one heat method, nothing experimental.
Validate the cycle with autoclave indicator tape on the lid, and start the timer only after the cooker reaches 15 psi. The gauge proves the chamber is hot. It does not prove a dense, wet center is hot. Default to an 80–90 minute hold for any load that is deep, packed, or wet. A short cycle on a heavy jar is how a cool core survives and blooms later as slime.
Safety Checks Before You Buy or Dump a Jar
What you put in the jar can ride into the mushroom. A 2025 review on PubMed Central warns that alternative substrates may contain pollutants, pathogenic microorganisms, and inconsistent composition, and that research treatments include fermentation, steaming, or chemical pre-treatment. Those are lab treatments, not a weekend experiment. The same review treats residue transfer from substrate into fruiting bodies as an underrecognized food-safety concern.
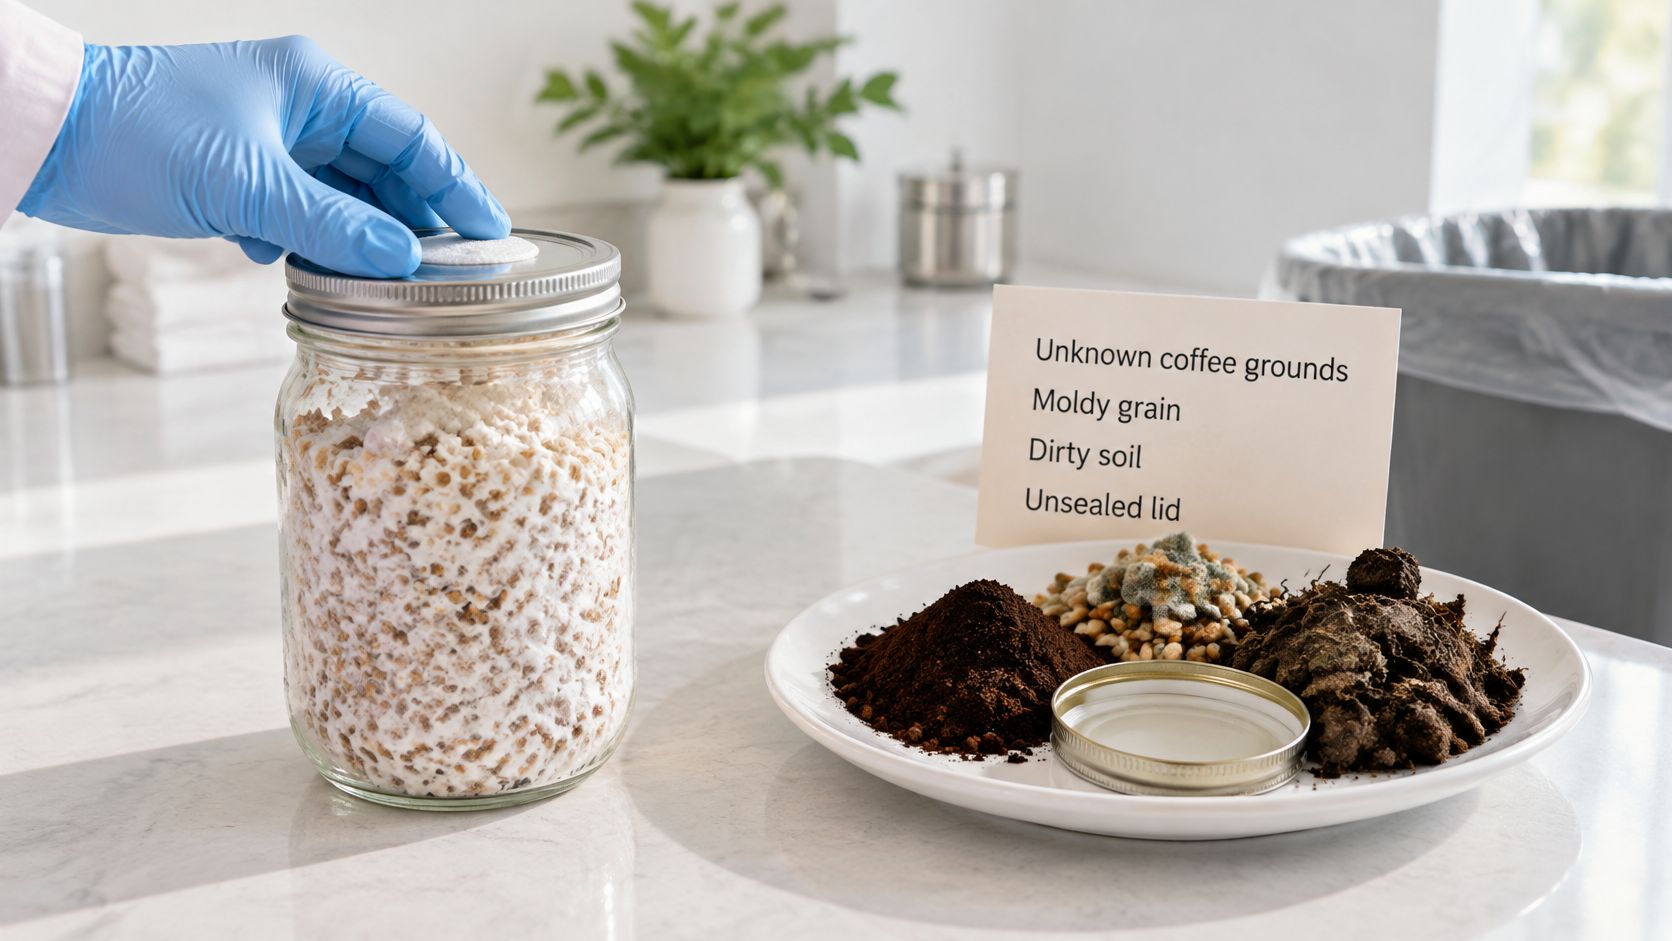
What stays out of a first edible jar
Leave these off the shopping list until you have a clean, plain run behind you.
Unknown coffee grounds: Oils, sugars, and whoever handled the pot make an inconsistent, contamination-prone mix.
Farm residues and recycled waste: They can carry pollutants, pathogens, or a makeup that changes from bag to bag.
A "richer" label with no sterilize date: Supplements belong only on a jar you fully sterilize, not on a mystery bag.
Prefer food-grade grain, gypsum, and hardwood from a seller who can tell you the source. Match the purchase to the formula row you already chose, not to the richest sticker on the shelf.
A short buy checklist
Before you pay, look for an intact filter or injection port, no water pooled in the bag or jar, a stated grain and moisture method, a use-by or sterilize date, and clear species guidance. Pre-sterilized grain removes the failure window that sits before colonization, which matters when the cooker or the still-air setup is your weak point. Store unused hydrated substrate cool and dark, and don't stretch an old mix past the maker's window.
How to dump a bad jar
Bag a contaminated jar without opening it, tie the bag, and put it in household trash. Don't compost it beside the shelf where clean jars are colonizing. Opening it "just to see" loads the room with spores you'll meet on the next batch.
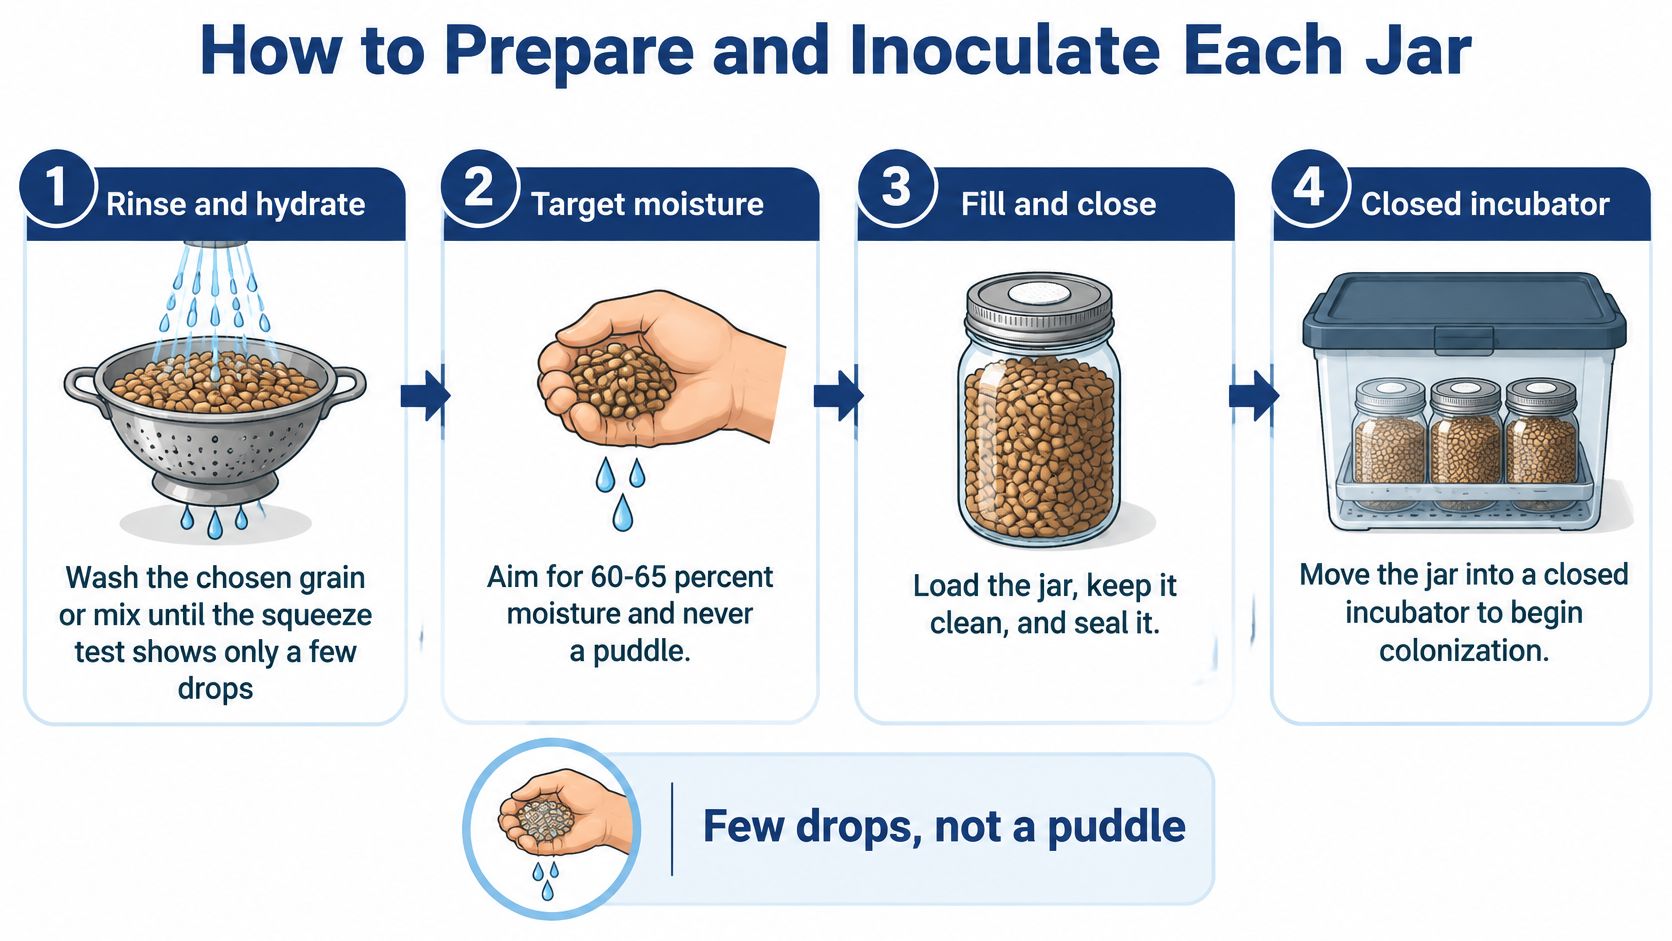
How to Prepare and Inoculate Each Jar
Walk one jar from dry grain to a closed incubator. Each step has one slip that ruins it, and none of them show up until days later.
Academic oyster protocols report 60–65% water content in spawn mixtures and fill containers below the lid so gas can move, per this MDPI sustainability study. Those protocols use pressurized steam at 121°C, with times from roughly 30 minutes for smaller test vessels to 80–90 minutes or longer for dense, larger loads. Time follows particle size, fill depth, and heat penetration, not the pressure reading alone.
The sequence
Rinse and hydrate. Wash the grain or mix you already chose until a firm squeeze gives only a few drops. Aim for that 60–65% wet-weight range and never leave a puddle. Too wet, and you grow bacteria in airless pockets. Too dry, and colonization crawls.
Drain, then load loosely. Fill to about two-thirds or three-quarters. A packed jar keeps a cool center even when the cooker gauge looks right. Excessive fill weight is the usual reason a "full" cycle still fails.
Fit the lid before the heat. Use a filter lid, or a self-healing injection port plus a filter disc. Wipe the lid area. A solid lid with no filter pulls room air in as the jar cools.
Pressure-sterilize at 121°C. Treat 60 minutes as a floor for a small, loose 300–500 ml jar, not a target. A deep or wet load needs 80–90 minutes. Start the clock when the cooker reaches temperature.
Cool sealed jars all the way to room temperature. Inoculating while the glass is still warm heat-kills the culture. Leave them closed. Cracking a lid to "check steam" is how spores get in.
Inoculate in a wiped still-air box or a flow hood. In our Gro Magik grain-bag step, 5 ml of spore or liquid culture solution goes through the injection port. Use that 5 ml as a starting volume for a 300–500 ml jar, then follow your culture supplier's rate. Flame or swap the needle between jars. Our guide to aseptic technique is the workspace habit this step depends on.
Shake late, then leave it closed. Shake only when growth is healthy and roughly 30–50% of the jar. Incubate in a steady cool room without opening the lid.
The log and the finish line
Clean the workspace the way we clean an H2Shroom growing chamber, with 70%–99% isopropyl alcohol. Write down fill weight, hydration, the moment the cooker hit temperature, cool-down, and inoculation date. A good jar shows even white mycelium, no sour smell, and a filter that stays dry.
Judging sterilization by the clock alone is the pitfall. Dense, wet jars hold cooler internal zones, so a heavy pack fails even when the minutes look correct.
Contamination Patterns and the Next Batch
Sort the jar by what you can see and smell before anyone opens it. The fix belongs on the next batch. You don't rescue grain by cutting mold out of it.
The sour, wet jar
A sour smell or wet slime is usually too much water, a center that never got hot, or culture added while the jar was still warm. Bacteria like that film. Discard the jar sealed. On the next mix, stop at fewer drops on the squeeze, cool fully, and don't pack the center.
Colored growth
Green, black, gray, or pink growth means spores got in at the lid, the filter, or the needle. Isolate that jar unopened, away from anything still colonizing. Then rebuild the still-air box: wipe it, slow your hands down, and replace a soggy or cracked filter. Our mycelium contamination pictures are there so you can name the color before you touch the lid.
What you see | Usual cause | Do this next |
|---|---|---|
Sour smell or wet slime | Too wet, or inoculated while hot | Fewer drops on the squeeze; cool fully; discard sealed |
Green, black, gray, or pink mold | Lid, filter, or inoculation leak | Isolate unopened; rebuild the still-air setup |
White growth, then a stall | Dry grain, a cold room, or a packed center | Looser fill; a steady cool room; shake only at 30–50% if healthy |
Wispy growth that never thickens | Weak culture or low inoculum | Fresh culture; don't shake a weak jar |
No growth after about a week | Dead inoculum or heat damage | Test the culture first; inoculate only at room temperature |
Stalls, wisps, and silence
Healthy white growth that stalls often means dry grain, a cold room, or a packed center. Hold the jar in a steady cool room and shake only around 30–50% if the mycelium looks thick, not wispy. Wispy growth that never knits needs a fresh culture. Shaking a weak jar just spreads the problem. No growth after about a week points to a dead syringe or inoculum that met a hot jar.
Home jars don't share one failure rate. Published labs change the substrate, the vessel, the inoculum, and the airflow. Judge your process log instead. A wetter squeeze or a longer cool-down shows up on the jars you make the same week. A weak culture does not. Buy or make a fresh culture before you cook another load.
Never open a suspect jar beside colonizing jars, and never try to carve mold off grain. One open lid can seed the shelf.
Set Up a First Clean Jar Run
This week, pick one row and write the moisture target and the fill line on a note before you turn on the stove. Decide whether the jar is spawn or a fruiting cake before it goes in the cooker.
If you already have a pressure cooker and a still-air box, run two to four jars of that same recipe. One loss shouldn't be the whole project. If you don't have that gear, start with pre-sterilized grain and a clean liquid culture. Don't improvise a long steam on rye and call it sterile.
We carry spawn, substrates, and liquid culture recipes, plus grow chambers and kits built for straightforward home use, with storefronts in Lakewood and Englewood and help by email, phone, or in person. Classes on the CC Classroom calendar are the place to practice sterile technique before you buy a larger supplemented recipe. Products are for adults 21 and over, for lawful research and gourmet cultivation.
Once a spawn jar is fully white and dense, move it into a bulk bag or tub at the moisture you set for that formula, and log the transfer date. The spawn-to-bulk ratio is what sets how fast that bulk colonizes. Order or mix the single formula, sterilize it or buy it already sterile, inoculate only after a full cool-down, and log the jar instead of opening it to check.
We keep sterilized grain, substrates, liquid cultures, and simple grow kits ready for a first jar run, so you can match the formula to real heat instead of guessing at the stove. If you're in Denver or ordering from home, start with one plain recipe and the sterile supplies that go with it. Visit Colorado Cultures when you're ready to pick that single formula and run it clean.
Comments