
Mushroom Spawn Plugs: The Complete Grower's Guide
Mushroom spawn plugs are sterilized birch dowels inoculated with mycelium for outdoor log cultivation, and they can take nearly 30% longer to colonize a log than sawdust spawn. Depending on the species, climate, and log, fruiting may begin anywhere from about 6 months to 2 years after inoculation.
You've drilled the holes, tapped in the dowels, brushed on the wax, and stacked the logs in a shady corner. The instructions made the process look almost instant. Then a week passes, followed by another month, and the logs still look exactly like firewood.
That silence is normal. Mushroom spawn plugs make log cultivation accessible because the physical inoculation is simple, but the fungus still needs time to move through dense wood. The skill isn't just getting plugs into holes. It's choosing suitable logs, protecting moisture, storing the spawn properly, and understanding what healthy progress looks like when there's nothing visible on the bark.
Introduction to Mushroom Spawn Plugs
A stack of freshly cut hardwood can look like the beginning of a mushroom garden. You drill a few holes, fit in the plugs, brush on wax, and expect the logs to change. After a week, then a month, they may still look exactly like firewood. That gap between simple instructions and slow biology causes much of the confusion around plug cultivation.
Mushroom spawn plugs are the bridge between a laboratory culture and an outdoor log. Each plug is a small wooden dowel already colonized by mushroom mycelium, the living network that grows through the wood before producing mushrooms. The process is straightforward: choose suitable wood, drill holes to match the plug, tap each dowel in firmly, and seal the opening so it stays protected from drying and contamination.
The plug works like a small starter culture placed at a defined point in the log. Unlike loose spawn, it does not need to be spread across a bulk substrate or held in place during inoculation. A snug fit matters. An oversized hole leaves space around the dowel, while a poorly seated plug can dry out or remain exposed.
The important expectation: drilling and waxing may take only an afternoon, but colonization continues out of sight for months. The visible task ends quickly; the fungal work does not.
The technique also has a long history. One historical reference traces mushroom cultivation on cut logs to China in 1313 during the Yuan Dynasty. Modern plug production prepares wooden dowels under controlled conditions before introducing mycelium, linking an old outdoor practice with carefully prepared spawn (historical plug-spawn instructions).
For a first-time grower, spawn is best understood as a living starter culture, not a seed that sprouts immediately. The mycelium must establish itself, spread through compatible wood, and respond to suitable moisture and environmental conditions. A quiet log does not provide much visual feedback, so patience and careful moisture management matter as much as accurate drilling.
What Are Spawn Plugs and How Are They Made
A freshly purchased spawn plug can look like an ordinary piece of wood, yet it already contains a living fungal culture. The short dowel has been prepared as both food and shelter for mycelium, then colonized before it reaches the grower. That distinction explains the reality gap in many guides: drilling and waxing may fit into one afternoon, while the fungus may spend months establishing itself inside the log.
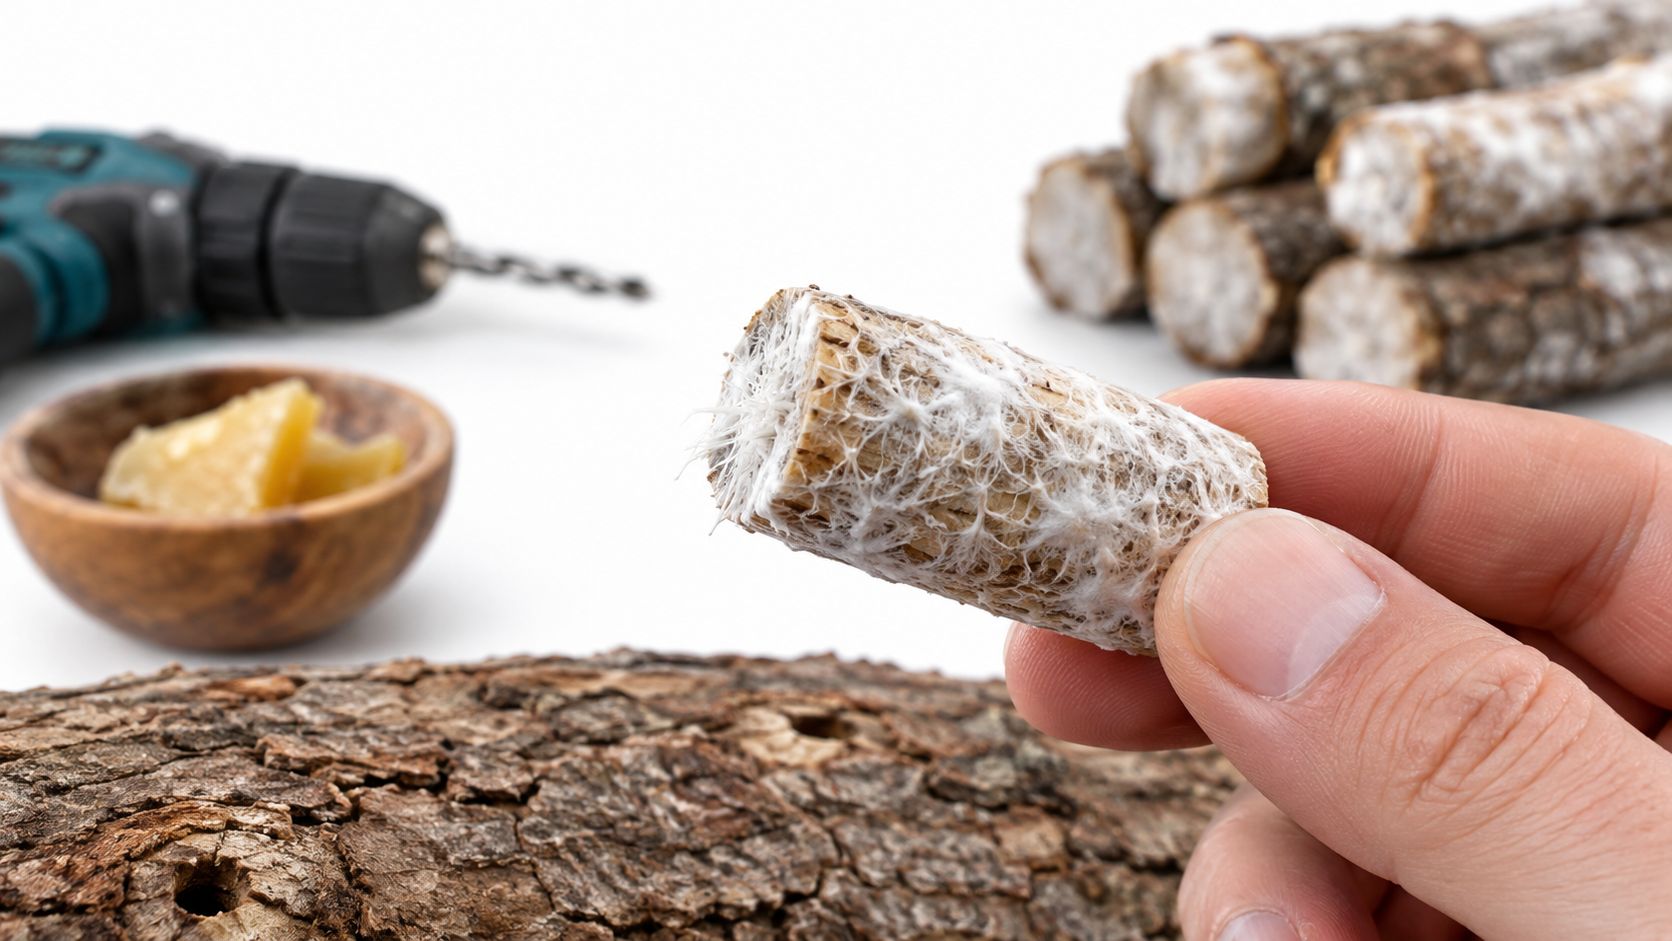
From dry dowel to living spawn
Manufacturing starts with spiral-grooved birch-wood dowels. The grooves provide more textured surface for mycelium and help retain the culture on the dowel. Kiln-drying lowers the wood's initial moisture, creating a controlled starting point for preparation.
The dowels are then soaked in molasses-rich water for 3 days. This adds accessible nutrition so the fungus can establish throughout the wood. High-pressure steam sterilization follows, reducing competing organisms before mycelium is introduced. In effect, the dowel becomes a prepared growing medium rather than a piece of wood with fungus sitting on its surface. The documented preparation includes these stages (the documented plug preparation process).
After inoculation, mycelium spreads across and into the dowel. A healthy plug may develop a thick white coating or visible network, although its appearance varies with the mushroom culture and storage conditions. White growth alone does not prove that the culture will perform well. The mycelium must remain alive and able to resume growth after it is placed in compatible wood.
What the grower receives
A package of plugs contains pre-colonized hardwood dowels intended for drilled logs or stumps. Each dowel is a separate inoculation unit, so a grower can count the points and work through a project in an orderly way. Their rigid shape also makes handling cleaner than loose spawn.
The apparent simplicity can be misleading. The visible work may involve only a drill, individual plugs, and protective wax, but those steps start a much longer biological process. A plug does not rapidly fill a log just because it fits tightly. Mycelium must grow outward from each point, cross the wood, and remain supplied with suitable moisture.
Treat the dowels as living material, not dry hardware. Heat, drying, rough handling, and delays can reduce their usefulness. Follow the supplier's storage guidance, inspect the plugs on arrival, and coordinate delivery with the time your logs are ready for inoculation. The better the culture is protected before use, the better its chance of continuing growth afterward.
Plug Spawn Versus Sawdust Spawn
The choice between plug spawn and sawdust spawn comes down to application, speed, and handling preference. Both methods introduce living mycelium to wood, but they distribute that inoculum differently.
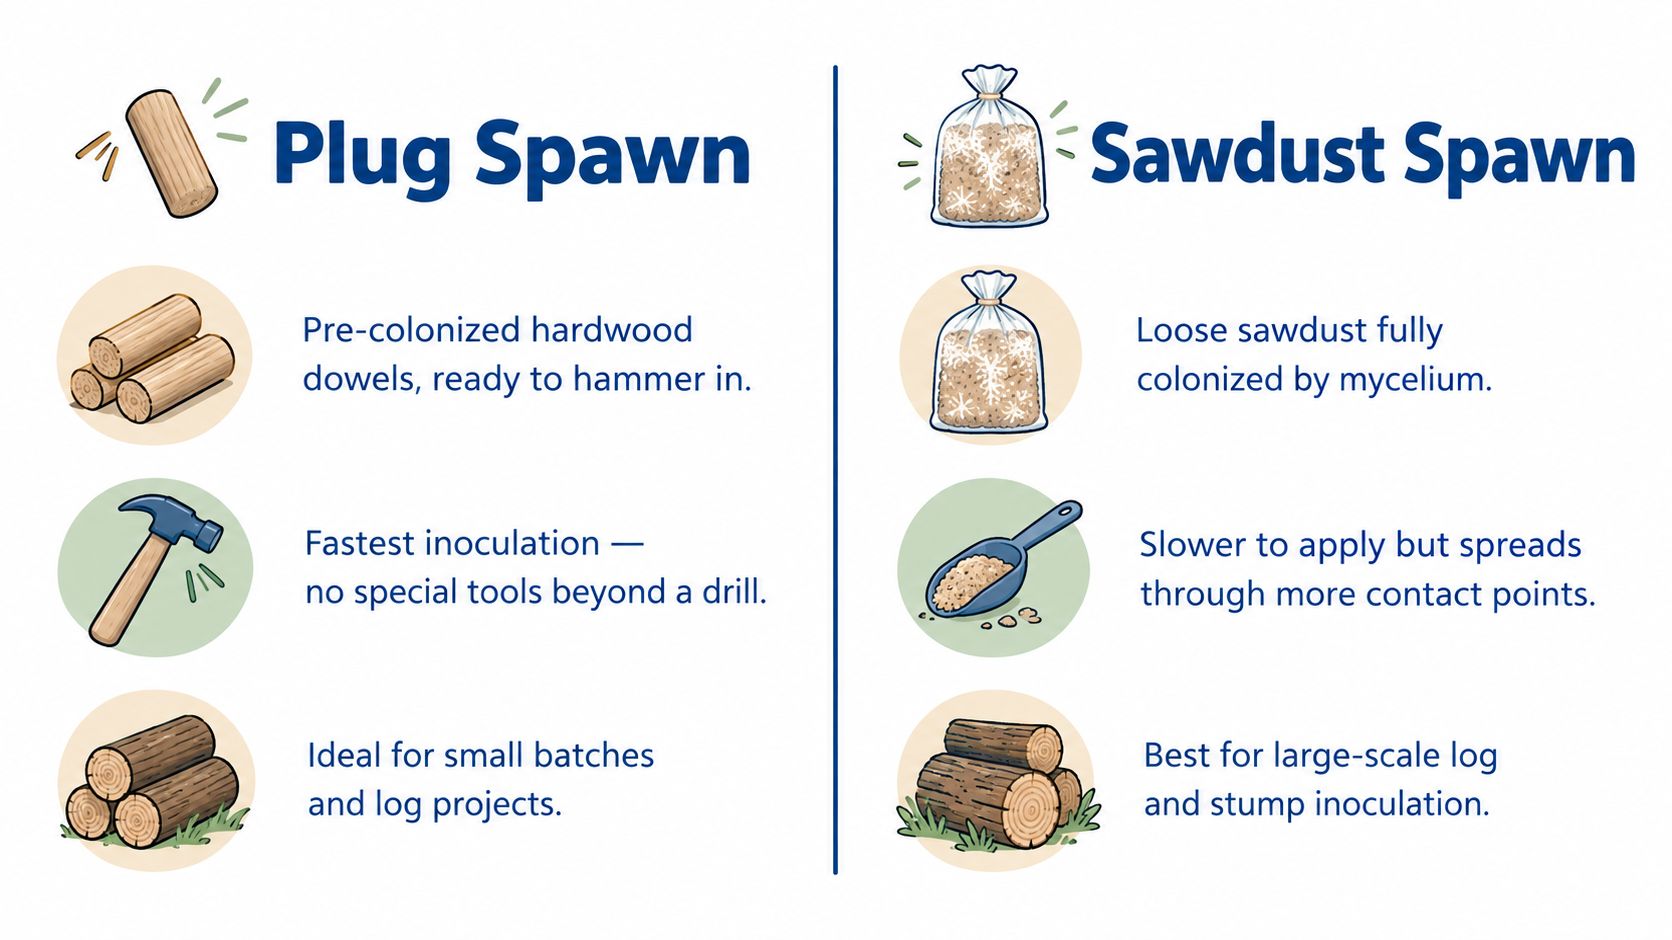
Consideration | Plug spawn | Sawdust spawn |
|---|---|---|
Form | Colonized wooden dowels | Loose colonized sawdust |
Main use | Drilled holes in logs and stumps | Log inoculation and other applications |
Handling | Inserted individually and sealed | Packed into prepared inoculation points |
Colonization | Dependable, but slower in logs | Generally faster in logs |
Equipment | A hand drill, hammer or mallet, and wax | Tools suited to the chosen application |
Cost per log | Slightly more expensive | Often more economical for dense inoculation |
Plug spawn takes nearly 30% longer to colonize a log than sawdust spawn, and Cornell guidance describes plug inoculation as significantly slower and slightly more expensive per log (comparison of plug and sawdust spawn). That difference matters if your priority is rapid establishment or if you're inoculating a large quantity of wood.
The advantage of plugs is control. Each dowel has a known place in the log, and you can inspect the inoculation pattern as you work. A hand drill is enough to create the holes, so the process suits a small backyard project where you want a tangible, uncomplicated method.
Sawdust spawn offers more contact points and can spread through a log efficiently when applied correctly. It may suit growers who value colonization speed, denser inoculation, or larger projects. It can also require more careful handling because loose material must be placed into the inoculation openings without excessive drying or contamination.
Choose plugs if you want a tidy, countable process and don't mind waiting. Choose sawdust if faster colonization and application efficiency matter more than the convenience of individual dowels. Neither option removes the need for fresh wood, moisture management, shade, and patience.
How to Inoculate Logs and Stumps With Plugs
The basic method is straightforward, but precision affects how well the log supports the fungus. Start with fresh-cut hardwood, retaining sound bark and avoiding wood that has already begun to rot. Extension guidance recommends logs about 3 to 4 feet long and roughly 3 to 8 inches in diameter (hardwood log dimensions and drilling guidance).
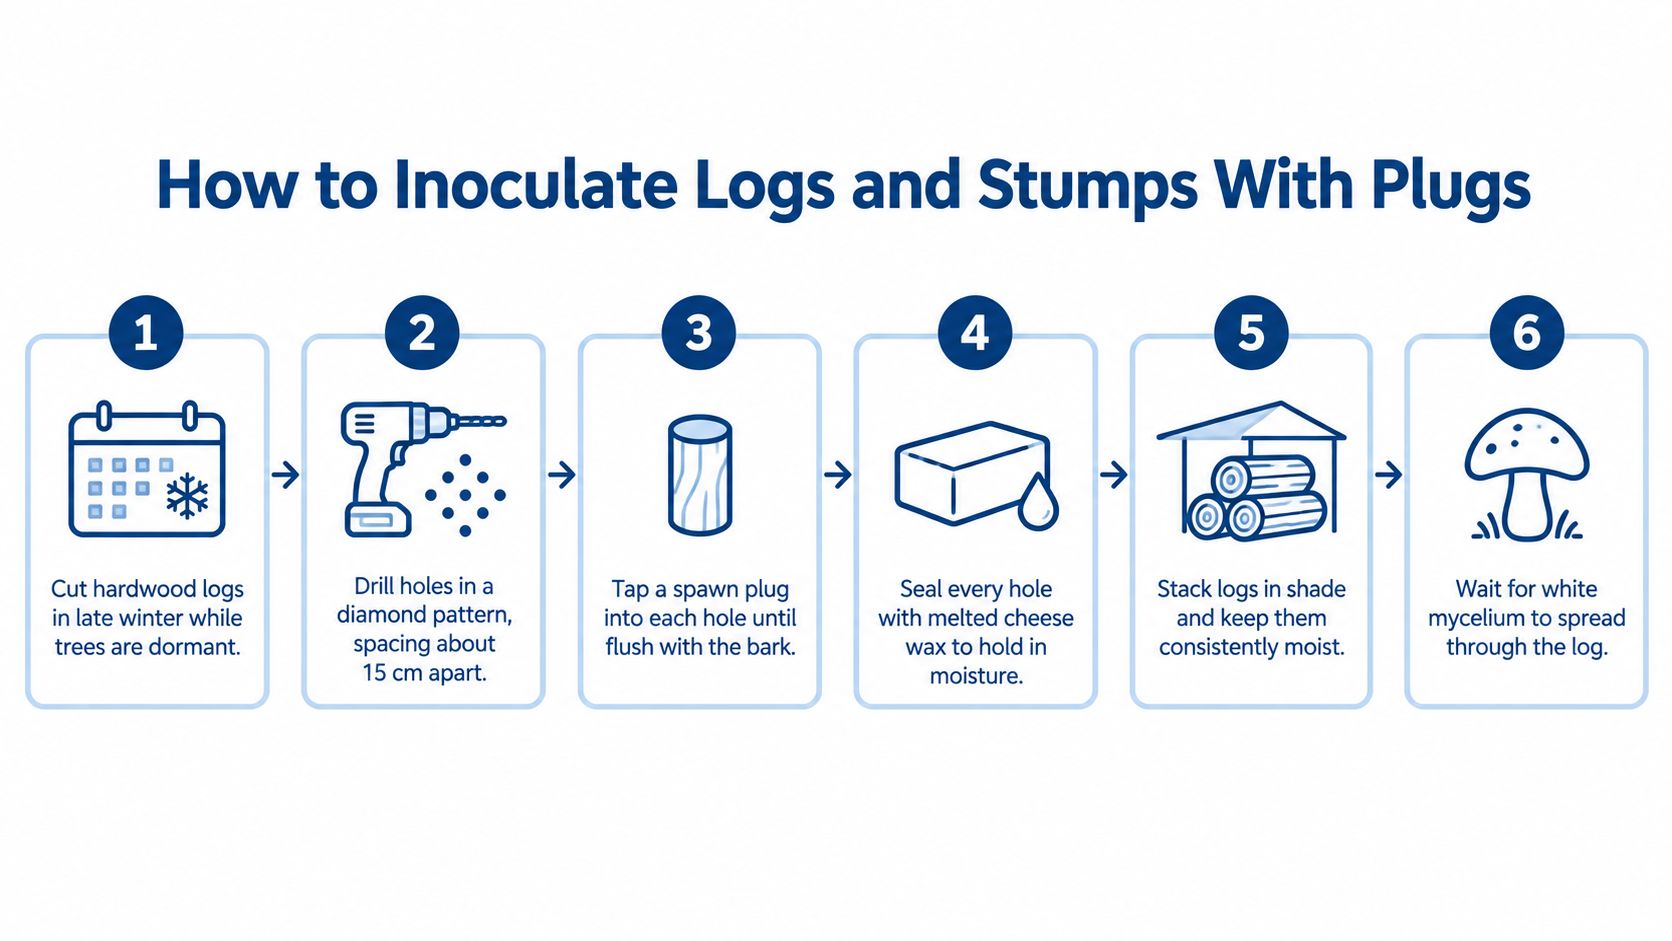
Prepare the wood and drilling pattern
Use a drill bit that matches the plug size recommended by your supplier. Drill holes deep enough to receive the full dowel without splitting the bark, and keep the holes clean as you work.
Arrange the holes in staggered diamond rows rather than lining them up in a grid. Space holes 4 to 6 inches apart, with 2 to 3 inches between rows. This arrangement provides multiple inoculation points while avoiding unnecessary waste of spawn and wood. It also leaves enough wood between holes to help preserve structural strength and moisture.
Work across one log at a time. If the surface becomes dry or the project is interrupted, protect the prepared logs and spawn from direct sun and wind.
Insert and seal each plug
Place one colonized dowel in each hole and tap it in with a hammer or mallet until it sits flush with the bark. Don't crush the plug, drive it below the bark, or leave a large gap around it. A secure fit gives the mycelium contact with the surrounding wood.
Melt a suitable wax, such as cheese wax or another product intended for this use, and seal every inoculation point. Cover the exposed end of each plug completely. Seal damaged areas in the bark as well, because open wounds can lose moisture and provide entry points for competitors.
For a more detailed example of the drilling, tapping, and waxing sequence, see this guide to shiitake mushroom plugs.
Place the logs for incubation
Move the inoculated logs to a shaded, protected location where they won't dry rapidly or receive prolonged direct sun. Keep them off hot exposed surfaces when possible, and arrange them so air can circulate without allowing the wood to lose moisture.
Practical rule: check the logs by condition, not by the calendar. Bark that stays intact and wood that doesn't develop deep drying cracks are better signs than visible mushrooms during the early incubation period.
Stumps can be treated using the same principles. Drill into sound wood, distribute the plugs across the available surface, tap them flush, and wax the openings. A stump may be harder to move and monitor than a cut log, so choose its location carefully before inoculation.
The drill-and-wax work is only the beginning. Most failures attributed to “bad plugs” involve unsuitable or excessively dry wood, poor protection from weather, delayed inoculation, or unrealistic expectations about how quickly the fungus should become visible.
Realistic Colonization Timelines and Fruiting
You drill a fresh log, insert the plugs, seal the holes, and expect the next sign of success to be a mushroom. Months later, the bark still looks unchanged. That quiet period is normal. Mycelium can spread through the wood without producing pins, white patches, or other visible evidence.
Guidance places first fruiting at roughly 6 months to 2 years after inoculation, while some logs may produce in cycles for up to 8 years (FAQ guidance on spawn and fruiting timelines). The range is wide because species, local climate, log freshness, wood diameter, moisture retention, and temperature changes all affect the schedule.
Separate colonization from fruiting
Colonization is the stage in which mycelium establishes itself and moves through the wood. Fruiting comes later, when the fungus produces mushrooms. A log can be colonizing normally while remaining far from fruiting readiness, so a lack of mushrooms does not by itself show that the inoculation failed.
For example, a grower may inoculate a log in spring, see nothing by early summer, and throw it away. The fungus may just be following the slower end of its outdoor cycle. The drill-and-wax instructions are quick, but the biological process behaves more like a slow occupation of a house than a short task with an immediate result.
Use four practical phases to judge progress:
Early incubation: Protect the logs from drying, severe exposure, and unnecessary handling.
Establishment: Give the mycelium time to move through the wood instead of disturbing plugs to inspect them.
Fruiting readiness: Look for mushrooms only after the log has had a reasonable chance to become colonized.
Long-term care: Continue providing shade and moisture as seasonal conditions change.
Why conditions change the calendar
Fresh logs retain moisture and resources that support establishment. Dry, damaged, or poorly protected wood gives the fungus a more difficult place to grow. A larger log also contains more wood for the mycelium to occupy, which can extend the time before fruiting.
Cold climates add another variable. Plug spawn can suit fall or stump inoculation in colder conditions, where slower external drying may give the fungus time to establish before competing fungi become dominant. Winter does not make growth fast. It can make the inoculation date work better with the wood's ability to hold moisture.
Treat the project as a perennial cultivation cycle rather than a one-season test. Patience is part of the method, because visible mushrooms are the final stage of a process that starts inside the wood.
How to Select the Best Spawn for Your Project
Start with the log, not the product page. Identify the hardwood available to you, decide whether you're working with movable logs or a fixed stump, and assess whether you can provide shade and consistent moisture. Then choose a mushroom culture that is intended for that type of outdoor wood and fits your local growing conditions.
A useful purchasing checklist includes:
Match the culture to the project: Confirm that the selected mushroom is suitable for log or stump cultivation and that the supplier gives clear wood guidance.
Inspect the dowels: Look for plugs that appear actively colonized rather than excessively dry, damaged, or neglected.
Plan the inoculation date: Have your drill, wax, logs, and protected incubation area ready before the spawn arrives.
Follow storage instructions: Refrigeration windows cited by suppliers range from a couple of months to 6 to 12 months, but one guide recommends ordering close to inoculation for freshness (plug storage and handling guidance).
Avoid unnecessary temperature stress: Keep the package protected during delivery and don't leave living spawn in unsuitable heat or direct sun.
Storage is where many home projects become less reliable. A grower buys plugs before obtaining logs, postpones the work, and assumes refrigeration makes the delay irrelevant. Cold storage can extend usability, but it doesn't replace freshness or careful handling.
Your substrate choice also matters. Review this guide to hardwood mushroom substrate when comparing wood-based cultivation materials and planning how your log project fits into a broader growing setup.
The best spawn is the spawn you can use promptly in appropriate wood. Match the culture, prepare the tools, protect the moisture, and accept that the visible reward may arrive long after the practical work is finished.
Colorado Cultures offers mushroom cultivation supplies, including sterilized grain bags, substrates, grow kits, cultures, and tools, along with guides, tutorials, and classes for new growers. If you're preparing a log project or building a wider home cultivation setup, visit Colorado Cultures to explore supplies and practical support.
Comments