
CVG Mushroom Substrate: What It Is and How to Use It
If CVG is such a popular mushroom substrate, why can a perfectly hydrated batch still fail to produce mushrooms? The missing piece is often food, not water.
CVG mushroom substrate combines coconut coir, vermiculite, and gypsum. Growers use it to manage moisture and texture, but that doesn't make it a complete growing medium for every mushroom. Understanding that distinction helps you choose a suitable recipe, avoid unnecessary supplements, and recognize when a stalled grow needs something other than more water.
CVG Ratios and What Each Ingredient Does
Component | Amount | Role in the mix |
|---|---|---|
Coconut coir | About half the base mix, equal in volume to vermiculite | Fibrous structure and water retention |
Vermiculite | About half the base mix, equal in volume to coir | Spreads moisture and helps preserve air spaces |
Gypsum | A small mineral addition, measured according to the selected recipe | Calcium, sulfur, and limited buffering |
Water | Enough to reach field capacity, with clumping and little or no free water when squeezed | Moisture for colonization |
Treat this as a volume-based formulation, not an instruction to weigh equal masses. Coir and vermiculite have different bulk densities, so equal weights won't produce equal volumes. Use the same measuring jug or scoop for both, then record their weights if you want to reproduce that particular batch.
Coir supplies the fibrous framework and holds water. Vermiculite helps distribute that water without turning the mixture into a dense mass. Gypsum supplies minerals, but it doesn't replace an appropriate food source or function like a strong pH-adjusting agent.
Think of a sponge with spacers
Coir is the sponge. Vermiculite acts like spacers within that sponge, helping maintain a workable texture rather than letting everything pack together. Gypsum is a mineral addition, not the meal.
Coir's usefulness isn't just a hobbyist assumption. A peer-reviewed comparison of coconut coir, maize straw, and sugarcane leaves found that coir supported mycelial growth, with performance statistically similar to the other materials tested. That supports its practical value without proving that every mushroom will fruit well on a CVG recipe.
A beginner can easily confuse colonization with productive fruiting. Mycelium spreading into a material tells you that it can occupy that environment. It doesn't necessarily tell you that the material supplies enough usable nutrition for a satisfactory harvest.
Practical rule: Judge a substrate by its role in the whole growing system, not by whether mycelium turns it white.
CVG also isn't entirely inert in the strict biological sense. Coir is organic material containing cellulose, but a low-nutrient coir blend isn't equivalent to a tested straw or supplemented hardwood formulation.
Before mixing, write down the ingredient volumes, the gypsum measurement basis, and the intended mushroom species. Keep the batch sheet beside your tub so you don't accidentally switch between volume and weight halfway through preparation.
Which Species Suit CVG and Which Need Supplements
Species group | Role of CVG | Recommended approach |
|---|---|---|
Pleurotus, or oyster mushrooms | Moisture and texture component | Use a tested coir blend with straw, bran, or sawdust rather than assuming plain CVG is sufficient |
Wood-decay gourmet species | Supporting moisture component | Choose a suitable lignocellulosic food source; don't make CVG the default main substrate |
Species grown with a casing or surface layer | Relatively low-nutrient top layer over colonized bulk | Use only where the species and cultivation method call for casing; keep the underlying food source appropriate |
Species compatibility comes before recipe convenience. Oyster mushrooms can use several agricultural materials, but that flexibility doesn't mean all formulations perform equally well.
In a Pleurotus ostreatus study comparing coconut coir and bean-straw mixtures, a 2:3 bean-straw-to-coir mixture averaged 45.1 g/kg, compared with 9.3 g/kg for sole coir. This wasn't a classic CVG trial, so it shouldn't be treated as a direct yield prediction for your tub. It does show why replacing a suitable food source with coir can be a poor trade.
A separate oyster-mushroom trial discussed in the Asian Journal of Mycology used coir supplemented with rice bran, chalk, gypsum, and corn flour, with primordia appearing after 24 days. Those results describe that supplemented formulation, not unsupplemented coir.
Choose food before choosing additives
For wood-decay gourmet mushrooms, begin with a species-appropriate woody or other lignocellulosic substrate. Coir may help tune texture and water retention, but adding vermiculite and gypsum doesn't turn it into hardwood.
Bran is a different kind of ingredient from vermiculite. It changes nutrient availability and can make the recipe more attractive to competing organisms. Once you add a nutritious supplement, reconsider the treatment and handling requirements instead of treating the mixture as ordinary CVG.
For oysters, our guide to oyster mushroom substrates can help you compare the underlying food materials before choosing a coir blend.
Casing is a separate job
A casing layer manages conditions at the surface of an already colonized substrate. It isn't supposed to replace the food beneath it, and not every mushroom benefits from casing.
Don't interpret the phrase “surface layer for any species” as a universal recommendation. Use a casing only when the cultivation method for your selected species calls for one.
If growth is slow, compare it with the expectations for the actual species, spawn, and recipe you're using. Slow growth alone doesn't prove contamination, and it doesn't justify adding bran to an active batch. Confirm the recipe's suitability, then test a revised formulation separately.
How to Mix and Hydrate CVG Step by Step
Prepare a clean mixing tub, a graduated jug, a sturdy spoon, and heat-safe containers. Break compressed coir apart before measuring so you aren't comparing a packed brick with loose vermiculite.
Use this visual as a mixing reminder, with volume measurements governing the base ratio.
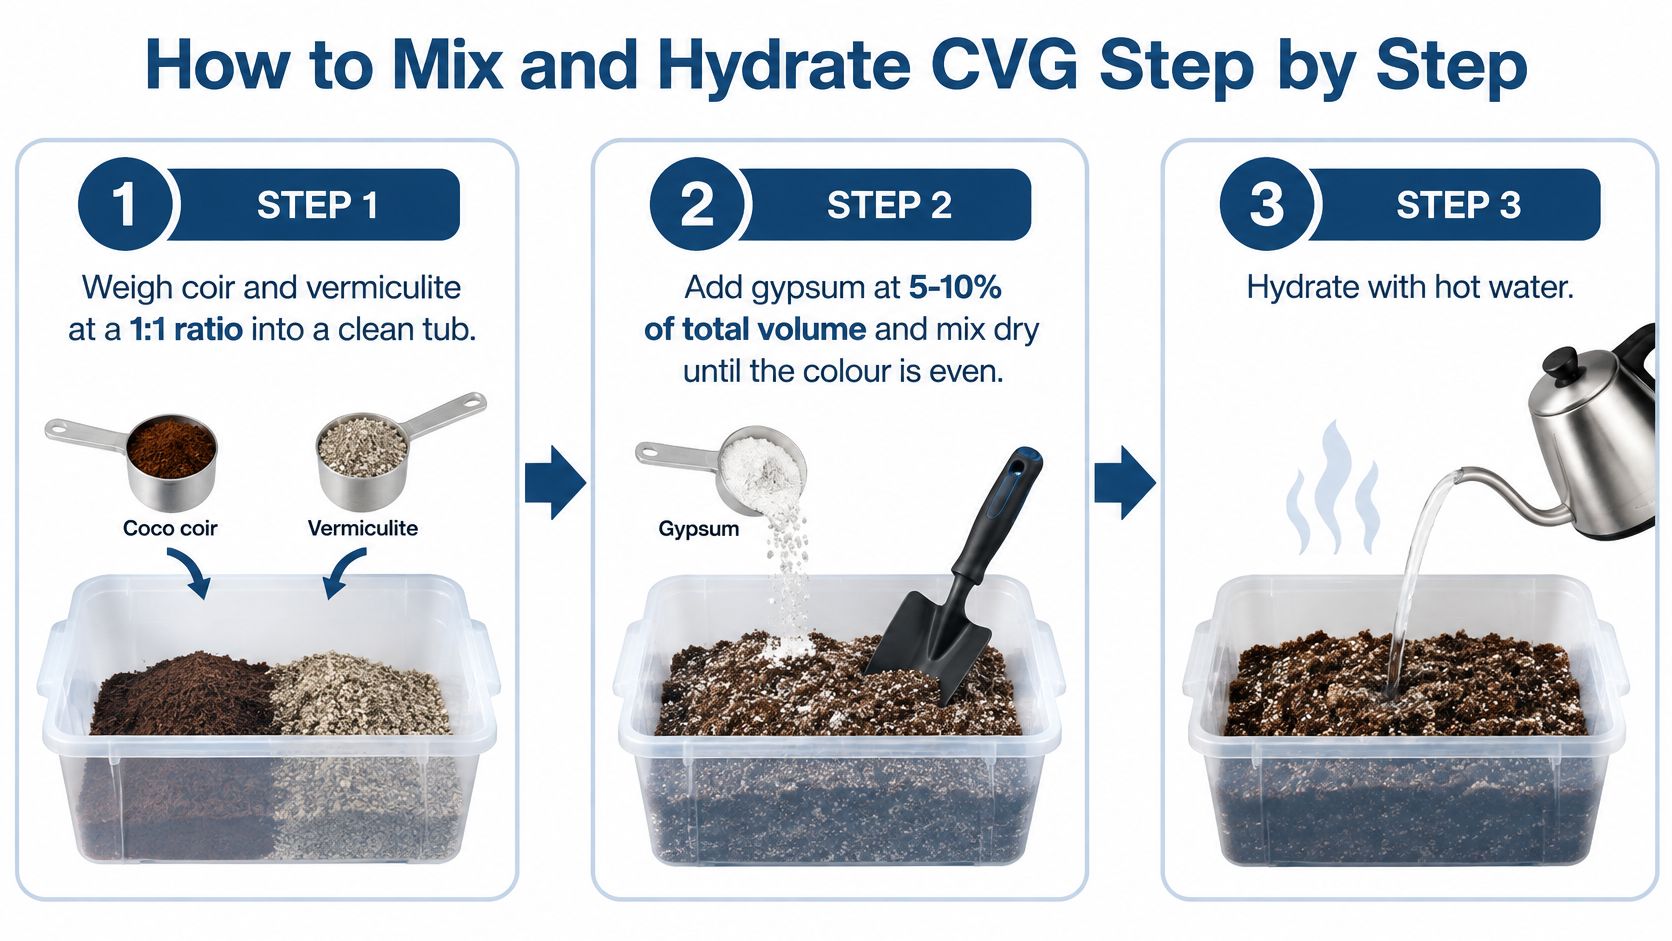
The formulation described in this substrate preparation reference uses approximately 1:1 coir to vermiculite, with gypsum at about 5–10% by volume. Record whether your recipe defines gypsum as a share of the finished dry blend or as an addition to the base, because those calculations aren't interchangeable.
Measure, mix, and check
Measure the base into a clean tub. Use equal volumes of loosened coir and vermiculite, avoiding the common mistake of substituting equal weights because both ingredients happen to be on a scale.
Distribute the gypsum through the dry ingredients. Stir until there are no visible powder pockets, because adding water before distributing the powder makes mineral clumps and uneven wetting harder to correct.
Add hot water gradually while mixing. Work down to the bottom and break apart remaining coir lumps, rather than pouring in all the water at once and leaving dry centers surrounded by saturated material.
Check a cooled handful with the squeeze test. The mixture should hold together and release little or no free water, so don't test dangerously hot material or mistake a flowing stream for acceptable moisture.
Fill suitable bags or containers without heavy compression. Settle the material gently while preserving its loose texture, because forcing it down tightly removes the spaces you worked to retain.
Complete the chosen heat treatment and cool before adding spawn. Use heat-compatible bags or vessels and protected cooling, rather than assuming that hydration with hot water automatically completed a controlled treatment.
Field capacity is a practical endpoint, not a fixed water dose. Coir products differ in texture and starting moisture, and the water you need can change between batches. Record what you added instead of forcing every batch to accept the same amount.
Our field-capacity guide explains how to judge the squeeze test without confusing a damp surface with properly hydrated material throughout the tub.
Inspect the entire fill
Check material from different parts of the mixture before loading. A dry top and wet bottom can give misleading results if you test only the easiest handful to reach.
The finished mixture should have even color, loose texture, and no pooled water at the base. Excess water restricts oxygen movement, while insufficient moisture limits the mycelium's ability to transport materials and develop fruit bodies.
Use the accompanying video as a preparation aid while keeping your written recipe beside the work area.
Choosing How to Pasteurize or Sterilize CVG
Method | Conditions | Best for | Trade-off |
|---|---|---|---|
Hot-water pasteurization | Hold the entire substrate within the temperature and duration specified by a tested protocol | Small home batches with basic equipment | Reduces competitors without achieving sterilization; cooling and handling still matter |
Extended pasteurization | Use a validated longer-hold protocol with monitored substrate temperature | Growers equipped to maintain steady heat without pressure equipment | Occupies equipment longer and requires monitoring |
Pressure sterilization | Follow a validated cycle for the recipe, bag size, load, and pressure equipment | Nutrient-enriched formulations and controlled workflows | Requires pressure-rated equipment and protected cooling and inoculation |
Choose the method that suits the formulation and your equipment, not whichever sounds most aggressive. Batch size matters because the center of a dense load heats differently from the surrounding water or chamber.
A pot of hot water and a pressure sterilizer aren't interchangeable tools. Pasteurization reduces competing organisms; sterilization targets a much broader microbial load. Neither approach protects the substrate from contamination introduced afterward.
Hot water requires more than a hot start
Pouring hot water onto coir is a hydration step unless you also establish that the substrate receives the required heat exposure. A bucket may lose heat unevenly, particularly around its walls and lid.
Use a probe thermometer to measure the substrate rather than judging treatment by steam rising from the surface. Start the holding period according to the selected protocol, not when you turn on the stove.
For a practical treatment workflow, use our mushroom substrate pasteurization guide. Keep the recipe and treatment protocol together so you don't borrow the temperature from one method and the holding time from another.
Supplements change the decision
A longer pasteurization run isn't automatically an adequate substitute for sterilization. Adding bran or another concentrated nutrient source changes what competitors can grow on and may require a different preparation workflow.
Pressure treatment also needs more than a timer setting. Bag dimensions, substrate density, equipment capacity, and load arrangement affect heat penetration. Follow the equipment manufacturer's safety instructions, including venting and natural depressurization, and never improvise with containers that aren't rated for the process.
More heat won't repair excess water, poor ingredient distribution, or a bag packed too tightly.
Cooling deserves the same attention as heating. Keep treated material protected while it cools, and don't add spawn to a hot center just because the outside of the bag feels comfortable.
Sterilized substrate is especially dependent on clean handling afterward. Opening it casually in a dusty room can undo the benefit of careful processing.
Write down the method, target conditions, measured conditions, load arrangement, and cooling procedure. Run a small batch before increasing production, and change the load only when you can still verify that the treatment reaches the material throughout.
Common Problems and How to Fix Them
Symptom | Likely cause | Fix |
|---|---|---|
Slow colonization with thin, even white growth | Hydration imbalance, unsuitable nutrition, weak spawn, or unsuitable incubation conditions | Check moisture and growing conditions; test a recipe change separately |
Water pooling at the base of the bag | Over-hydration or uneven water distribution | Correct before inoculation; use less water in the next preparation |
Mix crumbles and never clumps | Under-hydration | Add water gradually before treatment, mix thoroughly, and retest |
Green, black, or pink patches | Suspected contamination | Isolate and discard the block; don't reuse it |
Sour or foul smell | Suspected contamination or anaerobic conditions | Discard the batch and correct preparation and handling for the replacement |
Appearance is a warning system, not a laboratory diagnosis. White growth can be mushroom mycelium, but some contaminants are white too. Thin, even growth by itself can't establish that a block is clean or identify the exact reason it's slow.
Likewise, a fuzzy area isn't automatically contamination. What matters is unexpected growth, changing colors, unusual texture, stalled development, and other signs considered together.
Correct preparation problems before inoculation
If an unspawned mix contains standing water, drain it in a clean, suitable vessel and mix again before completing treatment. Retest material from the bottom rather than assuming that removing the visible puddle corrected the whole batch.
A dry, crumbly preparation is easier to adjust. Add water gradually, stir thoroughly, and allow it to distribute before repeating the squeeze test. Don't inject or pour extra water into a colonizing bag just because the surface looks dry.
For a sealed, active grow, repeated opening and manipulation create another opportunity for contamination. If excess water is severe, replacing the batch can be more sensible than trying to rescue it through increasingly invasive adjustments.
When uncertain: Keep a questionable block away from healthy grows. Don't open it indoors to investigate or deliberately sniff suspected mold.
Diagnose in the cheapest useful order
Start with your batch sheet and inspect the container without opening it. Check moisture distribution, incubation conditions, spawn quality, and whether the selected mushroom has an appropriate food source.
A moisture adjustment can be evaluated during preparation of the replacement batch. A species or formulation change requires a complete comparison grow before you can judge its effect. There isn't a universal recovery deadline for slow CVG.
Change one variable at a time. If you simultaneously alter the substrate, spawn, treatment, and incubation location, a better result won't tell you which change helped.
Discard contaminated material rather than scooping away visible patches. Seal it before moving it out of the growing area, then clean the surrounding workspace and reusable equipment. Heat treatment of the next batch should accompany cleaner handling, not replace it.
Storing and Reusing Spent CVG Safely
Keep dry ingredients sealed in a cool, dark place, protected from leaks and humidity. Label containers with purchase or preparation dates, and inspect for damp clumps, mustiness, or sour odors before use.
Our Full Flush substrate should be stored in a cool, dark spot until ready to mix and used within 10 months. That product-specific guidance isn't a shelf-life guarantee for homemade, hydrated CVG.
Give spent material a separate pathway
A review in the Journal of Advances in Biology & Biotechnology notes that spent mushroom substrate can contain roughly 80% water, making transport harder and microbial spoilage a concern. The same review identifies variable composition, salinity, and nutrient imbalance as considerations for reuse.
For clean, spent material, use a cautious garden-reuse pathway:
Drain free water. Collect the material where runoff won't reach your growing supplies, stored substrate, or clean work area.
Dry or cure it appropriately. Avoid leaving it as a wet, compacted heap; drying reduces handling weight but doesn't disinfect it.
Compost it fully. Blend it into an actively managed compost system rather than treating a discarded block as finished compost.
Test a small amount. Try the finished amendment on non-edible plants before wider application, watching for poor drainage or plant stress.
Don't apply fresh spent CVG directly to seedlings, indoor plants, or edible crops by default. Its previous use doesn't establish that it has a suitable salt level, nutrient balance, or structure for those plants.
Contaminated blocks don't belong in this reuse pathway. Discard them rather than composting them near food gardens or bringing them back into the growing workspace.
Add drainage, composting, and workspace cleanup to your grow calendar before harvest. Planning the exit route prevents a finished grow from becoming a forgotten wet bag beside your next batch.
Start Your First Batch with a Tested Recipe
Choose the mushroom first, then choose the substrate. For a first grow, a species-matched recipe gives you a more useful starting point than a universal CVG formula.
Keep the test small enough to fit a manageable container and the heat-treatment equipment you already own. Use clean, vigorous spawn, and record the recipe, hydration result, treatment conditions, and inoculation date on the same batch sheet.
Compare progress with the expectations attached to that species and cultivation method. If moisture is suitable but growth remains poor, review the food source, spawn quality, and incubation conditions before adding more water.
Make each change traceable
If you decide to supplement, prepare a fresh test batch using a documented formulation and its matching treatment process. Don't improvise a nutrient addition inside a stalled grow.
If colonization proceeds normally but fruiting stalls, investigate species-specific fruiting requirements, including fresh air, humidity, temperature, and maturity. Changing the mixing recipe won't necessarily solve a later-stage problem.
Use this checklist before you begin:
Species confirmed: The recipe matches the mushroom you intend to grow.
Container selected: The fill fits your vessel and treatment equipment.
Treatment chosen: Heating, cooling, and handling requirements are written down.
Test scheduled: You can monitor progress and record observations.
Storage and disposal planned: Unused ingredients and finished blocks have separate destinations.
A useful first batch doesn't need to be large. It needs to be repeatable enough that you can understand the result and make the next decision confidently.
We carry spawn, substrates, and liquid culture recipes to support your mushroom-growing projects. Visit Colorado Cultures to explore supplies and get help matching your mushroom species with an appropriate substrate and preparation method.
Comments