
Grow Bag Tips for Sterilized Bags and All-in-One Systems
You've just opened a freshly sterilized mushroom bag and noticed condensation coating the plastic. The substrate looks damp, but there's no obvious puddle. Should you leave it alone, increase humidity, cut the bag, or start over? That uncertainty causes more beginner failures than a lack of equipment.
The most useful grow bag tips aren't about chasing the highest possible humidity. They're about interpreting moisture in context, protecting gas exchange, and making small changes without exposing a clean substrate to contamination. Treat the bag as a living system, not a disposable container, and your decisions become much easier.
Understanding Grow Bags as Controlled Systems
A beginner often makes the same mistake: the bag colonizes, then gets opened immediately because the plastic seems to be in the way. Another grower carefully sterilizes the substrate but handles the filter casually, presses it against a damp surface, or covers it with tape. Both actions undermine the design of the system.
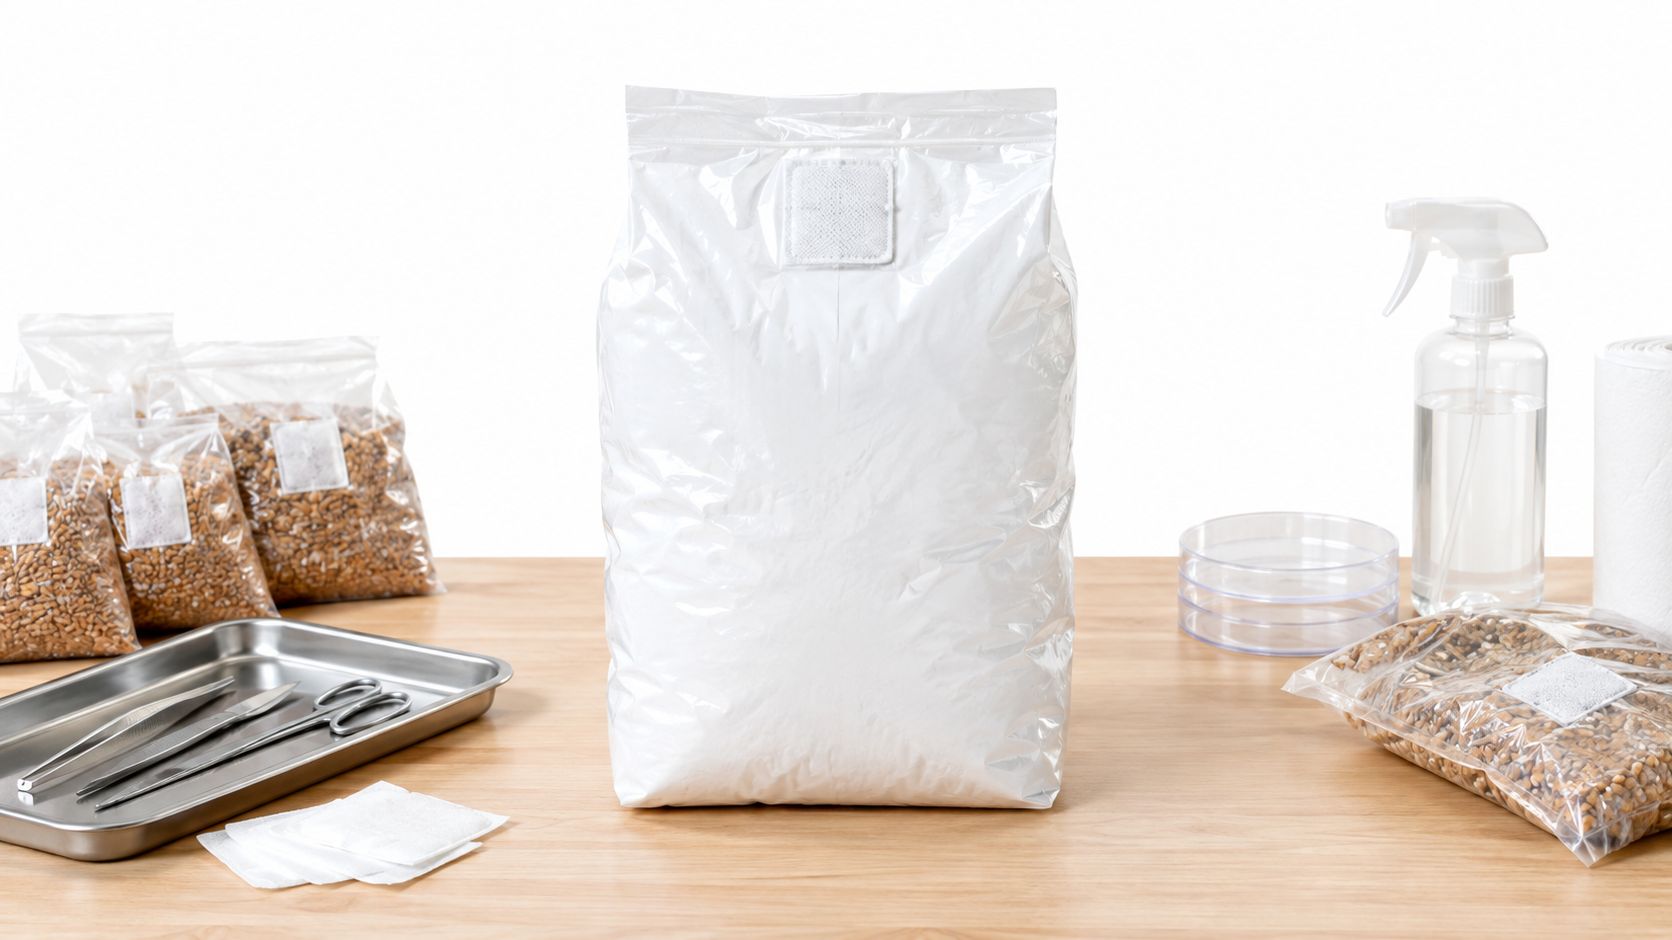
Grow bags combine containment, gas exchange, and sterilization in one unit. University of Hawaii cultivation materials describe polypropylene bags as heat-resistant containers for wood-decomposing mushrooms. Substrate is mixed with water, packed into the bag, sterilized, and inoculated afterward. The filter allows air exchange while helping exclude spores and microorganisms, so it isn't merely a packaging feature. University of Hawaii cultivation materials explain the role of polypropylene bags and filters.
Match the bag to the biology
Polypropylene is popular because it tolerates heat and offers useful clarity during colonization. For shiitake, typical bags contain approximately 1.5–4 kilograms of wet substrate, which shows why bag size should match the species, moisture level, and intended production scale rather than being chosen by appearance alone. Plastic bags or bottles can also support species such as Ganoderma lucidum, but a substrate formula that works as a starting point for one strain isn't automatically universal.
Before inoculation, check four things:
Filter position: It must remain unobstructed and dry enough to exchange air.
Fill level: Don't pack so much substrate into the bag that heat transfer and colonization become uneven.
Closure: Keep the bag closed until the substrate has colonized sufficiently for the chosen fruiting method.
Surface condition: Free water, slime, sour odors, or unusual coloration deserve quarantine, not optimism.
A useful comparison is a polytunnel. Both systems create a managed growing environment, but they only work when airflow, moisture, and structure are considered together. For a broader look at controlled garden environments, why a polytunnel makes sense provides helpful context.
Practical rule: Protect the filter as carefully as you protect the substrate. A blocked or contaminated filter can turn a well-prepared bag into a stalled one.
Inoculation Technique for Sterilized Grain Bags
Inoculation is the point where a clean process can be lost in a few careless movements. The substrate may be sterile, but the room, tools, hands, and bag exterior aren't automatically clean. Work methodically instead of trying to move quickly.
Prepare the bag before opening anything
Start with temperature. A recently sterilized bag must cool fully to room temperature before you add grain spawn. Warm substrate can damage living mycelium, encourage condensation, and make it harder to judge whether moisture is balanced.
Before filling, aim for approximately 65–75% substrate moisture by weight, with thorough hydration but no free water pooling at the bottom. FAO cultivation guidance describes this moisture range, sterilization at 121°C, and a 15 psi cycle lasting one hour. The exact cycle still needs to suit the bag material and your equipment.
Use this workflow:
Inspect the filter and seal. Reject or isolate bags with a torn filter, damaged seam, or wet filter patch.
Clean the work area. Remove clutter, wipe the surface, and limit movement while the bag is open.
Handle the spawn deliberately. Break up grain spawn only as needed, and keep it away from the filter interior and the work surface.
Open the bag briefly. Don't leave the mouth exposed while searching for tools or adjusting the substrate.
Distribute the spawn. Close the bag promptly, then mix only if the product and strain instructions call for it.
Label the bag. Record the species or strain, date, substrate, and any unusual observation.
You don't need to improvise around basic sterile technique. A clean workspace, cooled substrate, unobstructed filter, and fast closure will usually matter more than adding extra handling steps. For a detailed walkthrough, how to inoculate sterilized grain bags offers a useful reference.
Keep the inoculated bag somewhere stable and avoid repeatedly squeezing it to “check” progress. Every unnecessary manipulation can disturb the filter, damage developing mycelium, or introduce contaminants through a weak point.
Incubation and Fruiting Conditions That Boost Yield
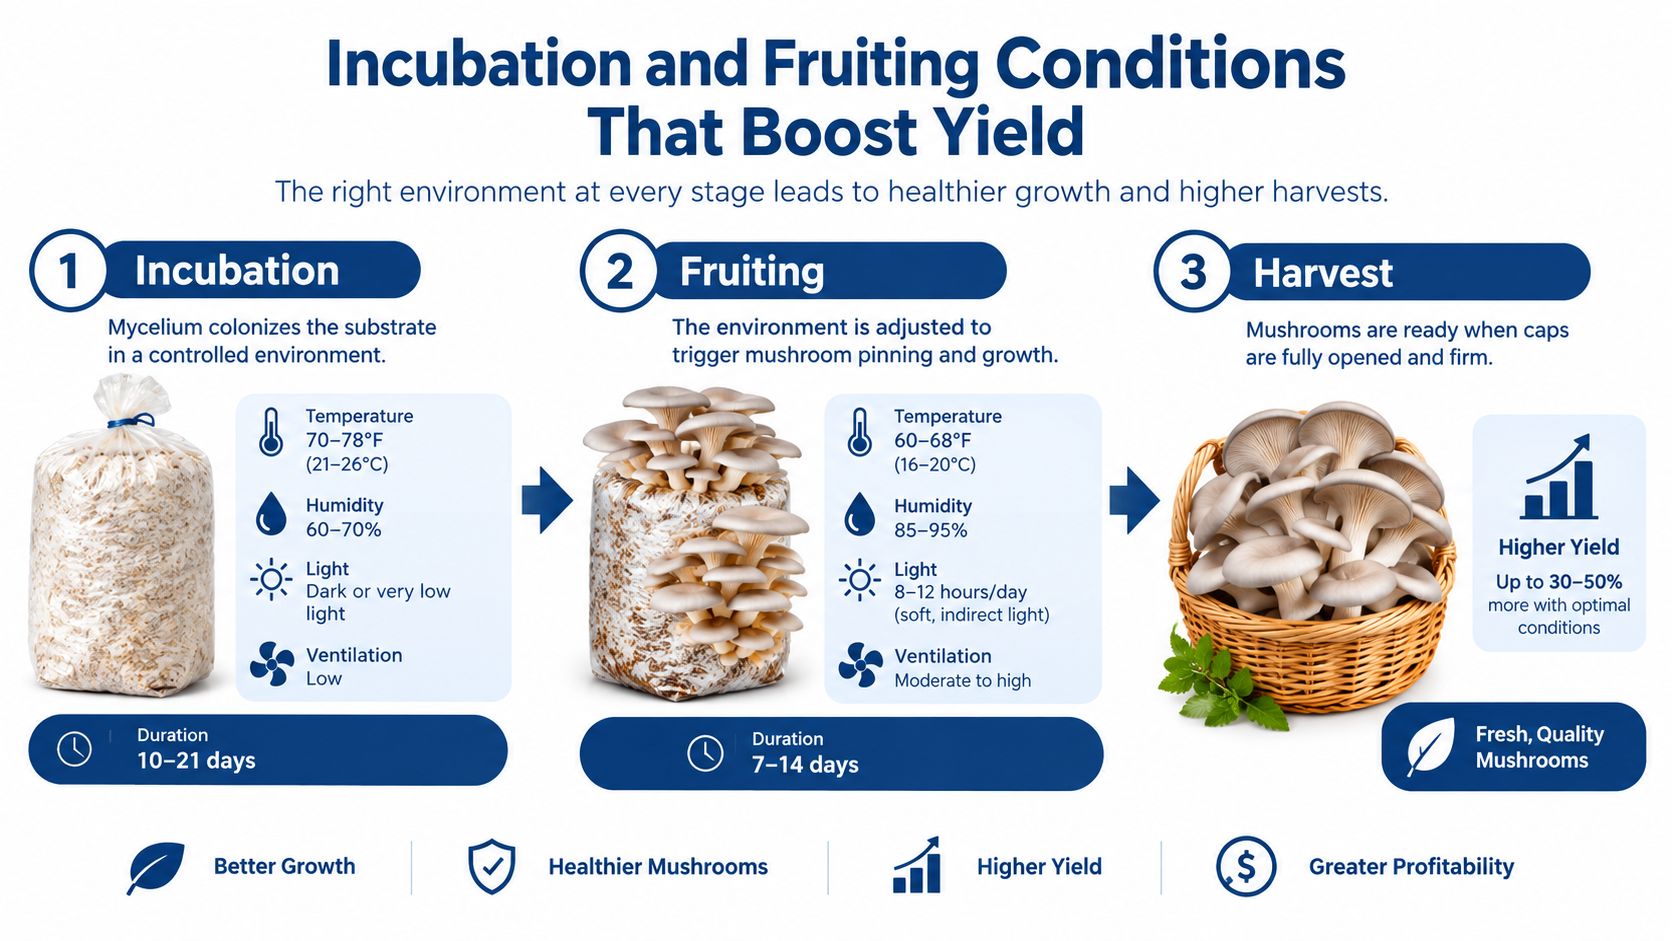
A colonizing bag needs patience more than constant intervention. Give it stable conditions suited to the species, keep the filter functional, and resist opening it just because you can see growth through the plastic. Light and fresh-air requirements change as the bag moves from incubation toward fruiting, so the bag shouldn't be managed the same way at every stage.
Bag retention is one of the clearest examples of a small management choice with a large practical effect. In an oyster mushroom study summarized by the FAO AGRIS database, retaining the polythene bag produced 1,644.61 grams per bed, while completely removing it produced 1,111.19 grams per bed, approximately 48% more yield under the reported conditions. The FAO AGRIS record details the bag-opening comparison.
Use controlled openings instead of stripping the bag
The plastic can preserve substrate structure and moisture while directing fruiting toward selected openings. That doesn't mean every species should be fruited identically. Follow the requirements of the strain, observe how quickly the surface dries, and make openings that expose the intended fruiting area without turning the whole block into an uncontrolled surface.
A practical sequence looks like this:
During colonization: Keep the bag closed and the filter unobstructed.
At full colonization: Confirm that the block is consolidated and free from suspicious colors, odors, or slime.
When fruiting: Cut or open only the area required by the chosen method.
During development: Adjust room humidity and fresh-air exchange rather than flooding the exposed substrate.
After harvest: Keep the block protected while assessing whether another flush is appropriate.
Removing the bag entirely can increase exposed surface area, but exposure isn't the same as productive fruiting. More exposed substrate also means more opportunities for drying, handling damage, and contamination. The reported oyster study doesn't establish a universal rule for every mushroom, yet it strongly supports testing controlled openings before adopting complete bag removal.
For practical instructions on managing an all-in-one block, all-in-one grow bag fruiting conditions is a useful companion.
Here's a visual reminder of how conditions change across the grow:
Humidity Management and Contamination Prevention
Humidity problems usually begin with a misleading instruction: keep everything very humid. That advice ignores where the water lands, how long surfaces stay wet, whether air moves afterward, and whether the humidifier reservoir is clean.
In an indoor grey oyster mushroom study, indirect, brief, frequent humidification with a plastic cork and weekly container cleaning was associated with contamination ranging from 0.1–0.5%. Poor positioning or prolonged humidification, missing corks, and infrequent cleaning produced contamination as high as 25.30% in bags and 30.75% on caps. The study describes how humidification practice affected contamination.
A practical humidity troubleshooting matrix
What you observe | Likely issue | First response |
|---|---|---|
Dry pins or edges | The exposed surface is losing moisture faster than the room replaces it | Humidify the room indirectly and check whether airflow is aimed directly at the bag |
Wet caps or slick surfaces | Mist is landing on tissue and remaining there | Reduce direct spraying, improve gentle air exchange, and let surfaces dry between cycles |
Heavy condensation inside the bag | Temperature differences or excess internal moisture | Check for actual pooling, keep the filter clear, and avoid opening the bag just because the plastic is fogged |
Stagnant air | Humidity is present but fresh-air exchange is insufficient | Move air around the room without blasting the fruiting surface |
Sour odor, slime, or suspicious colored growth | Possible contamination or bacterial activity | Isolate the bag immediately and don't open it near healthy cultures |
Water collecting in tubing or a reservoir | Water management or cleanliness problem | Stop the source, clean the reservoir, and inspect exposed bags before resuming |
The distinction between condensation and free water matters. Condensation can reflect a temperature difference and may not require intervention. Water pooling against the substrate, collecting at the bottom, or leaving persistently wet surfaces is more concerning because it can limit oxygen movement and create favorable conditions for contaminants.
Place the humidifier so it conditions the room rather than spraying directly into bag openings. Keep the reservoir clean, use short controlled humidification cycles, and check the bag after changes. If the room is dry because of indoor heating, increase moisture gradually instead of compensating with prolonged misting.
For a broader prevention checklist, how to prevent mushroom contamination covers practical handling and environmental controls.
Storage and Troubleshooting Common Grow Bag Issues
A stalled bag doesn't always need more humidity, more heat, or more handling. Diagnosis starts with separating a normal visual change from a genuine warning sign. Clear plastic can make every droplet look alarming, while a contaminated bag can appear deceptively ordinary until odor or color changes become obvious.
Use a quarantine-first decision tree
If the bag has a sour odor, colored growth, slime, or rapid unexplained wetness, move it away from clean cultures without opening it. Seal or contain it according to your local waste and safety practices, and clean any surface it contacted.
If the bag has condensation but no pooling, odor, or abnormal growth, leave it closed and observe it. Check the filter, room stability, and temperature before making a change. Condensation alone isn't proof that the bag is too wet.
If water is visibly pooling, don't automatically knead, drain, or vent the bag. Opening it can create a larger contamination route, while kneading can spread a problem through otherwise healthy substrate. First record where the water sits, inspect the filter, and compare the condition with the species and stage.
If colonization has stalled, look for compacted substrate, a blocked or damp filter, excessive fill depth, temperature instability, or early contamination. Avoid repeated squeezing. A stalled bag that smells sour or develops abnormal color should be quarantined rather than “rescued.”
A modular fungal bioreactor study found that high humidity and strong air supply supported faster mycelium production, but it also warned that excess humidity can cause free-water accumulation. Government guidance places substrate moisture near 60% and describes a practical squeeze test in which no water should drip from the substrate. The study and cultivation guidance discuss moisture optimization and the squeeze test.
When in doubt, isolate first and adjust second. A small environmental mistake is easier to correct than contamination spread through a shared grow space.
Store unused bags clean, dry, and protected from punctures or compression around the filter. Label prepared bags so you can trace substrate and sterilization details later. Good records turn a frustrating failure into a repeatable correction.
Putting It All Together for Successful Grow Bags
The strongest grow bag tips reduce to a sequence of deliberate checks. Before filling, balance hydration so the substrate is moist without free water. During sterilization, use a validated process for the bag material. After cooling, inoculate quickly in a clean workspace and keep the filter unobstructed.
During incubation, patience protects the block. Don't open a bag just to inspect it more closely, and don't confuse condensation with contamination without checking odor, color, texture, and pooling. During fruiting, make controlled openings, provide fresh-air exchange without blasting the surface, and manage room humidity rather than soaking the bag.
A simple record can improve every future run:
Before inoculation: Note substrate formula, fill weight, moisture condition, and sterilization details.
During colonization: Record the date of inoculation, visible growth, filter condition, and any unusual odor.
During fruiting: Track where openings were made, how the room was humidified, and whether surfaces stayed wet.
After harvest: Write down what dried too quickly, what remained saturated, and what you'd change next time.
Experienced cultivators still refine these judgments because every room, strain, substrate, and bag behaves a little differently. Trust observations over generic humidity rules, change one variable at a time, and treat any suspect bag as a containment problem before treating it as a growing problem.
Colorado Cultures offers sterilized grain bags, all-in-one grow bags, substrates, grow kits, and tools for home cultivators and lab work, along with printable instructions, video tutorials, and in-person or remote guidance. If you want supplies that support cleaner inoculation and more controlled moisture management, visit Colorado Cultures and choose the setup that fits your next grow.
Comments