
Long Syringe Needle Sizes and Uses for Mushroom Growing
You're at the bench with a filter-patch jar, a grain bag, and a thick spore solution, and none of them wants the same needle. A long syringe needle only earns its length when the grain or liquid sits past a lid, a recessed port, or a deep layer of spawn. Extra shaft bends, brushes the outside of the bag, and picks up whatever is sitting there.
I would rather a short needle that lands in the grain than a long one that wobbles on the way in. Buy the shortest needle that still reaches the target, keep it covered until that moment, and drop it in a sharps container when you're done.
Long Syringe Needle Sizes at a Glance
Match the needle to the job in front of you, not to the longest pack on the shelf. A thick spore slurry going into a deep grain bag is a different tool from clear liquid culture going through a small filter port, and a tall jar is a different job again.
Gauge is the width of the bore. A higher gauge number means a thinner needle and slower flow. An 18 G needle is wide and moves thick liquid quickly, but it leaves a bigger hole in the port. A 22 G needle is fine and gentle on a septum, and it clogs the moment a grain fragment hits the tip. Length is separate from gauge. Two needles can both be 1.5 inches and behave nothing alike.
Gauge and length | Length in mm | Best target | Main trade-off |
|---|---|---|---|
18 G x 1.5 in | 38 mm | Thick liquid culture, deep grain bags | Wider hole, larger puncture |
20 G x 1.5 in | 38 mm | Liquid culture through filter ports | Balanced flow and reach, the all-round choice |
22 G x 1.5 in | 38 mm | Thin, clear liquid through narrow ports | Tip clogs easily with grain debris |
18 G x 3 in | 76 mm | Tall jars and deep vessel reach | Bends easily, harder to control the tip |
20 G x 1 in | 25 mm | Shallow ports and short reach | Not enough reach for deep grain |
Where to start
These sizes are typical hobby stock. Read the actual packaging before you open it, because a "1.5 inch" needle from one maker can sit a little short or long of the next.
Practical rule: Start with the 20 G x 1.5 in row unless the target is clearly deeper or the liquid is clearly thicker.
Reach for 18 G x 1.5 in when the solution is cloudy with spores or the grain sits well below the port. Use 22 G x 1.5 in only for thin, clear culture through a narrow port you don't want to core. Save 18 G x 3 in for tall jars where a 38 mm needle stops at the neck. Use 20 G x 1 in when the port is flush and the liquid is right behind it. A short needle that stops in open air above the grain has not inoculated anything.
Where a Long Needle Earns Its Place
A long needle works like a long pair of tongs. It lets you reach into a jar or bag without putting your hand, or a short tip, into that space. Length is useful only when the target is farther away than a short needle can travel.

Four jobs that actually need reach
Liquid culture transfer. You're pulling culture from a vial or a source syringe into a clean barrel. The tip has to sit in the liquid, not on the meniscus. A short needle works if the liquid fills the vial. It fails when the culture is a shallow pool at the bottom and the tip never breaks the surface, so you draw air and then spit foam into the next vessel.
Inoculation through filter ports. On many grain bags the injection port is small, thick, or set back from the plastic. The needle has to cross that membrane and still have tip left inside the bag. A 25 mm needle can use its whole length just getting through a stiff port, which leaves the culture on the inner face of the plastic instead of in the grain.
Deep grain in a bag. Shake the bag and the spawn often settles in a pocket well below the port. You need the tip inside that pocket, not hovering in the headspace. A short needle leaves a wet spot on the inner wall. Colonization then starts late, or not at all, while the rest of the bag stays dry.
Jars and narrow necks. The needle has to pass the lid ring or the mouth before it ever sees substrate. On a tall jar, 38 mm can be gone before the tip clears the neck. That's the one job where a 3 inch needle is the working tool, not a luxury. You still hold it close to the hub so the shaft doesn't whip.
If the target sits within a few millimetres of the entry point, extra length adds risk and no benefit. The tip has more room to wander, and more of the shaft is exposed while you line up the port.
How to Choose the Shortest Needle That Reaches
Run this check before you buy, and again before you open a pack. The winner is the shortest needle that still lands inside the target.
Measure the target depth. From the outside of the port or lid to the grain or liquid level, in millimetres. Don't guess from the photo on the bag.
Add a 5 mm margin. The tip should end inside the target, not kissing the surface. Surface contact wets the wall and misses the spawn.
Check the opening. A needle that can't pass the port is useless, however long it is. A thick 18 G can core a small self-healing septum that a 20 G slips through.
Match gauge to the liquid. Thick spore solution needs a wider bore. Thin, clear culture can take a finer needle. If you can see chunks, don't start at 22 G.
Hold it one-handed. At the angle you'll use, you should control the hub without bracing the shaft on the bag. If you need two hands to keep it straight, it's too long for that vessel.
Pick the shortest needle that passes steps 1 to 5. If a 25 mm and a 38 mm both reach, buy the 25 mm.
What extra length actually costs
Unnecessary length isn't a free upgrade. A longer shaft flexes when it meets packed grain, so the tip drifts off the spot you aimed at. More of the metal sits in open air between the package and the port, which is more surface that can brush a glove, a sleeve, or the outside of the bag. Control gets worse as the tip gets farther from your fingers. You feel the hub, not the point.
If two needles reach, buy the shorter one.
The clip below shows a steady port entry, which is the motion you're checking in step 5.
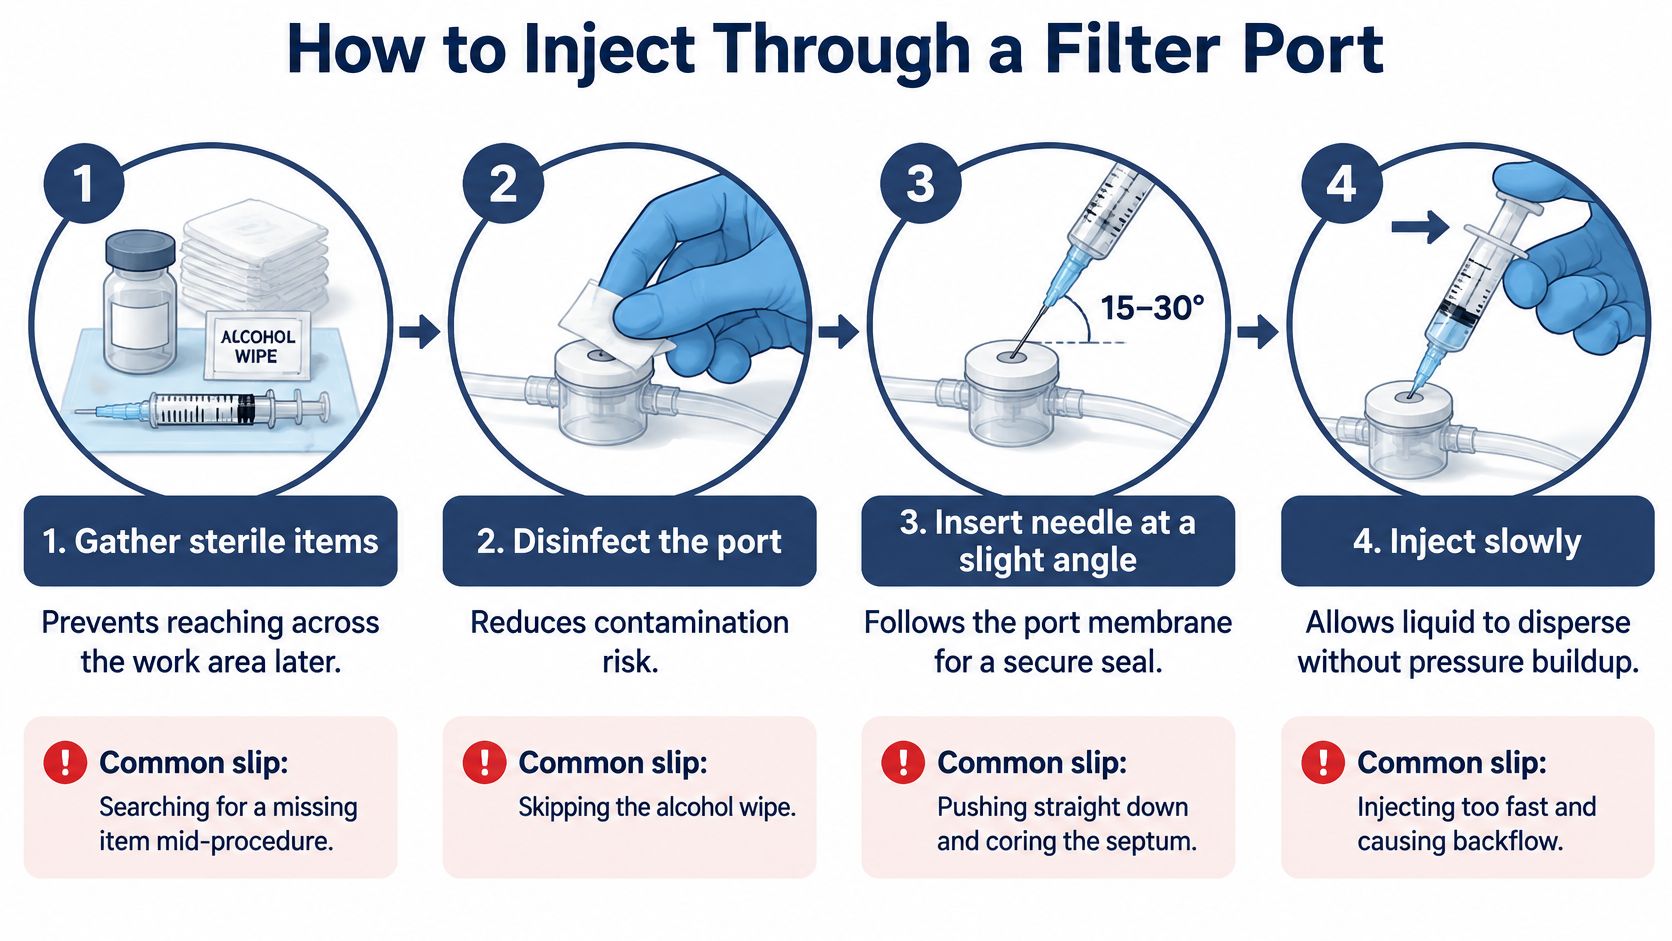
How to Inject Through a Filter Port
Work on a wiped bench, with the bag or jar already in place. A self-healing injection port only seals if you enter it cleanly and leave on the same line.
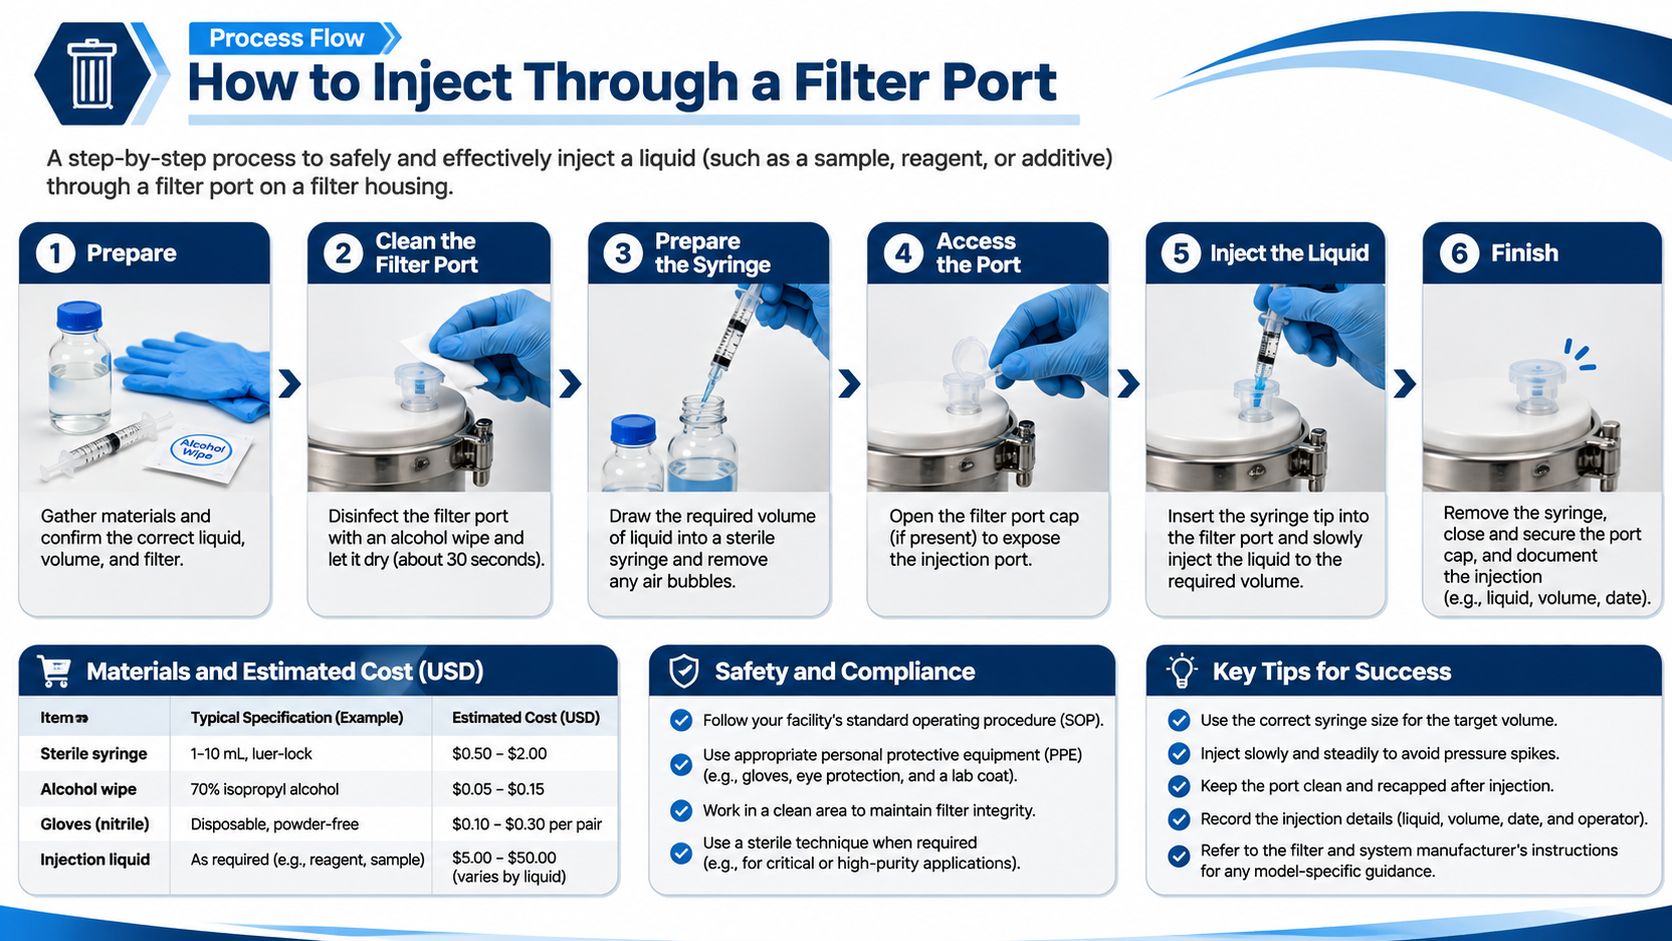
Gather every sterile item before you open anything. Syringe, needle pack, alcohol pad, and the receiving vessel should already be in the clean zone. Reaching across the bench mid-injection drags your sleeve over the port. The usual slip is hunting for a missing pad after the needle is already out.
Wipe the filter patch or injection port and let it dry. An alcohol pad cuts what's on the surface, and a dry port doesn't thin the culture with leftover alcohol. Injecting through a wet port is the slip that dilutes the dose and leaves a damp ring.
Open the needle at the work zone and keep the hub covered until you use it. Peel the pack open from the hub end so the shaft never touches your fingers. Setting the needle on the bench ends the run. That needle is done.
Draw the liquid slowly. Hold the syringe upright and tap air bubbles to the top before you push them out. A fast pull sucks air and then spatters when you correct it. Slow draw, small bubbles, one gentle tap.
Enter near 90 degrees and stop at target depth. Push with steady pressure only until the tip is inside the grain or liquid. Forcing a needle that meets resistance bends it, especially a long 22 G. If it won't advance, back out on the same line and try a wider gauge, not more muscle.
Dispense slowly, withdraw on the same path, and leave the port alone. A slow plunge lets liquid move into the grain instead of backing up the needle. Yanking out at a new angle drags the septum and leaves a leak path. Cover isn't a second wipe frenzy. Don't touch the puncture with a bare finger.
Drop the needle into a sharps container at once. Don't recap it. Two hands on a used needle is how sticks happen. The port should look closed, not wet.
What a clean inoculation looks like
Liquid enters without a hard stop, the plunger moves smoothly, and the port shows no bead of culture after you withdraw. If you see backflow or a damp patch, that vessel is the one you watch. Don't "fix" it by stabbing the same hole again with the same needle.
Keeping Long Needles Sterile and Disposing Safely
A needle marked sterile is sterile when you open the pack. It isn't sterile after the shaft passes a port, a stopper, or the dusty outside of a bag. Longer metal makes that worse, because the tip travels farther and the exposed area is larger. In a classroom or a shared bench, that extra reach is also extra chance of an accidental brush.
Nursing guidance on needle handling warns that needles shouldn't touch unsterile surfaces, packaging should be checked for damage, used equipment should go immediately into a sharps container, and two-handed recapping raises needlestick risk. The same guidance calls for aseptic technique and says a syringe shouldn't be reused even when the needle is changed.
A workflow that keeps the shaft clean
Inspect the pack first. Torn wrappers, crushed hubs, and needles that have pushed through the cap don't go into a vessel. Open a new one.
Nothing unsterile touches the metal. That includes the bench, your glove after you've handled the outside of a bag, and the bag exterior itself. The port face is the only surface the tip should meet, and only after you've wiped it.
One new needle per vessel. Changing nothing and moving to the next jar carries whatever the first stopper had on it. A fresh needle is cheaper than a contaminated bag.
Keep the shaft covered whenever it isn't in use. Cap stays on until the port is dry and you're ready to enter. If you have to set it down, you don't. You discard it.
Prepare the receiving vessel first. Port wiped, bag positioned, sharps container open and within a short move. Then expose the needle. Short travel is the whole point.
Separate clean and waste. Sterile packs stay on one side. The sharps container stays on the other. Don't reach across open needles to grab a fresh bag.
The same habits scale when you're teaching. Our sterile technique principles walk through zone layout in more detail, which matters once more than one person is at the bench.
Disposal and resterilizing
Drop used needles straight into a rigid sharps container. Don't empty that container by hand when it fills. Seal it and replace it. A laundry-bottle substitute only works if it's thick plastic, leak-resistant, lidded, and labeled, and it still isn't as reliable as a purpose-made sharps bin.
Treat every sterile needle as single-use. Discard it after one vessel. Don't flame, boil, or pressure-cook a needle that has touched the bench or the outside of a bag and expect it to be clean again. The hub, the crimp, and any bend you can't see won't give you a trustworthy result. A new pack is the reset.
Common Needle Problems and How to Fix Them
Most failed injections look like one of four symptoms. The fix is either a one-minute change of gauge or angle, or a full restart with fresh sterile items. Don't blend the two.
Symptom | Likely cause | Fix |
|---|---|---|
Liquid will not flow | Tip clogged with grain fragments or dried spore | Switch to a wider gauge and clear the tip on a clean surface |
Needle bends inside the bag | Needle too long or too thin for the grain | Use a shorter needle or a heavier gauge |
Port leaks or dampens after withdrawal | Shallow entry angle or withdrawal along a different path | Slow the push, enter near 90 degrees and withdraw along the same path |
Tip shows contamination | Tip touched a non-sterile surface | Discard the needle and restart with a new sterile needle |
Which fixes are quick
No flow is the one you'll see first with spore syringes. Grain dust and dried clumps sit in a 22 G bore and stop the plunger. Switch to 18 G or 20 G and draw from a clear pocket of liquid, not from the settled sludge at the bottom. That's a one-minute change if you still have a sealed needle and the current one never touched the bag. If you already pushed a half-clogged needle into the port, treat that port as used and don't re-stab it while forcing the clog through.
A bend inside the bag means the shaft is too long, too fine, or both, for packed grain. Pull it out on the same line if it will come freely. Then switch to a shorter needle or a heavier gauge, such as 18 G at 1.5 inches instead of 22 G at 3 inches. A bent needle doesn't straighten back into a safe tool. Discard it.
A leaking or damp port is technique, not a bad bag, most of the time. You entered at a shallow angle or left on a different path, so the septum has a slit instead of a point. On the next vessel, slow the plunge, stay near 90 degrees, and withdraw along the entry line. Don't smear the leak with your glove.
A contaminated tip isn't a wipe-and-continue problem. If the point touched the bench, the bag exterior, or an unwiped lid, that needle is finished. So is the culture still in a syringe you drew with it, if the tip went back into the source. Restart with a new sterile needle and a vessel you haven't punctured.
A clogged tip can be swapped in a minute. A tip that touched the bench means the whole setup starts over.
Pick Your Needle and Run a Test Run
If you don't have a measured target yet, buy 20 G x 1.5 in. It's the all-round choice for liquid culture through filter ports, and it's the row I'd start a new grower on. If you already know the grain is deep or the liquid is thick, use the depth measurement and the six-step check, and don't default to the longest needle in the drawer.
Before a real batch, run one spare jar or bag. Use a sterile needle from a sealed pack and a clear liquid so you can see the flow. Practise the near-90-degree entry, the slow push, and the same-path withdrawal. Whether you're comparing a liquid culture versus a spore syringe, the needle test is the same. The Microppose Mark 1 Grow Kit includes a syringe filled with spore/LC solution, so the needle you pair with it should match that liquid, not the tallest jar you own.
Keep a short log for each run: gauge and length, measured target depth, whether the tip reached it, whether flow was smooth, and whether the port leaked or dampened. Buy the next pack from that log.
The right needle is the shortest one that reliably reaches the target, stays sterile until the moment of use, and goes straight into a sharps container afterward.
Colorado Cultures stocks sterilized grain bags, injection-port supplies, and grow kits for home cultivators who want a clean start on gourmet and specialty mushrooms. If you're pairing a syringe with the right needle and a sterile bag, we can help you set up that bench. Visit Colorado Cultures for supplies, class dates, and practical help from our Denver-area stores.
Comments