
Mushroom Growing Container Guide: Types, Sizes and Airflow
You bought a tote, punched a few holes, and now the lid is dripping while the stems look stretched and pale. That is the moment most first grows stall. A mushroom growing container is not a storage box. It is a small fruiting room that has to hold moisture, let stale air out, and keep competing microbes from getting a free meal.
Denver apartments make the trade-off sharper. Dry indoor air pushes people to seal everything shut. A sealed, wet tub then traps carbon dioxide and invites bacterial slime. The better goal is a controlled balance, not the wettest box you can build.
Mushroom Growing Container Types Compared
Container | Best for | Main drawback |
|---|---|---|
Monotub (plastic tote with lid) | Reusable fruiting at home | Heavy and needs cleaning between runs |
Grow bag (poly bag with filter patch) | Beginners using grain or sawdust | Single use and hard to reshape |
Bucket (food-grade, about 5 gal) | Bulk straw or sawdust substrate | Heavy when full and needs drainage |
Mason jar (quart or pint) | Spawn, liquid culture and small tests | Too small for a full fruiting flush |
Shallow tray | Surface fruiting and quick checks | Dries fast and needs a humidity cover |
Think of each option as a greenhouse scaled to fungi. It must hold moisture, admit fresh air, and block contamination. A box that only traps water fails that job.
Monotub. A roughly 66-quart plastic tote with a lid is the workhorse for repeat fruiting at home. You can wash it, run another batch, and keep the same hole pattern. It is awkward to lift once full, and leftover film on the walls feeds the next contaminant if you skip the scrub.
Grow bag. A polypropylene bag with a filter patch is the easiest entry for grain or sawdust. You don't cut holes or fit a lid. It is single use, and once the block sets you can't reshape the growing space. Many people start here, then move to a tub after one clean flush.
Bucket. A food-grade bucket of about 5 gallons suits bulk straw or sawdust, especially oysters. It is heavy when wet and needs a way for excess water to leave the bottom. Without drainage, the lower substrate turns anaerobic.
Mason jar. Quart and pint jars are for spawn, liquid culture, and small tests. They colonize quickly and show problems early. They are too small for a full fruiting flush, so treat them as the nursery, not the greenhouse.
Shallow tray. Trays work for surface fruiting and quick checks of a new substrate mix. They dry fast. Pair one with a humidity cover or you will watch pins shrivel overnight.
Match the vessel to the species and the batch you plan, then look at the table again before you buy. A gear list for home setups, including tubs, bags, and basic tools, sits in our equipment for growing mushrooms guide.
Matching Species to the Right Container
Species | Container that suits | Fruiting humidity | Fresh-air need |
|---|---|---|---|
Oyster (Pleurotus) | Bags, buckets or monotubs | 85-95% | Moderate to high |
Lion's mane (Hericium) | Monotub or bag with filter patch | 85-95% | Moderate |
Shiitake | Blocks, bags or sawdust-filled tubs | 80-90% | Steady |
Wine cap (Stropharia) | Outdoor bed or large tub | 80-90% | Open outdoor air |
Oyster mushrooms are the forgiving starter. Bags, buckets, and monotubs all work if you can hold 85-95% humidity and give moderate to high fresh air. Long, hollow stems are the usual complaint, and they point to stale air more often than to a bad strain.
Lion's mane likes a monotub or a bag with a filter patch, also around 85-95%, with only moderate exchange. Too much direct breeze browns the spines before they develop. A bag that stays slightly closed often outperforms a wide-open tote.
Shiitake fruits from blocks, bags, or sawdust-filled tubs at 80-90% with steady fresh air. A setup that keeps oysters happy can stall shiitake if the air barely moves. Plan more ventilation than you would for a humidity-hungry species, and don't expect a sealed bag to finish the job after colonization.
Wine cap belongs outdoors in a bed, or in a large tub where air comes from the open ground. Fruiting humidity sits around 80-90%. There isn't a firm indoor fresh-air number for this species, so follow local outdoor guidance rather than copying an indoor hole pattern.
Run this check before you buy
Look up the species' humidity range and how much fresh air it wants. Then pick the vessel that can deliver both, not the one that looks easiest on the shelf.
High fresh-air species suit ventilated tubs and buckets with planned holes.
Humidity-hungry species suit filter bags and tubs you can keep mostly closed.
Outdoor species don't need a sealed chamber at all.
Practical rule: A container that fruits oysters cleanly can still fail shiitake if you never increase the air moving through it.
Sizing Your Container to Your Batch
Container | Approximate volume | Batch it suits |
|---|---|---|
Quart mason jar | About 1 L | Spawn and small tests |
5 lb grow bag | About 2-3 L of substrate | First flush for beginners |
5 gallon bucket | About 19 L | Bulk straw or sawdust |
Volume sets the batch. It does not mean you fill the vessel to the rim. Mushrooms fruit into the air above the substrate. Pack that space solid and the mycelium has nowhere clean to pin.
Leave headspace on purpose
Fill to roughly two-thirds of the interior. A quart jar holds about 1 L, which is plenty for spawn or a trial, not a dinner-plate flush. A 5 lb grow bag, about 2-3 L of substrate, is a sensible first fruiting batch. A 5 gallon bucket, about 19 L, is bulk straw or sawdust once you already know the species will fruit for you. A 66-quart monotub, on the order of 60 L, is for repeat fruiting after that first success, not for week one.
Say you have 2 kg of hydrated sawdust. That belongs in the grow bag, not dumped into a tote with a lonely inch of substrate across the bottom. A thin layer in a huge tub dries at the edges and colonizes in patches.
Small dries out, large goes stale
Small containers lose moisture and heat faster. You will mist more often, and a sunny windowsill can cook a jar in an afternoon. Large containers hold water better, but a bigger mass of mycelium releases more carbon dioxide. They need more fresh air, not just a bigger lid.
Start with the smallest container that holds one planned batch. Scale up only after one successful flush.
Weigh the substrate before you fill. Write that weight on the lid. The next batch then starts from the same amount, so a weak flush tells you something about air or moisture instead of a mystery change in how much you packed.
How Many Air Holes a Container Needs
Fresh-air exchange is the slow trade of gases. Mycelium and fruit bodies use oxygen and give off carbon dioxide. You want that carbon dioxide to leave while most of the moisture stays inside.
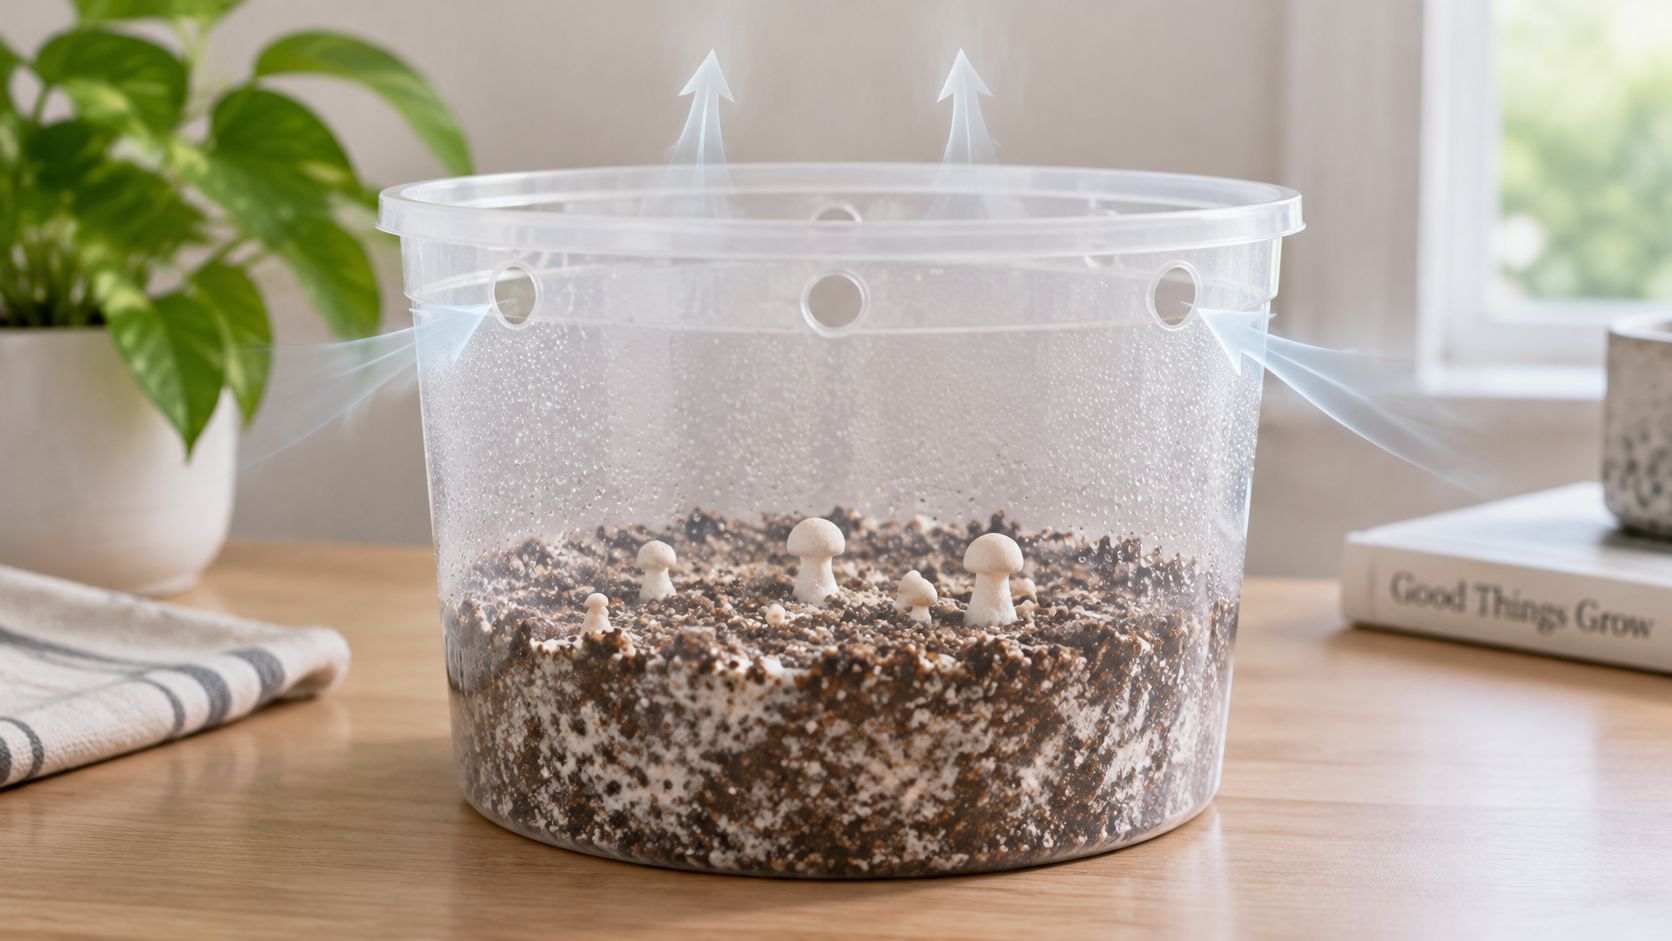
For a practical small tub, Utah State University Extension recommends four holes about 1 inch across: two on opposite sides near the lower portion and two near the upper portion. Warm, moist air rises. Cooler room air slips in low and exits high. You are using that pressure difference, not a fan blasting across the substrate.
Seal first, filter later
During colonization, keep the holes sealed so spores and dust stay out while the mycelium claims the substrate. At fruiting, swap the temporary seal for micropore tape. The tape filters the exchange without turning the tub into a wind tunnel.
Fruiting generally needs carbon dioxide below about 1,000 ppm. Above that, development weakens. Stems stretch, caps stay small, and the block looks busy without producing normal mushrooms. Visible condensation on the walls is not a reliable gauge of that gas. Put a hygrometer in every container. Add a CO2 meter once the chamber is large enough that you can't judge it by fruit shape alone.
Watch a short walk-through of passive holes and filtered exchange before you drill, so the high-and-low pattern is clear.
Tune the holes, don't decorate with them
Hole count and placement are variables. Change them when the mushrooms tell you to.
Long stems and small caps: add exchange gradually. Another filtered hole, or a looser tape layer, beats ripping the lid off.
Dry, cracked substrate or shriveled pins: you have too much direct airflow. Narrow the openings or move the tub out of a draft.
Heavy dripping from the lid with pale growth: moisture is high and air is low. Increase gentle exchange before you stop misting entirely.
Strong airflow aimed at the block dries it fast. The aim is a slow leak of gases, not a breeze.
Keeping Humidity Right Without Flooding the Grow
Pins dry out in hours. Standing water breeds bacteria just as fast. You manage those two risks on different days of the same flush.
Cornell Small Farms identifies humidity above 85% as especially important during the first several days after fruiting starts. After pinning, mushrooms tolerate lower humidity, though conditions around 80% remain preferable. Young pins are the fragile stage. Mature caps can handle a drier room.
Mist walls, not caps
A sealed or semi-sealed mushroom growing container needs both retained moisture and controlled ventilation. Mist so interior surfaces carry a thin film. Free water dripping onto the substrate or the fruit bodies is too much. If the walls already glisten, another spray only feeds bacteria.
Condensation that keeps dripping from the lid means humidity is high relative to airflow. Increasing gentle exchange is safer than cutting all moisture at once. Dry the air by moving it, not by abandoning the pins.
Species ranges and why fresh air changes with each mushroom are laid out in our mushroom growing requirements notes. Use those targets when you set the hygrometer alarm, then let daily fruit shape override a single number.
A daily loop you can actually follow
Look at the surface. Dry and dull means a light mist on the walls. Shiny and pooled means no mist today.
Look at the fruit. Elongated stems, undersized caps, odd odors, or condensation that won't clear mean open or filter another vent.
Empty standing water. If water builds up in an H2Shroom chamber, the drainage hole can empty it or lower humidity. A soaked base is not "extra moisture." It is a contamination site.
Larger setups should use a humidistat and ventilation control instead of guessing from the lid. A household tub can stay manual if you check it once a day at the same time. Skipping two days in a dry apartment is how a promising pin set collapses.
How to Sterilize and Set Up Your Container
A clean vessel still fails if the substrate goes in wet-dirty or the holes get cut through colonized mix. Run the setup as a checklist.
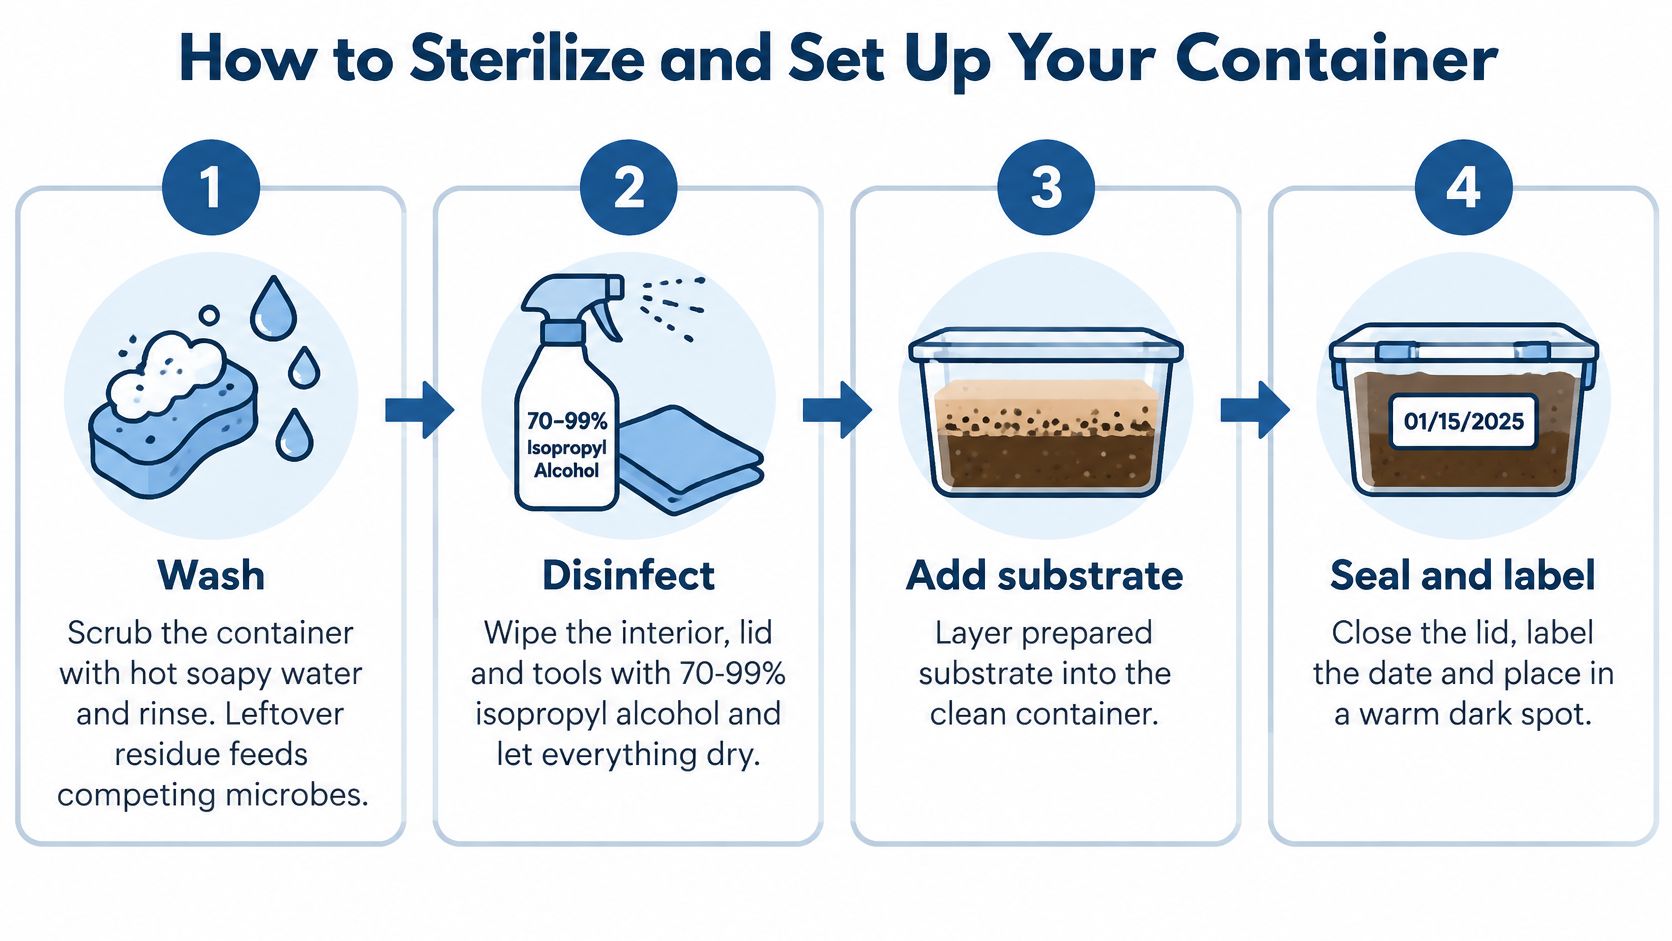
Wash. Scrub with hot soapy water and rinse. Leftover residue feeds competing microbes. The common slip is a quick rinse that leaves a film in the corners.
Disinfect and dry. Wipe the interior, lid, and tools with 70-99% isopropyl alcohol, then let everything dry fully. The H2Shroom growing chamber should be cleaned with 70%-99% ISO alcohol. Wet alcohol on the walls invites bacteria. Don't load substrate onto a damp surface. Our sterilization process page covers why alcohol wipes and heat treatment are different jobs.
Treat the substrate apart from the tub. Sterilize or pasteurize grain, sawdust, or straw on its own. The vessel stays a clean shell. Cooking substrate inside the fruiting container warps plastic and doesn't replace a real pasteurization step.
Cut vents before you fill. Fit the filter patch or tape so no hole is bored through substrate later. People who drill after filling push dust and plastic into the block.
Fill to the working level. Use the two-thirds mark from your batch plan and press the surface level. Packing too tight starves the interior of air and slows colonization.
Inoculate in a clean area. Cover, then set the container out of direct sun. A bright window overheats a small jar and dries a tray.
Label the lid with the start date. You will forget which batch is which once two tubs sit side by side.
A ready container has no residue, dry walls, and an intact seal or filter. If any of those three is missing, stop and fix it before spawn goes in.
Diagnosing Contamination and What to Keep
Is this growth normal, or should the container be isolated or discarded? That question matters more than a perfect photo of healthy mycelium, because suspicious growth shows up after you have already invested the batch.
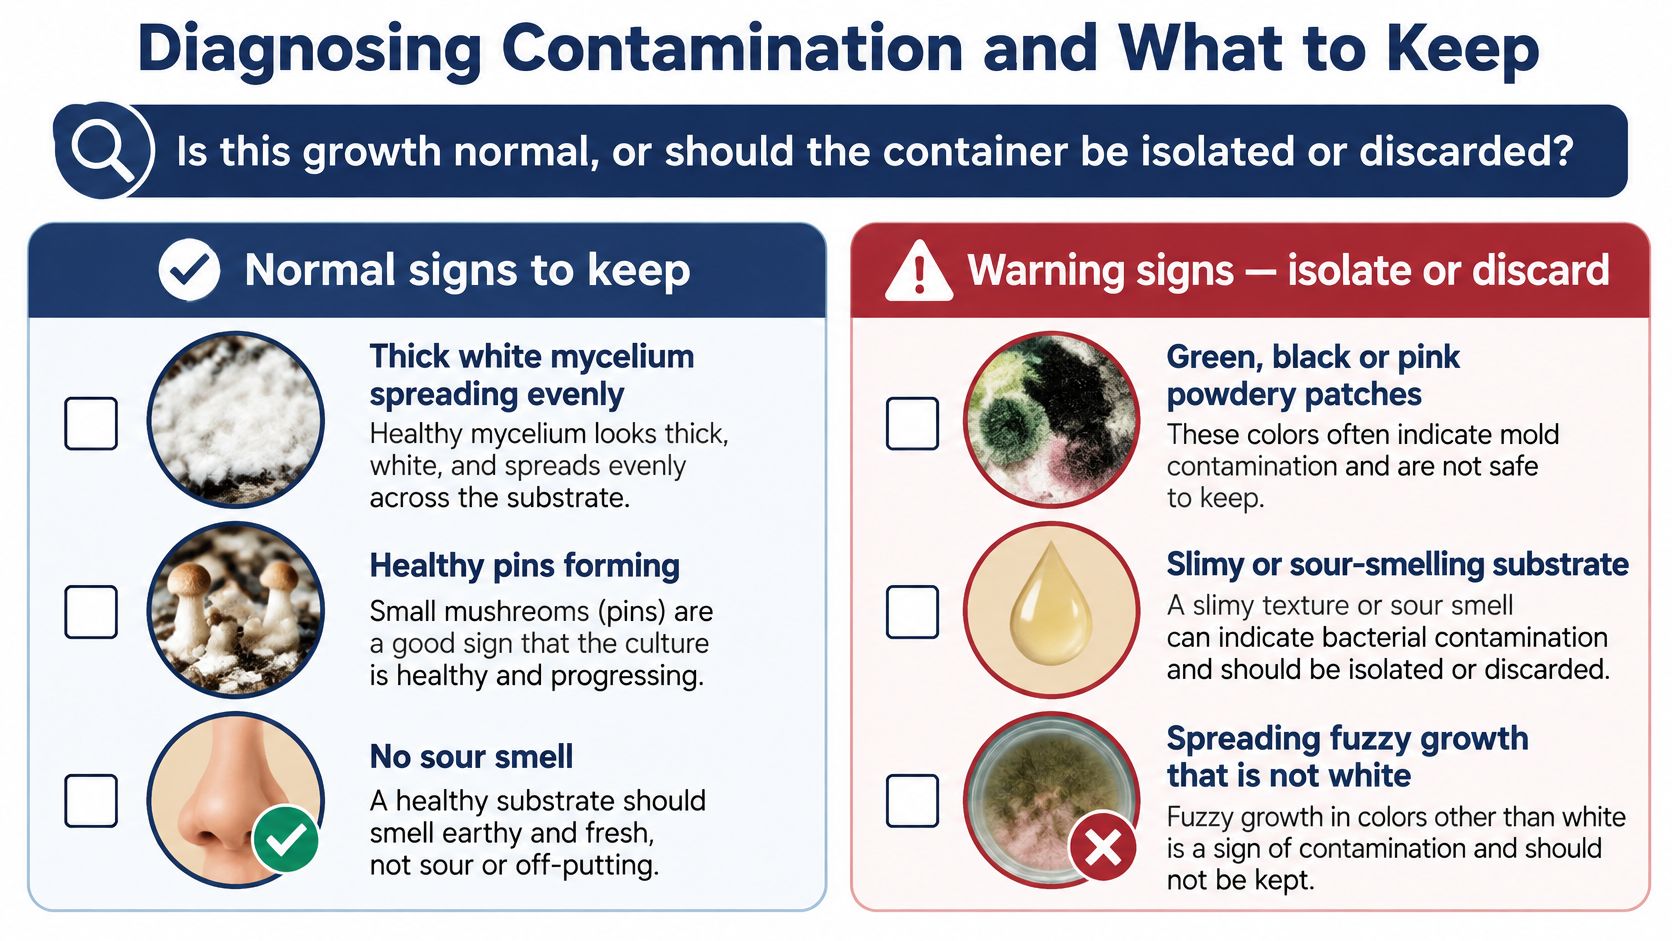
Thick white mycelium, healthy pins, and no sour smell are normal. Keep that container and watch it. A small surface spot that dries can be minor surface contamination. Keep it too, but don't open it next to clean cultures.
Warning signs are different. Unusual colors such as green, black, or pink, a sour or foul odor, wet bacterial slick areas, colonization that stalls, and growth spreading along the substrate all need a decision the same day. A recent review of cultivation hygiene identifies spawning, casing, and post-harvest handling as critical contamination points, and it flags potential mycotoxin and food-safety concerns when competing fungi get favorable conditions. Looking at a patch does not prove the block is safe to eat.
Three actions, no middle mush
Keep and watch when growth is white and even, pins look normal, or a tiny spot dries and does not spread.
Isolate when color or odor is confined to one area. Move the container away from clean work. Don't crack the lid "just to smell it" beside a fresh bag.
Discard when slick areas, foul smell, or non-white growth run through the substrate. Don't eat that material, and don't toss it on a casual compost pile without precautions that keep spores off your next project.
Condensation, slow colonization, and mild odors often trace back to humidity or airflow, not a doomed block. Adjust exchange and keep watching before you throw out a tub that is only too wet.
Sign | Likely cause | Action |
|---|---|---|
Thick white mycelium, healthy pins, no sour smell | Normal growth | Keep and watch |
Small surface spot that dries | Minor surface contamination | Keep and watch |
Stalled colonization or slow growth with condensation | Humidity or airflow problem | Adjust airflow and keep watching |
Unusual color (green, black or pink) confined to one area | Possible contamination | Isolate |
Sour or foul odor confined to one area | Possible contamination | Isolate |
Wet bacterial slick or foul smell throughout | Spreading contamination | Discard |
Growth spreading along the substrate | Spreading contamination | Discard |
Visual inspection cannot guarantee safety. Isolate first, decide second, and never open a suspect container beside clean cultures.
Pick Your First Container and Start Growing
Choose one type from the comparison table, size it to a single batch, and plan the vent holes before you buy plastic or cut anything. Sterilize the container and the substrate before the first run, and confirm the species matches the humidity and fresh-air row you already picked.
Put a hygrometer in the container and write down what happens. Use the symptom table when something looks off, so a green patch and a stretched stem don't get the same response. A notebook page is enough. Record the date, container type, species, substrate weight, hole count, humidity readings, and the day pins first appear. That first flush shows which setting to change next time.
We publish written instructions for the Microppose Mark 1 Grow Kit, Gro Magik Grow Kit, All in One Grow Bag, and Full Flush Grow Kit, and we offer personal consultation if you are new to mycology and want help setting up a growing room. For racks, filters, and other fittings once the chamber is chosen, commercial grow accessories from Labs USA cover the hardware side without changing how you balance moisture and fresh air.
Your one action before you inoculate: write down the container type, species, batch weight, and start date. That line is the baseline the next flush gets compared against.
Colorado Cultures stocks grow chambers, sterilized substrates, and beginner kits prepared for home cultivation in the Denver area, with printable instructions so your first mushroom growing container starts clean. If you want help matching a tub, bag, or kit to the species you plan to fruit, visit Colorado Cultures and bring your batch notes with you.
Comments