
Mushroom Growing Requirements: Conditions That Matter
You've set up a grow bag on a shelf, misted it because the room feels dry, and now you're wondering whether the mushrooms need more humidity, more air, or both. That confusion is common because mushroom growing requirements aren't one fixed set of settings. They change with the species and with the stage of growth.
A reliable grow starts by matching conditions to the mushroom you're cultivating, then checking that the temperature, humidity, fresh air, and substrate moisture work together. Here's how to turn those requirements into practical decisions for a home setup.
Target Conditions for Popular Species
Start with the fruiting targets for your species. These are the conditions to aim for when mushrooms are forming, not universal settings for every stage.
Species | Temperature | Relative humidity | CO2 level |
|---|---|---|---|
Oyster mushrooms | 10–17°C | About 85% | Below 1,000 ppm |
King oyster mushrooms | 12–15°C | 95–97% | Below 1,200 ppm |
Shimeji | 13–18°C | About 90% | 2,000–3,000 ppm |
General home beginner baseline | 16–27°C (60–80°F) | Below 80% | No single general target |
These fruiting ranges come from a comparative study of mushroom-growing conditions, which reports different temperature, humidity, and carbon dioxide requirements for oyster, king oyster, and shimeji mushrooms. The comparative research on species-specific mushroom conditions also points to a practical trade-off: high humidity without enough fresh air can lead to poor mushroom shape, while too much ventilation can dry out a block and interrupt pinning.
The general home baseline is useful when you're starting out, but it's a starting point, not a guarantee. It doesn't replace the target for a particular species, and it doesn't tell you what to use during colonization. Treat it as a broad reference, then use your species' fruiting range to set the growing area.
Match all the readings
To use the table, find your species, then check whether your grow space can hold all three readings at the same time. A room that reaches the right temperature may still be too dry, too humid, or short on fresh air. CO2 matters because air exchange affects the shape and development of the mushrooms, not just how comfortable the room feels to you.
Measure conditions near the height where mushrooms are forming, or at canopy level. A sensor against a wall or on a high shelf might not reflect the conditions around the fruiting block. Keep a simple log of readings and changes so you can connect an adjustment to what happens next.
These numbers describe fruiting conditions, not colonization. The requirements can differ between those stages, so don't assume that a setting that supports mycelium growth will also produce healthy mushrooms. Light isn't included in the table: check the species' needs before setting a timer. For white button mushrooms, the fruiting schedule used here is 12 hours on and 12 hours off; a window works only if it reliably provides that schedule.
Choose your species' row and check whether your space can meet its targets together. If you're starting with button mushrooms, this guide to growing button mushrooms can help you plan for that specific type.
Substrate Moisture and Clean Preparation
First choose a substrate that suits your mushroom. Straw and supplemented sawdust are common bases for oyster and king oyster blocks, while white button mushrooms grow in prepared compost. The right moisture check depends on what you're growing in, so match the material to the species before testing it.
For white button mushrooms, Pennsylvania State University Extension reports that compost commonly has 70–73% moisture at filling. Properly conditioned compost releases water when squeezed without being excessively wet, as explained in its guide to basic procedures for Agaricus mushroom growing. The percentage is a reference for button mushroom compost, not a universal target for every substrate.
Use a squeeze test
A squeeze test gives you a practical check of how a substrate feels. Test material from the middle, where moisture can differ from what you see at the surface or edges.
Take a firm handful from the middle of the substrate.
Squeeze it hard.
Check the result. A few drops suggest it's at the right moisture level for this check. A steady stream means it's too wet. If it crumbles without releasing any moisture, it's too dry.
A bag may look dry around the edge but still be wet inside. Testing only the outside can lead you to add water when the middle is already saturated. For more detail on judging substrate moisture, read about field capacity and getting the right moisture level.
Pair heat treatment with clean handling
Compost preparation involves both temperature and timing. Penn State describes beneficial microorganisms performing best at 115–140°F (46–60°C) and says composting generally raises air and substrate temperatures to about 140°F (60°C) for at least two hours. Those figures describe compost preparation, not a do-it-yourself instruction to heat an arbitrary substrate without a suitable method.
Heat treatment or sterilization doesn't replace clean handling. Before inoculation, wash your hands or put on clean gloves, wipe down the work area, and keep sealed containers closed until you're ready to use them. The H2Shroom growing chamber should be cleaned with 70%–99% ISO alcohol before use.
Practical rule: Correct substrate moisture before you inoculate. Waiting until contamination appears won't fix a moisture problem and can make it harder to identify what went wrong.
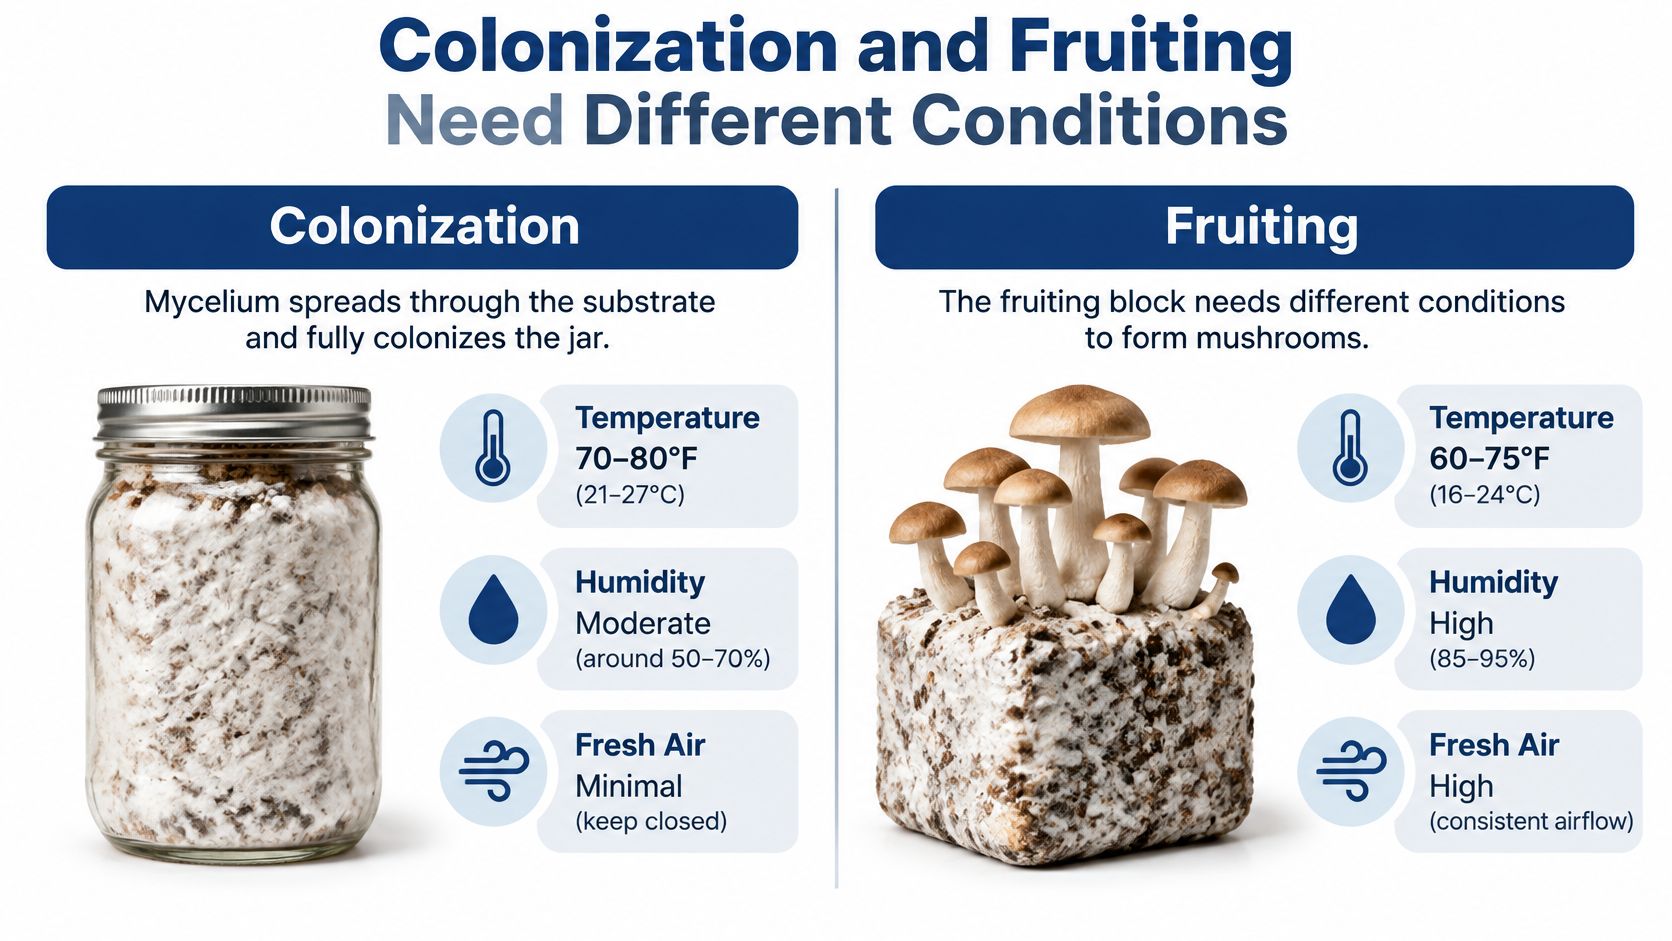
Colonization and Fruiting Need Different Conditions
A jar of colonizing mycelium and a block that's producing mushrooms are two different environments. During colonization, mycelium spreads through the substrate. Fruiting calls for a different balance of temperature, humidity, and fresh air.
The Utah State University Extension guide to home mushroom cultivation gives a general beginner range of 60–80°F (about 16–27°C) with humidity below 80%, while noting that ideal conditions vary by species and growth stage. White button mushroom production provides a more specific comparison: Penn State's reference conditions place mycelial growth near 75–76°F (24–24.4°C), while fruiting air temperature is reduced to 60–66°F (15.6–18.9°C). During pinning and cropping, carbon dioxide is managed at approximately 1,000–2,500 ppm.
Stage | Temperature | Humidity | CO2 | Light |
|---|---|---|---|---|
Spawn colonization, white button reference | 23–24°C (74–76°F) | At least 95% | No fruiting target specified | No fruiting schedule specified |
Fruiting, white button reference | 15.6–18.9°C (60–66°F) | Adjusted with enough air exchange | 1,000–2,500 ppm | 12 hours on, 12 hours off |
During spawn growth, at least 95% relative humidity helps prevent the substrate from drying. Fruiting needs enough ventilation to remove excess carbon dioxide and support normal cap and stem development. These are not interchangeable settings: keeping the fruiting area at colonization conditions, with little fresh air, may leave mushrooms with thin stems and small caps.
A fruiting spot should be low traffic and able to provide the appropriate light schedule. For Full Flush, that means at least 12 hours of light a day, and a window can work without a light if it provides that schedule. Fruiting conditions also call for 12 hours on and 12 hours off of indoor artificial lighting or indirect sunlight.
Before starting, write down both sets of settings: one for colonization and one for fruiting. If you can't state how the conditions change between the two stages, put the settings on a card near the grow so you don't have to rely on memory.
Timelines From Inoculation to Harvest
A grower sets fruiting conditions for a newly colonized block and sees nothing on day five. That's not, by itself, a reason to panic: pins commonly appear 7–20 days after fruiting conditions are set, according to Colorado Cultures' growing guidance.
The process has distinct steps. First, inoculate the substrate and allow the mycelium to colonize it. Then provide the fruiting conditions, including light and fresh air. Watch for pins during the expected window, and keep notes on when they first appear.
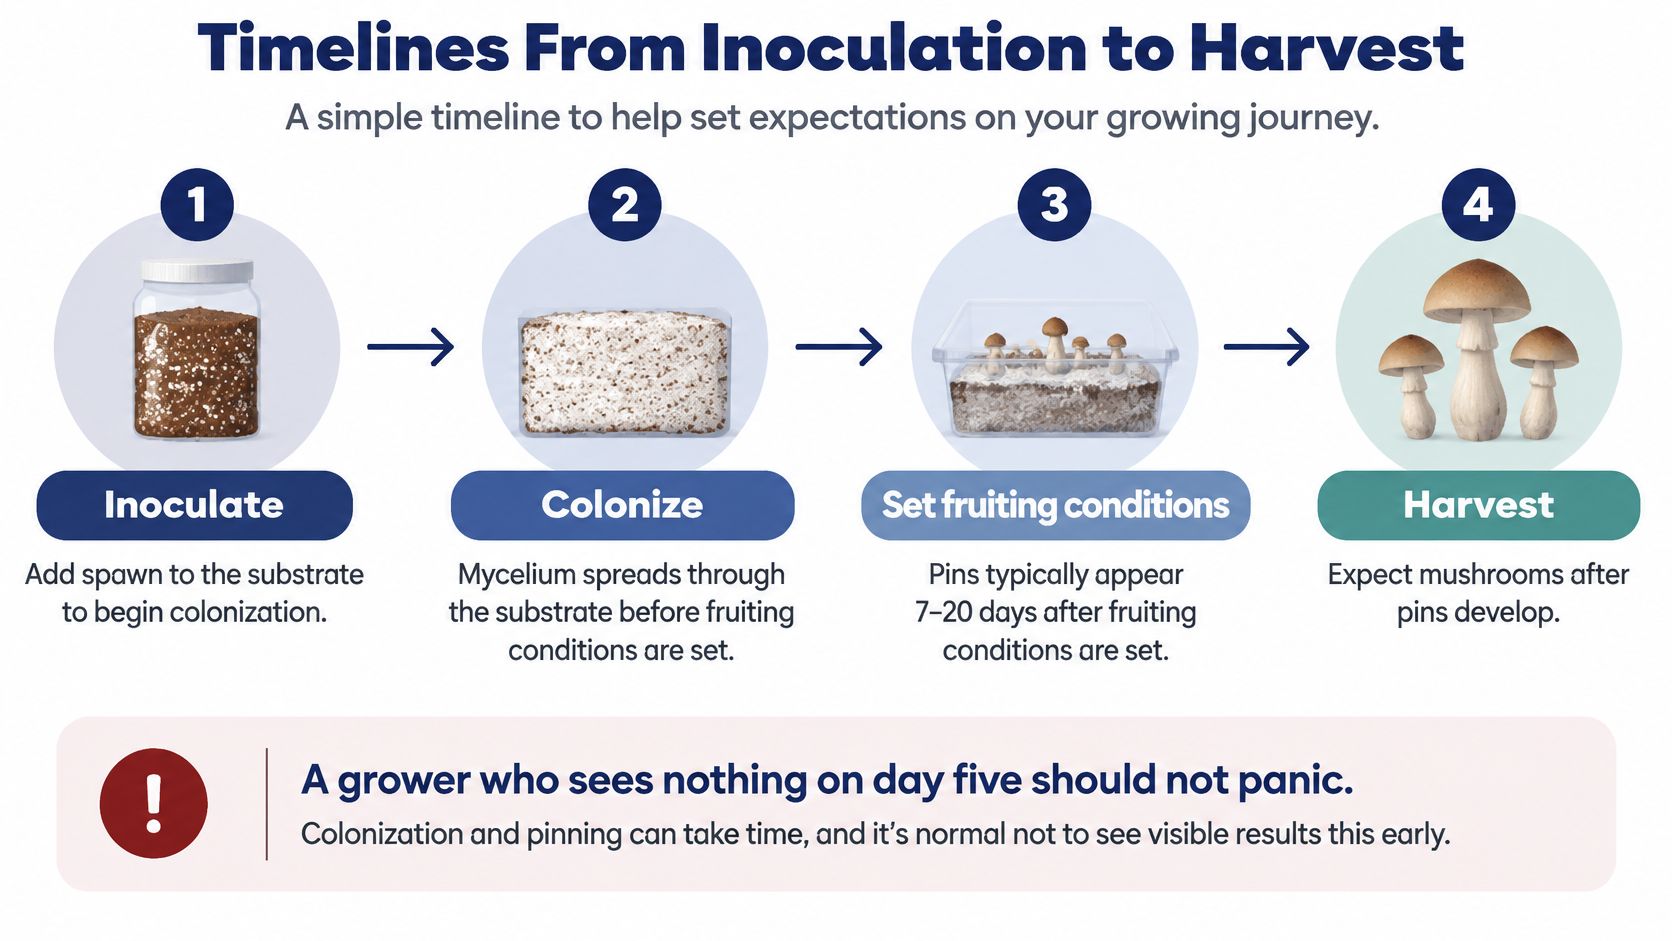
A block that pins on day nine and produces mushrooms by day fifteen is following a plausible timeline. If there are no pins after three weeks, review the conditions you're maintaining during fruiting and check the readings at the height of the block. A slow start can point to a mismatch in the environment, but don't change several settings at once; you'll want to know which adjustment made a difference.
Harvest before spores drop
Watch the mushrooms as they develop, especially the veil. For H2Shroom, harvest after watching for the veil to drop, but before spores drop. Colorado Cultures recommends harvesting before spores drop for the best results and flavor.
To pick a mushroom, gently turn the stem until you feel a small break. Avoid pulling up substrate, which can disturb the block and interfere with a later flush. Once mushrooms stop growing or other molds appear, stop repeating the grow.
Keep a record of inoculation, colonization, pinning, and harvest dates. That log gives you a useful comparison for the next block, especially if you're trying to work out whether a change in airflow, humidity, or temperature affected the timing.
Troubleshooting Humidity and Airflow Trade-Offs
Start with the symptom you can see, then make one adjustment and wait a full day before changing another. A symptom can have more than one cause, so use this table as a starting diagnosis, not a verdict.
Symptom | Likely cause | Adjustment |
|---|---|---|
Misshapen caps, poor morphology | Humidity is high with too little fresh air | Add air exchange and hold humidity at target, not maximum |
Block drying out, pinning stops | Excessive ventilation | Reduce airflow and raise humidity toward target |
Water pooling in the chamber | Condensation at high humidity | Empty standing water through the drainage hole |
Stale smell, condensation in a sealed room | Low air exchange | Add fresh-air exchange and recheck the room |
Measure at canopy level, where the mushrooms form, rather than relying on a reading near the ceiling or against a wall. If water builds up in the H2Shroom chamber, use its drainage hole to empty standing water or reduce humidity. For a setup that needs help maintaining moisture, you can compare ultrasonic air humidifier options, then check that added humidity doesn't come at the expense of fresh air.
In Denver, indoor heating during winter can quickly dry the air and the block. Check readings daily during cold spells and after the furnace runs, and record both the conditions and any changes you make. That record helps you distinguish a short-lived fluctuation from a pattern that needs a different adjustment.
Ventilation, Spores and Indoor Safety
Maximum humidity isn't automatically safest or best for the grow. Oyster mushrooms can release high volumes of spores during fruiting, and spores in enclosed or poorly ventilated spaces may irritate the airways. The National Center for Appropriate Technology's mushroom cultivation guidance recommends proper ventilation or respiratory protection for larger-scale indoor production.
Ordinary household cultivation isn't the same as repeated or scaled-up production. Still, room placement and airflow matter. A sealed, humid space may reduce drying, but it can also accumulate stale air, condensation, odors, and spores.
Check the room before fruiting
Use this room-risk checklist before choosing where to put a fruiting block:
Keep the growing area away from bedrooms.
Place it away from HVAC return vents.
Confirm that the room can get fresh-air exchange.
Consider who will be in the room during harvesting and how comfortably they breathe there.
If you're growing repeatedly or at a larger scale, treat ventilation as a core part of the setup, not an optional extra. Follow appropriate ventilation practices, and use respiratory protection when needed for the production conditions.
Know when to stop
Stop or isolate production if someone in the home develops respiratory irritation, if visible contamination appears, or if you can't ventilate the room. Don't casually open or sample visibly contaminated material. Bag it and dispose of it according to local guidance.
Keep a log of contamination, airflow, harvest timing, and respiratory comfort. A record can help you spot a problem with room placement or workflow before it affects another grow. If the room feels stale or someone develops symptoms, prioritize safety over keeping the block fruiting.
Confirm Your Grow Space Before You Inoculate
Treat inoculation as a go or no-go decision. Work through the checklist in order, and don't start until each item passes.
Confirm the species. Find its fruiting row in the target table.
Check the environment. Verify temperature, humidity, and CO2 at canopy level.
Set up light. Confirm a 12-hours-on, 12-hours-off schedule in a low-traffic spot, or make sure a window provides it.
Test substrate moisture. Use the squeeze test before inoculating.
Clean the chamber and work area. Use 70%–99% ISO alcohol for the H2Shroom chamber.
Confirm room placement and ventilation. Check the safety considerations before fruiting.
Start a log. Record dates, readings, and changes.
It's a no-go if the room can't hold the required conditions, the substrate is too wet or too dry, or anyone at home feels respiratory irritation. Colorado Cultures publishes written instructions for the Microppose Mark 1 Grow Kit, Gro Magik Grow Kit, All in One Grow Bag, and Full Flush Grow Kit. For room planning, use this guide to setting up a grow room.
Say a Denver grower sets up a window spot and finds the canopy warm and humid, but with too little air exchange. The right move is to improve ventilation and check the readings again before inoculating, not to assume that high humidity alone makes the spot ready. Pick one species, run the checklist, and log your first grow before scaling up.
Colorado Cultures offers grow kits, substrates, sterilized grain, and practical instructions for home and lab cultivation. Match your supplies to the species and conditions you can maintain, then visit Colorado Cultures to explore options for your first grow.
Comments