
Blue Oyster Mushroom Spawn: How to Choose and Use It
Your bag of blue oyster mushroom spawn has arrived, and you're trying to decide whether it belongs in the refrigerator or straight into your prepared substrate. The grain looks mostly white, there's condensation against the plastic, and the label says blue oyster without telling you much about the culture.
The useful questions aren't how blue the mushrooms will be or how impressive the bag looks. They're whether the culture is clean, whether it's growing vigorously, and whether your handling will keep it that way. A modest test batch with good records tells you more than a colorful product name.
Choosing Spawn Rate and a Healthy Blue Oyster Culture
Start with the spawn rate, not the bag size. A review of Pleurotus ostreatus cultivation reported that 5.0% spawn gave the strongest result in one trial, producing 1,247.6 grams per kilogram of substrate and 62.3% biological efficiency, compared with 1,212.30 grams per kilogram at 4.0%.
Those results support using enough spawn, but they don't establish a universal optimum. Strain, substrate preparation, moisture, and contamination pressure can change the outcome. Biological efficiency compares fresh mushroom weight with dry substrate weight, so it isn't interchangeable with a yield reported against wet substrate.
Spawn Rates and Reported Results
Spawn rate (wet weight) | Reported result | Yield or efficiency | What it means for you |
|---|---|---|---|
2% | Low end of common protocols | No paired yield established here | Fewer inoculation points can leave a longer contamination window |
4.0% | Reduced-rate trial | 1,212.30 g per kg substrate | Slightly below the strongest result in that trial |
5.0% | Best result in one P. ostreatus trial | 1,247.6 g per kg; 62.3% biological efficiency | A practical starting point, not a yield promise |
10% | Upper end before potential diminishing returns | No paired yield established here | Extra spawn costs more without guaranteeing a worthwhile gain |
The distinction matters: the middle rows describe a particular yield comparison. The outer rows describe practical boundaries used in cultivation protocols, not results from that same experiment.
Buy the Culture, Not the Color
Blue oyster is usually a commercial name for selected Pleurotus ostreatus cultures. It doesn't, by itself, guarantee a particular strain, fruiting temperature, or harvest schedule.
Color isn't a reliable identity check. A study of light responses in P. ostreatus found that blue light affected mushroom organs differently and increased pileus development. A photograph of blue-gray caps therefore tells you less about culture quality than a clear identity and a clean production history.
Before buying, check:
Species name. Look for a scientific identification rather than a color name alone.
Strain notes. Favor useful information about tested substrates and growing conditions over promises of enormous harvests.
Batch date. Choose traceable stock that you can use promptly.
Judge vigor by consistent advancing growth, not whiteness alone. Dense mycelium over grain is encouraging, but white growth doesn't excuse wet, uncolonized pockets or suspicious discoloration. Don't open a questionable bag just to smell it.
Practical rule: For a first bulk-substrate batch, use the trial's starting benchmark, measured against prepared wet substrate on a scale. Don't estimate the ratio by comparing handfuls.
Storing Spawn and Spotting Bad Batches Before You Use Them
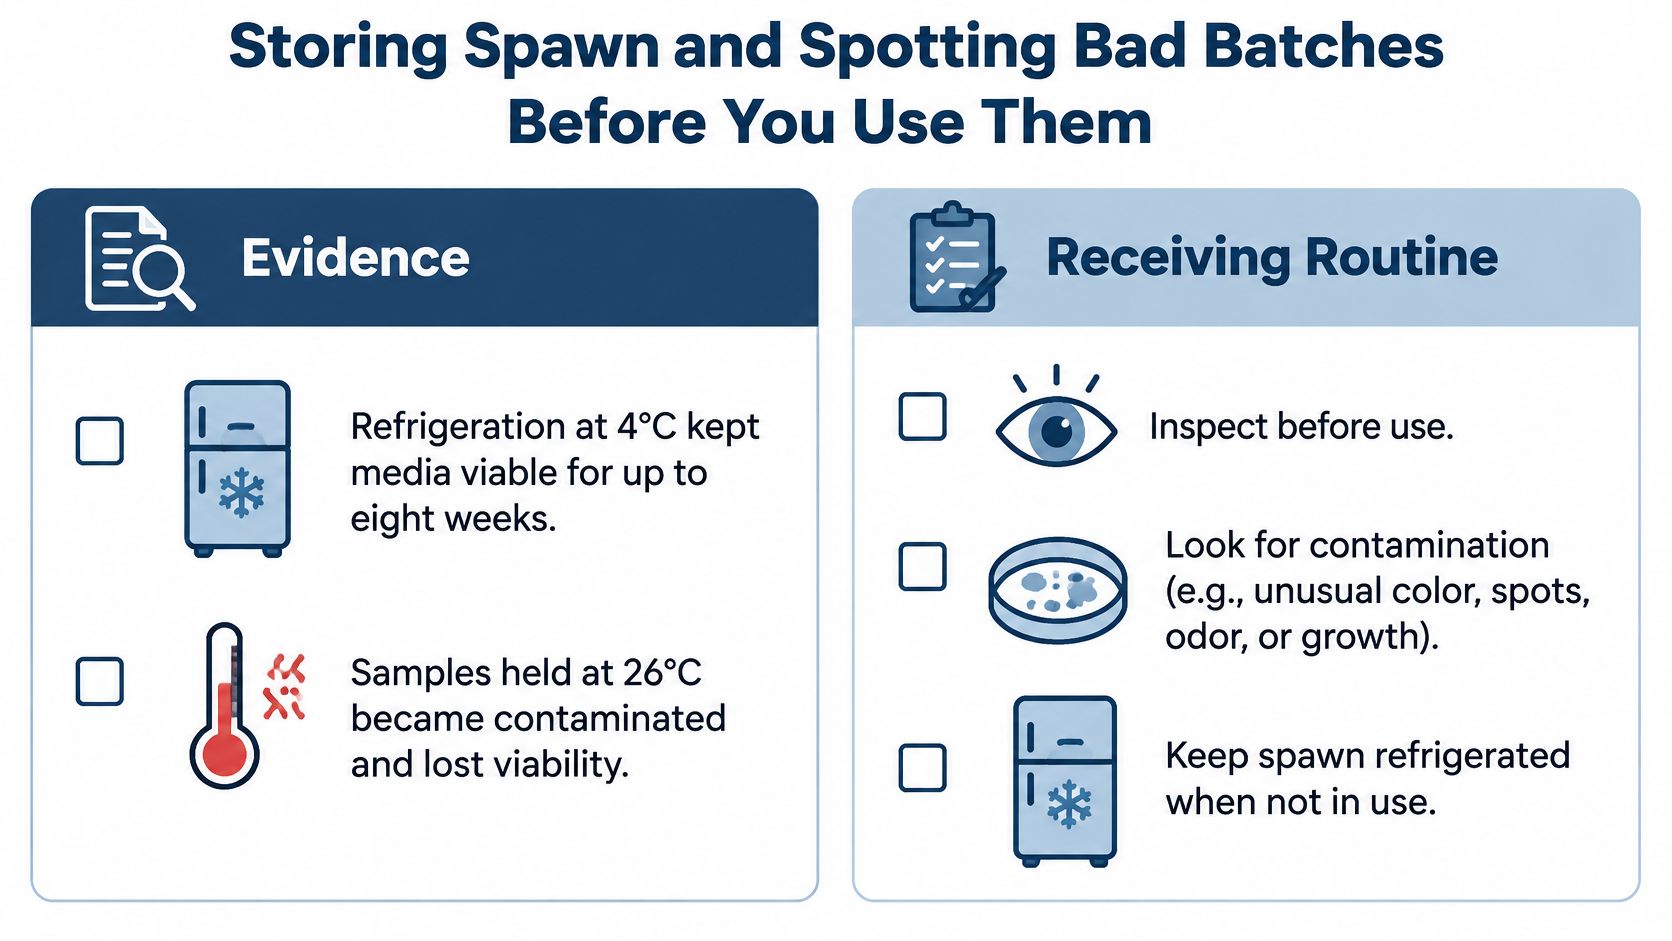
Cold storage buys time. It does not repair weak spawn. An older HortScience report on oyster mushroom propagation reported that P. ostreatus spore germination fell below 25% after four years at 2–4°C. That is evidence about stored spores, not a shelf-life promise for a commercial grain bag.
Treat receiving, refrigeration, and handling as contamination control. A bag that arrives warm, sits in a hot car, gets folded shut, or loses its filter has already spent part of its safety margin before you ever open the monotub.
Storage and Handling Boundaries
Storage or handling condition | Why it matters | Working response |
|---|---|---|
Refrigerated spawn | Cold slows decline only within the product's usable window | Follow the supplier's stated window and use the bag promptly |
Warm-held spawn | Heat speeds stress and gives contaminants a better start | Keep bags cold after arrival and avoid warm shelves or vehicles |
Old spore stock | Germination can fall sharply over long storage | Treat aged spores as unreliable for production runs |
Folded or loosely tied plastic | A loose closure can admit outside air | Reject or isolate compromised incoming spawn |
Unsterilized cotton plugs | Poorly prepared closures can carry contamination | Use properly prepared filtered closures when making spawn |
Judge the batch by advancing, clean colonization rather than the word “blue.” Dense white growth is encouraging, but speed and cleanliness matter more: grain should consolidate evenly, without wet pockets that stay bare while the rest turns white.
Inspect Before Refrigerating
Check the seal. Look for punctures, split seams, detached filters, and loose closures.
Record arrival conditions. Note whether the package arrived unusually warm, frozen, or visibly damaged. Denver deliveries can encounter both summer heat and winter cold.
Inspect through the bag. Look for colonized grain without colored patches, greasy-looking kernels, or pooled slime.
Separate doubtful stock. Put questionable bags in a secondary container, away from healthy cultures, and resolve their condition before using them.
Condensation alone does not diagnose contamination. A small amount of clear or amber liquid can be mycelial metabolites rather than proof of bacteria. Liquid combined with stalled growth, slimy grain, or an obvious sour odor is a different situation.
Avoid repeated warming and cooling. Keep the original filtered package intact, do not obstruct its filter, and do not replace a damaged closure over the kitchen counter and assume the contents stayed clean.
How to Prepare and Sterilize Grain for Spawn
Making grain spawn means growing a clean culture across sterilized grain. That's different from mixing purchased spawn into straw or another bulk substrate. Grain is nutritious enough that poor preparation gives bacteria and molds an excellent starting point.
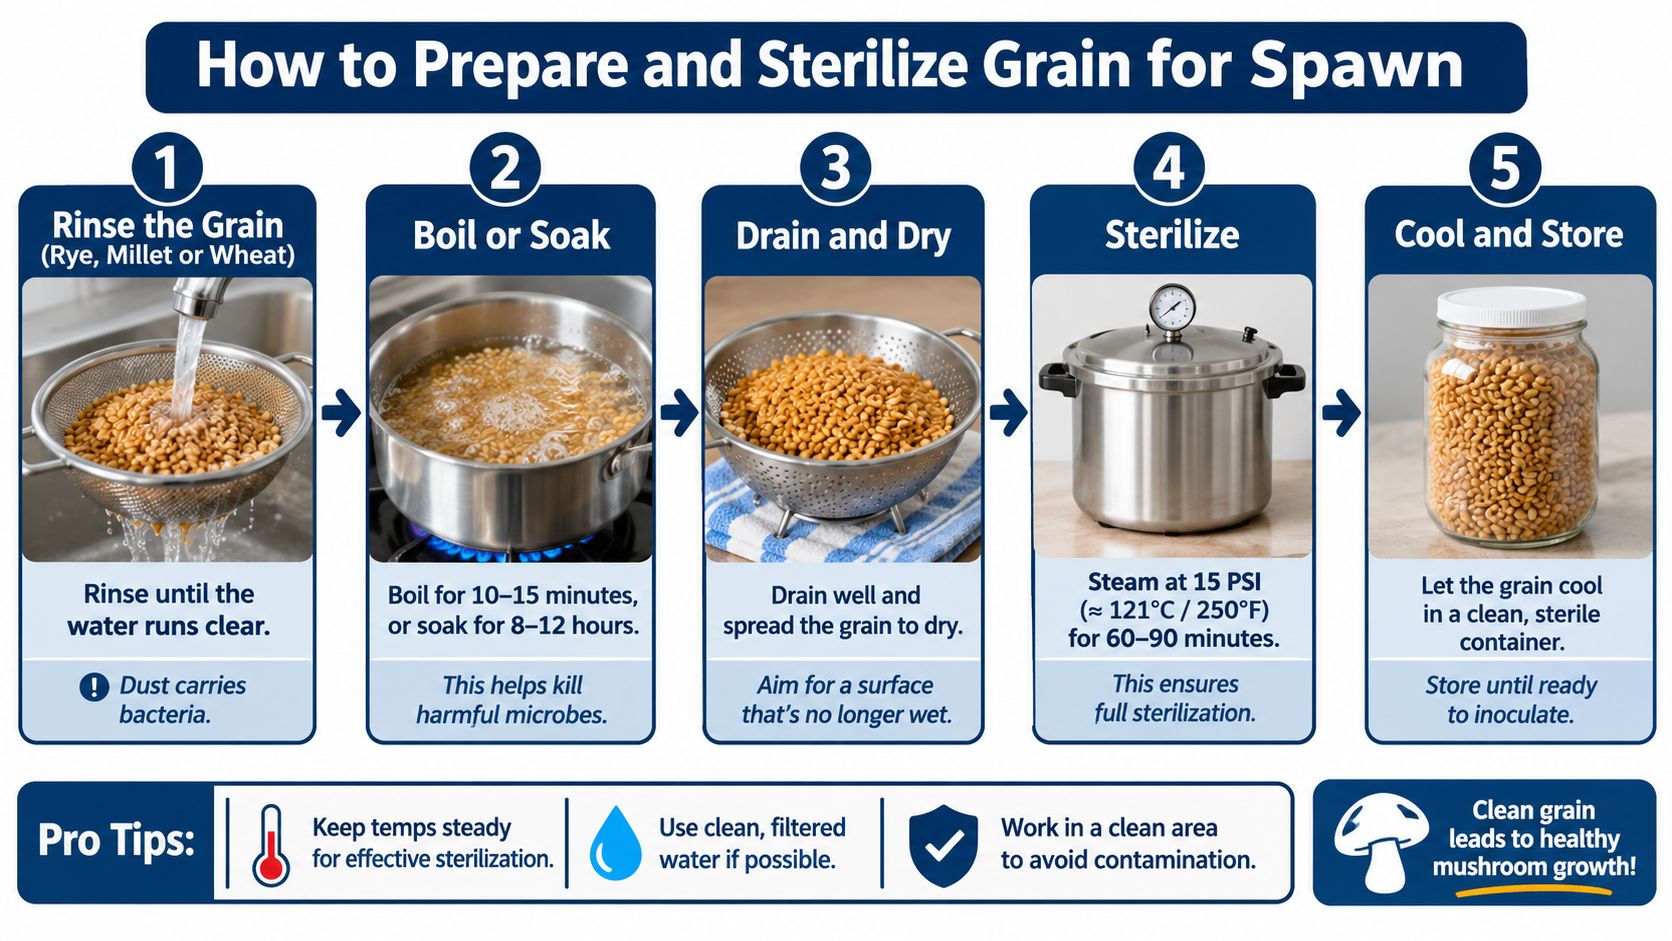
A published secondary-inoculum protocol for P. ostreatus describes approximately 2% gypsum, containers filled about two-thirds full, and sterilization at 121°C for approximately 60 minutes. Treat those as protocol conditions, not proof that every larger bag or pressure-cooker load will receive an adequate treatment.
Prepare for Separate, Hydrated Kernels
Rinse clean, intact grain. Rye, wheat, and millet can all be workable choices. Rinse away dust and debris so you can judge the kernels rather than a coating of starch and dirt.
Hydrate without bursting. Soak or simmer using a method suited to the grain, then cut or press a cooled kernel to inspect its interior. The center should be hydrated, but the batch shouldn't become a sticky mass of split kernels.
Drain and surface-dry. Spread the grain on a clean screen or suitable drying surface until there isn't free water coating it. The common mistake is confusing a hydrated interior with a wet exterior, then loading dripping grain into the container.
Add supplements deliberately. Gypsum can help kernels remain separate, but it won't rescue overcooked grain. Use calcium carbonate only where the chosen formulation calls for pH adjustment, and confirm what weight basis the recipe uses before measuring either additive.
The preparation sequence is easier to manage when hydration, draining, and loading are treated as separate jobs.
Sterilize the Whole Load, Not Just the Outside
Load loosely into suitable containers. Use heat-resistant jars with appropriate filtered lids or purpose-made filter bags. Leave room to redistribute the grain later, and keep kernels out of sealing surfaces.
Use a validated pressure-sterilization cycle. Follow the equipment's operating instructions and a cycle appropriate to the container size and load. A crowded cooker or oversized bag can heat unevenly, and elapsed time doesn't prove that the center received sufficient treatment.
Cool completely before inoculation. Leave containers closed while they cool, protecting filters and seals from unnecessary handling. A cool exterior isn't enough if the center of a grain bag is still hot.
Grain moisture is a preparation decision. You can't fix a soggy, inoculated jar by opening it to dry on the counter.
Before transferring culture, inspect for burst kernels, puddles, and damaged closures. Prepared grain should be evenly hydrated and reasonably free-flowing. Don't open sterile grain to perform a smell test; an obvious sour or sulfurous odor escaping a container is grounds to stop, not to investigate with a deep sniff.
How to Inoculate Grain Without Introducing Contamination
Grain inoculation and bulk spawning need different levels of protection. Opening sterile grain exposes a nutrient-rich medium, so use aseptic transfers. Mixing healthy spawn into properly prepared bulk substrate is a separate operation, even though both benefit from short handling times and clean equipment.
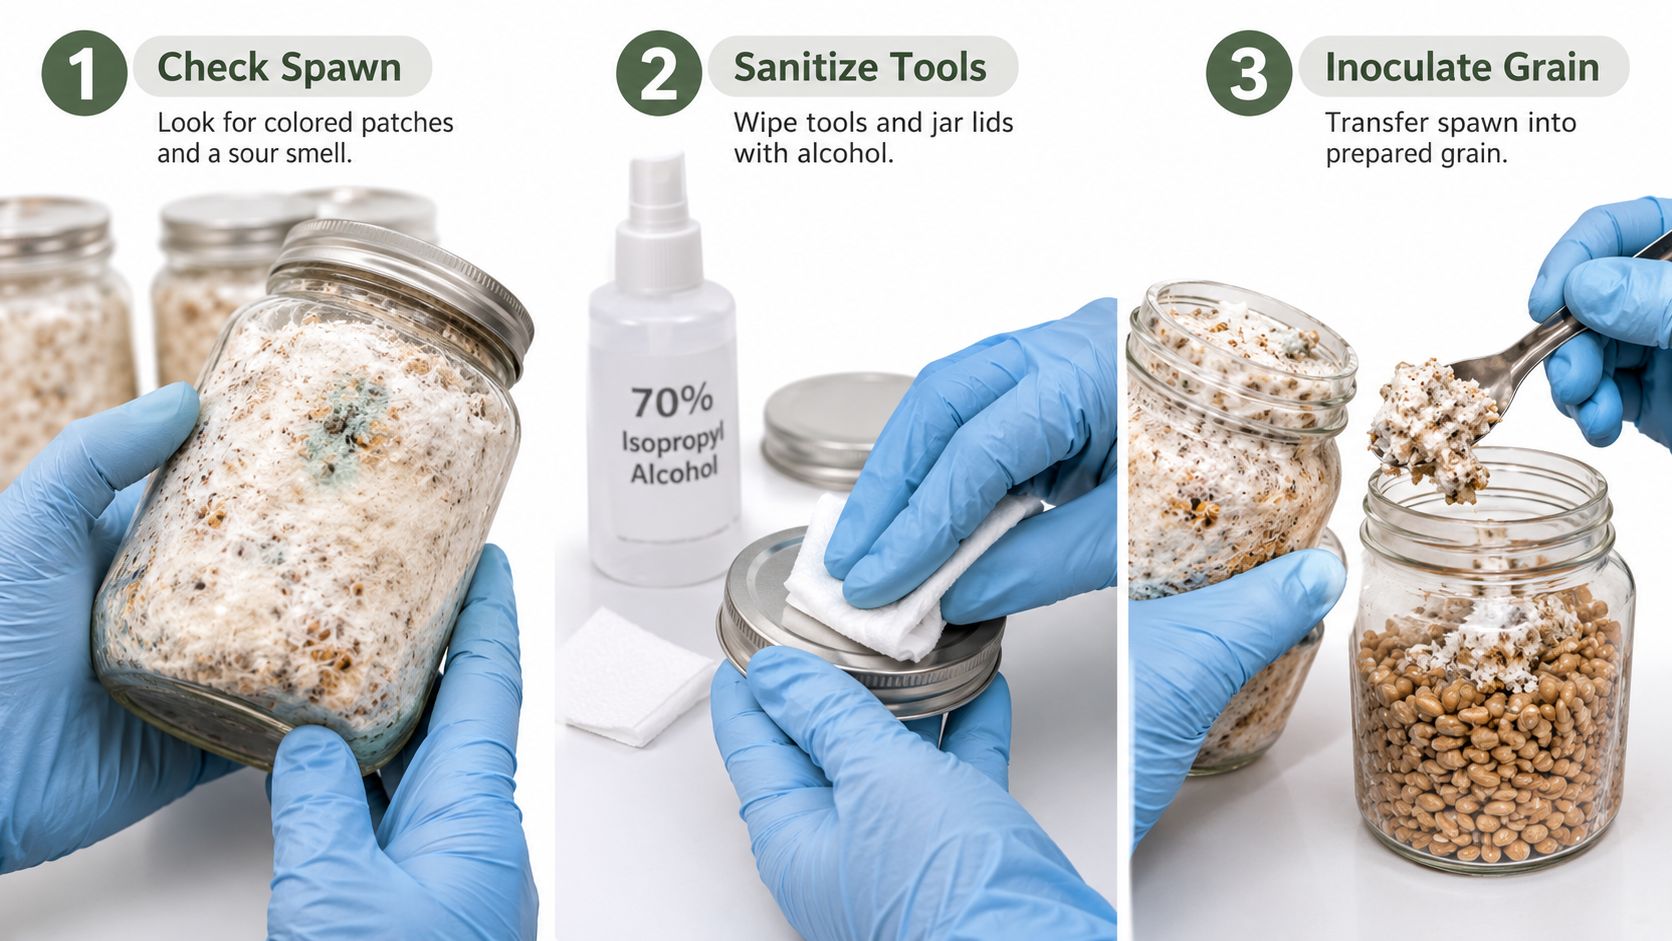
Use the visual sequence to organize the work before opening containers.
Keep the Transfer Short and Controlled
Select clean inoculum. Use actively growing pure culture for sterile grain, or verified healthy colonized grain for a grain-to-grain transfer. Don't expand a questionable culture just because most of it looks white.
Prepare the workspace. Clean the bench, sanitize suitable surfaces, and work in a properly operated still-air box or filtered-air workspace. Gloves aren't sterile just because they're new, and alcohol doesn't sterilize a dirty tool or make an open room aseptic.
Confirm cooling and transfer cleanly. Open containers only when your tools and inoculum are ready. Keep hands and unsterile objects from passing over exposed grain.
For bulk spawning, distribute kernels evenly. Break up healthy colonized spawn while its bag is still closed, then weigh and mix it through cooled, prepared substrate. Avoid crushing everything into a dense block.
Close and label immediately. Use the intended filtered closure and record the inoculum, substrate, preparation method, and date.
Colorado Cultures' sterile technique principles can help you separate cleaning, sanitizing, and aseptic handling. For a useful recording method, Verbal Experiment's guidance on documenting aseptic work in lab records helps turn a failed container into a traceable process problem.
This demonstration provides another way to follow the handling sequence.
Spend Effort on Cleanliness Before Extra Spawn
A review of oyster mushroom cultivation practices describes spawn rates around 2–10% by wet substrate weight, with potentially diminishing returns above about 10%. Extra spawn doesn't compensate for weak inoculum, incomplete treatment, or excessive handling.
Don't add bran impulsively to accelerate growth. Supplementation changes contamination risk and may require a different substrate-treatment process. Straw pasteurization and supplemented-sawdust sterilization aren't interchangeable because both substrates grow oysters.
Spawn Run Timeline From Colonized Grain to First Flush
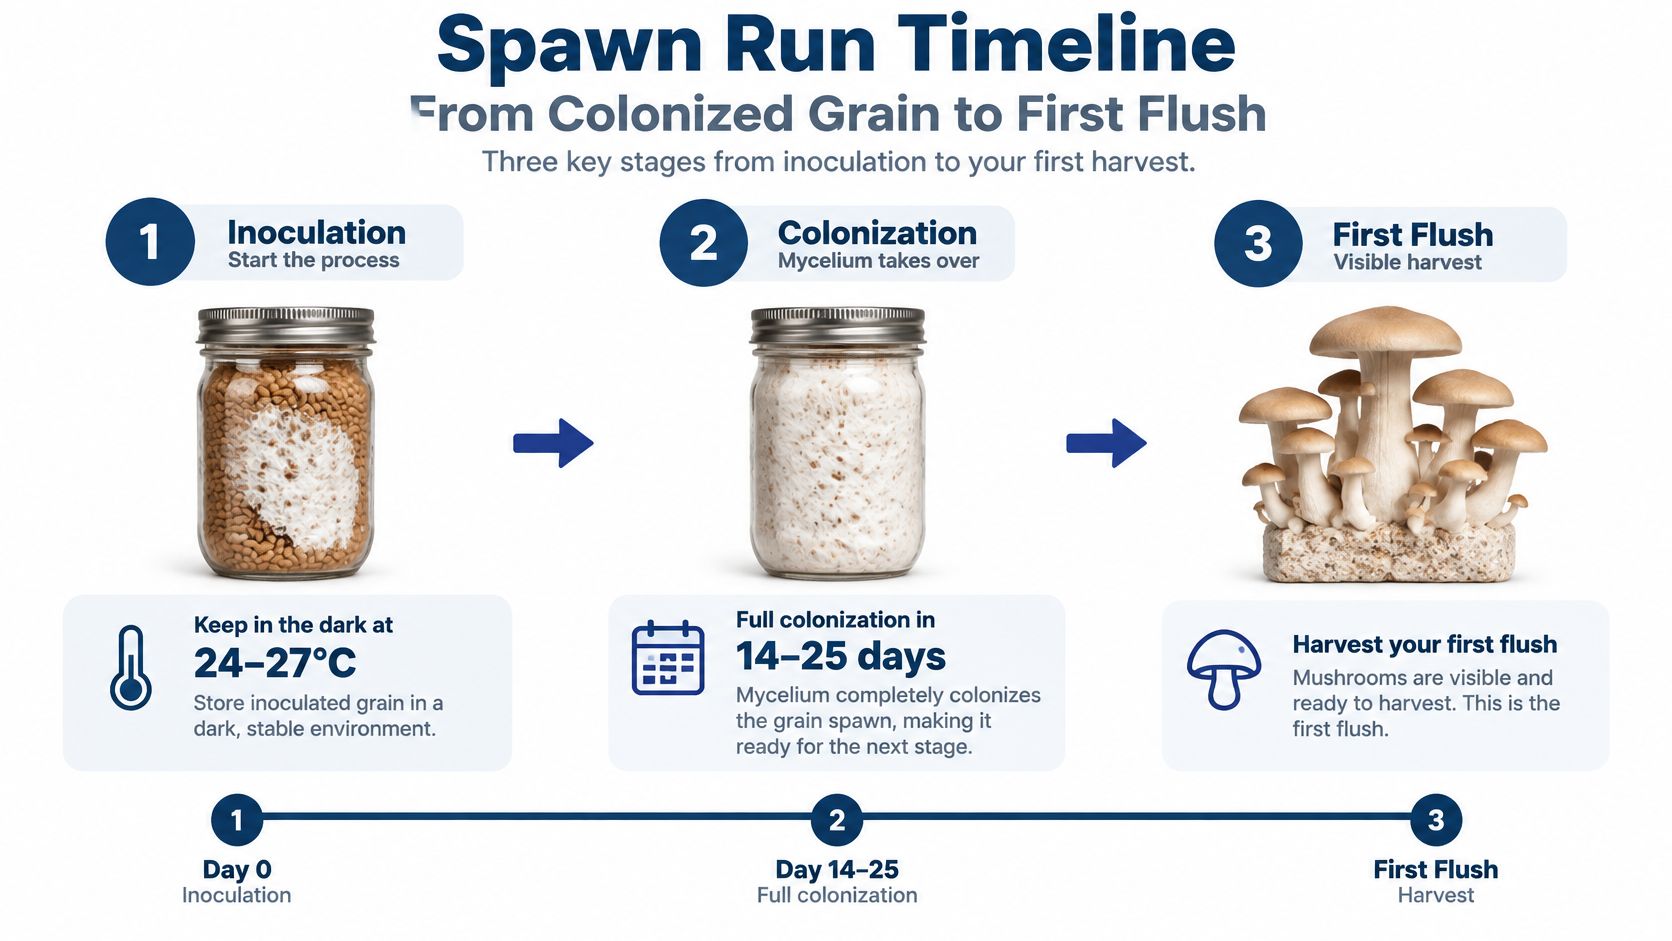
Say you've inoculated a grain jar and labeled it before putting it on a stable incubation shelf. Your next job isn't to make the calendar move faster. It's to watch whether the growth front advances evenly and whether the grain remains visibly sound.
A healthy run develops progressively. Small islands of mycelium expand into neighboring kernels, then join together. Don't transfer grain just because the visible surface looks finished if the underside still contains wet, bare pockets.
Use Phases Rather Than a Deadline
Phase | Typical timing | Sign to check before moving on |
|---|---|---|
Grain run | Follow the culture and grain protocol | Grain colonized throughout, without suspicious pockets |
Bulk substrate run | Our monotub process uses 5–10 days at 70–80°F | Substrate reaches 80–100% white |
Pinning | Our instructions describe baby mushrooms appearing after 7–20 days | Small developing mushrooms under suitable fruiting conditions |
Harvest | Judge by cap development, not a fixed day | Caps flatten before substantial spore release |
Those monotub and pinning windows describe our growing instructions, not a guaranteed schedule for every blue oyster strain. Container shape, substrate, and culture condition can shift progress. Follow the species-specific method rather than forcing an oyster block to behave like a different mushroom in a tub.
The timeline works best as a sequence of visible checkpoints.
Change Conditions When the Crop Is Ready
Once the production substrate is colonized, provide the fruiting conditions appropriate to the culture. Blue oysters need fresh air, humidity, and light for normal fruiting development. A sealed incubation container isn't automatically a suitable fruiting chamber.
In Denver's dry indoor air, more ventilation can also dry the developing crop. Adjust humidity alongside air exchange rather than leaving the lid wide open and trying to compensate with occasional heavy spraying. Aim for a humid environment without standing water or saturated mushroom clusters.
Watch the crop as well as the room. A hygrometer can describe chamber air while a nearby draft still dries the fruiting opening.
As pins develop, keep conditions steady and inspect without repeatedly handling the clusters. The stages of mushroom growth provide a useful visual framework for distinguishing expanding mycelium from actual fruiting development.
Harvest when the caps have opened appropriately, before spores drop, for the best results and flavor. Gently turn the stem until you feel a small break rather than pulling up substrate. If a cluster won't release cleanly, use a clean knife to separate it without tearing apart the block.
Fixing Stalled Runs, Contamination and Weak Pins
A stalled jar doesn't automatically need more heat or more inoculum. Check temperature, moisture, and growth pattern before changing anything. A cold location can slow a sound culture, while wet clumps or contaminated grain require a different response.
Compare the stalled container with its own earlier appearance. Marking the growth boundary on the outside of a jar makes advancement easier to judge than repeatedly asking whether it looks whiter.
Spawn Symptoms, Causes and Fixes
Symptom | Likely cause | Fix |
|---|---|---|
Grain stops advancing while much remains uncolonized | Cold location, wet clumps, weak inoculum, or hidden contamination | Verify incubation conditions; replace suspect stock and improve preparation next batch |
Green, black, or unusual spreading gray patches | Suspected mold contamination | Isolate and discard; keep away from healthy spawn |
Sour or foul smell with slime | Suspected bacterial contamination | Discard; review grain hydration, sterilization, and transfer handling |
Wispy, thin mycelium | Culture characteristics, weak inoculum, low inoculation rate, or unsuitable conditions | Compare with the culture's expected growth and use active, clean inoculum |
Clumpy, soggy grain | Excess free moisture or burst kernels | Correct hydration and surface-drying before the next inoculation |
Pins fail to form | Incomplete colonization or unsuitable fruiting conditions | Confirm readiness, then check air exchange, humidity, and the culture's requirements |
Thin mycelium alone isn't proof that spawn is bad. Some healthy cultures look less dense than others, and bacteria can also be present beneath apparently substantial white growth. Diagnose the whole container, not a single feature.
Decide Whether the Fix Belongs to This Batch
A clean container in an unsuitable location may respond to a more stable environment. Check the actual shelf temperature rather than relying on the thermostat across the room. Avoid direct contact with heating mats, which can overheat or dry part of the container.
Wet grain is different. Don't open the jar to drain it, add dry grain, or stir in gypsum after inoculation. Those actions introduce another contamination opportunity without correcting the original preparation failure.
Discard clearly contaminated spawn instead of trying to rescue its white portion. Keep it closed while removing it from the growing area, and don't sniff moldy containers. Cutting away a visible patch doesn't establish that the remaining grain is clean.
For weak pins, distinguish a dry crop from an air-starved one before making a large adjustment. More fanning can worsen drying, while more misting won't correct inadequate gas exchange. Look for a consistent response to a modest change rather than changing every setting at once.
The oyster mushroom growing problems guide can help organize symptom checks. Record which containers failed and what they shared, such as the same grain preparation, transfer session, or shelf position.
Discard decision: A contaminated container is a reason to review the process, not a challenge to salvage the inoculum.
Environmental corrections can help the current crop. Hydration errors, compromised closures, and questionable source culture usually need correction over a fresh batch cycle.
Pick Your Spawn and Run a Test Batch
Choose dated, traceable blue oyster mushroom spawn with clean, fully colonized grain. Then make a small test batch before committing all your substrate. The objective is to establish that the culture and your process work together, not to chase the largest possible flush immediately.
Use a bulk-substrate test if you're evaluating purchased spawn. Use a separate sterile-grain test only if you're evaluating your ability to expand a culture. Mixing those goals makes a failure harder to interpret because you won't know which stage introduced the problem.
Keep the Test Easy to Repeat
Record the inputs. Log the culture identity, batch information, grain or substrate type, preparation method, and measured inoculation ratio.
Track the conditions. Note the incubation location and actual temperature, then photograph the container from the same angle as growth progresses.
Set discard criteria. Remove containers with obvious mold, slime, or foul odor rather than waiting for healthy growth to overpower contamination.
Scale only a clean process. Increase production after the test colonizes soundly and fruits under suitable conditions, keeping the same preparation and handling routine.
Don't assume a successful bag validates every later delivery. Inspect each incoming batch, preserve its identity in your notes, and avoid combining unknown or questionable stock.
A test batch isn't wasted capacity. It's a manageable way to learn whether your grain preparation, room conditions, and handling are dependable before a mistake costs you an entire grow.
Colorado Cultures carries spawn, substrates, and liquid culture recipes for growers building a repeatable cultivation routine. Visit Colorado Cultures to choose materials for a blue oyster test batch and get guidance on preparation and handling before you scale up.
Comments